background image

Owner’s Manual (Snowblower) 

N14821                                                                                     2 -                                                                         September, 2002                        

3

 
Set-up and Operating Instructions Continued 
 
Operating: 
 

8.


Check to make sure that all shields are in place 
and secure. 


The Loftness snowblower is an effective, reliable 
machine used for the removal of snow. Before 
operating this machine, become familiar with and 
study all the hazard warning and safety precautions 
listed in this book. 


CAUTION:  

Become familiar and know how to use all safety 
devices  and  controls  on  the  snowblower                  
before attempting to operate the unit. Know how to 
stop the unit before starting it.  


WARNING:   

Read and observe all warnings on the machine 
before  attempting  to  operate  the  snowblower.                  
Do not attempt to operate this machine unless all 
factory installed safety devices are in place. 


CAUTION:   

Before proceeding to perform any adjustments on 
 The snowblower, exercise the “Mandatory Shut- 
 down Procedure” (see section 1, page 1-2). 


The chain and sprockets should be inspected 
should be inspected for alignment and tension 
on the initial  use, and a periodic check should 
be made to keep them in alignment. 


Adjust the chain idler and re-tighten after one 
(1) hour of use. Chain should have about one 
inch of deflection. 


WARNING:  

Keep all guards, shields, and 

decals in place. 


The gearboxes use SAE #90 gear oil and should 
be checked regularly. Warranty will not be 
allowed when it is evident that gears were run 
dry. 


Operator should not raise and lower blower 
under heavy loads to gain traction. 


Adjust the blower skid shoes so the cutting 
blade is about 1/2” above the ground for best 
results. 


Do not use the snowblower as a bulldozer to 
push snow, let the blower work its way through 
the snow. 


Wet sticky snow requires more power to blow. 
The snowblower works better in this type of 
snow if it is kept working at its full capacity. 


Best operating speeds of fan depend on snow 
conditions. 


Do not use your hands or feet to unplug the 
chute. Do not attempt to clear a plugged chute 
while the snowblower is under power. 
Disengage the PTO or hydraulic controls by 
shutting off the power unit, remove ignition key, 
wait for all movement to stop, and then clear the 
snow from the chute using a wooden pole. 

 
A definite pattern of operation is required to 
thoroughly clean the snow area. The patterns shown 
below will avoid throwing snow in unwanted places 
as well as eliminating a second removal of snow. 
 
Diagram “A” illustrates the removal of sow when it 
is possible to throw the snow to the left and right, as 
on a long driveway. Start in the middle and work 
towards the opposite ends, throwing the snow to 
both sides without changing the direction of the 
discharge chute. 


                                  Diagram “A”


Summary of Contents for 842S

Page 1: ...127 Also Including Years 2003 2004 Model Number _________________ Serial Number __________________ Date of Purchase ________________ Specialized Equipment Inc 650 So Main Street PO Box 337 Hector MN 55342 Business Phone 320 848 6266 Fax 320 848 6269 Toll Free 1 800 828 7624 N14821 January 2004 ...

Page 2: ...re designed to provide years of dependable service when proper use and maintenance is adhered to The potential for misuse in many applications exists therefore a limited warranty is provided as follows All Shredders Axes Cutters Mowers Rotor Balance Critical rotor balance can be affected by conditions beyond LOFTNESS control such as the operation of a shredder beyond the Company s rated capacity i...

Page 3: ...ructions for Operation 1 2 Section 2 Operating Equipment Set up 2 1 Operating Instructions 2 3 Section 3 Maintenance Maintenance 3 1 Lubrication 3 1 Trouble Shooting 3 2 Storage 3 3 Bolt Torque Chart 3 4 Section 4 Service Parts Ordering Service Parts 4 1 Return Policy 4 1 Decal List 4 2 Decal Locations 4 3 Parts Lists and Drawing 4 4 ...

Page 4: ...ws and in compliance with on product labeling and these instructions Make sure that all personnel have read this owner s manual and thoroughly understand safe and correct operating installation and maintenance procedures Provide impact resistant shielding on the power unit to protect the operator from the possible dangers of flying debris Make sure the snowblower is set up correctly before being p...

Page 5: ...Section 1 Safety ...

Page 6: ...YEWEAR IS ABSOLUTELY MANDATORY for operator and others in the work area Due to the possible danger of flying debris it is ABSOLUTELY MANDATORY that IMPACT RESISTANT SHIELDING be provided on the power unit to protect the operator The owner is responsible for providing the operator protection devices on the power unit ...

Page 7: ...e used to indicate the following DANGER white lettering on red background Indicates am imminently hazardous situation that if not avoided will result in death or serious injury This signal word is to be limited to the most extreme situations typically for machine components which for functional purposes cannot be guarded WARNING black lettering on orange background Indicates a potentially hazardou...

Page 8: ... breakdown Become familiar with and know how to use all safety devices and controls on the snowblower before attempting to operate the unit Know how to stop the unit before starting it Should excessive vibration occur disengage the power take off or hydraulic valve immediately and do not continue to operate the machine until the problem has been determined and corrected Do not start operate or wor...

Page 9: ...raulic valve Before working under any hydraulically controlled implement be certain it is securely blocked Because of the potential safety hazard to eyes from hydraulic leaks and or flying debris use of protective eye ware is absolutely mandatory for operator and others in the work area Always use an approved roll bar and seatbelt for safe operation Overturning a loader without a roll bar and seat...

Page 10: ... work area while operating this machine Thoroughly clear the work area of all foreign objects such as bottles rocks wire etc before starting shredder Aways operate shredder level with the ground front to rear Never operate snowblower over 2 feet above the ground When high pressure fluid escapes it can be almost invisible yet have enough pressure to penetrate the skin and enter the blood stream Nev...

Page 11: ...ns Safety Continued DANGER Never get off skid steer while it is in motion as entanglement can cause personal injury or death Keep hands and feet out Do not step on or climb over the unit while machine is in operation or engine is running Do not carry passengers ...

Page 12: ......

Page 13: ...Section 2 Operating ...

Page 14: ...YEWEAR IS ABSOLUTELY MANDATORY for operator and others in the work area Due to the possible danger of flying debris it is ABSOLUTELY MANDATORY that IMPACT RESISTANT SHIELDING be provided on the power unit to protect the operator The owner is responsible for providing the operator protection devices on the power unit ...

Page 15: ...checking to insure that the step washers catch the base ring install the remaining step washers shoulder bolts and lock nuts then tighten Figure 3 4 Rotate the spout by hand to check for binding re adjust the bolts if binding occurs as the spout should rotate freely 5 Attach the spout rotator controls onto the bracket as shown below figures 4 5 or 6 The standard hand crank control figure 4 will us...

Page 16: ...ric spout control option figure 7 as follows 1 Mount the 2 way selector switch in a convenient location near the operator 2 Select an appropriate 12 volt power source that will supply 10 amp s continuously 3 Install a 20 amp inline fuse to the power source 4 Connect a red 14 ga wire from the outlet of the fuse to the 2 way selector switch terminal figure 7 Avoid hot or moving parts when routing wi...

Page 17: ...s and decals in place The gearboxes use SAE 90 gear oil and should be checked regularly Warranty will not be allowed when it is evident that gears were run dry Operator should not raise and lower blower under heavy loads to gain traction Adjust the blower skid shoes so the cutting blade is about 1 2 above the ground for best results Do not use the snowblower as a bulldozer to push snow let the blo...

Page 18: ...he sidewalk or driveway Start on one side of the area that needs to be cleaned set chute in the direction required to discharge the snow and proceed At the end of the first pass stop turn the machine around rotate the chute 180 degrees for the return pass Completion of each pass will require rotating the chute 180 degrees to maintain the direction of discharge to be towards the same area Diagram B...

Page 19: ...Section 3 Maintenance ...

Page 20: ......

Page 21: ...The driveline and components on these snowblowers are set up to run at 540 or 1000 RPM with shear bolts placed at the appropriate connections to protect the equipment if it becomes clogged and can not run Refer to figure 7 items 1 2 for location of shear bolts Figure 7 Lubrication Never attempt to lubricate the snowblower with the engine running Always be sure to exercise the Mandatory Shut down P...

Page 22: ...plete unit Hydraulic Hose Check to make sure they are connected into the correct outlet Connection ports on the spool valve Spout Will Frozen Snow Snow or ice has become compacted on spout rotator gear Not Rotate remove as required and clean after each use to avoid freezing Gear Alignment Spout rotator gear and drive sprocket have become misaligned Realign per instructions given in section 2 pages...

Page 23: ...aged clean the snowblower especially in areas of drive chain fan spout and auger where it could become frozen or rusted together and cause damage when unit is used next time Be sure to exercise the Mandatory Shut down Procedure section 1 page 1 2 before attempting any type of cleaning or maintenance Repair or replace worn parts Coat moving parts and high wear areas with oil especially the chains a...

Page 24: ...old 1 4 55 6 2 72 8 1 86 9 7 112 13 121 14 157 18 61 6 9 86 9 8 5 16 115 13 149 17 178 20 229 26 250 28 324 37 125 14 176 20 3 8 17 23 22 30 26 35 34 46 37 50 48 65 19 26 26 35 7 16 27 37 35 47 42 57 54 73 59 80 77 104 30 41 42 57 1 2 42 57 54 73 64 87 83 113 91 123 117 159 45 61 64 88 9 16 60 81 77 104 92 125 120 163 130 176 169 229 65 88 92 125 5 8 83 112 107 145 128 174 165 224 180 244 233 316 ...

Page 25: ... W ZnCr W CL 8 8 Plated Plated Plated Bolt Silver Gold Silver Gold Silver Gold M4 15 107 19 2 2 23 2 6 30 3 4 33 3 7 42 4 8 16 1 8 M6 51 5 8 67 7 6 79 8 9 102 12 115 13 150 17 56 6 3 M8 124 14 159 18 195 22 248 28 274 31 354 40 133 15 M10 21 28 27 36 32 43 41 56 45 61 58 79 22 30 M12 36 49 46 63 55 750 72 97 79 107 102 138 39 53 M16 89 121 117 158 137 186 177 240 196 266 254 344 97 131 M20 175 237...

Page 26: ......

Page 27: ...Section 4 Service Parts ...

Page 28: ......

Page 29: ...ether freight express parcel or other handling is desired Confirm telephone orders in writing 2 Inspection of parts when received is important Damages or shortages should be brought to the attention of the carrier at the time the parts are accepted Shipper s responsibilities cease upon delivery of shipment in good order to the customer Return Policy Return of parts for either warranty or incorrect...

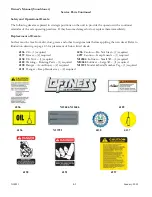
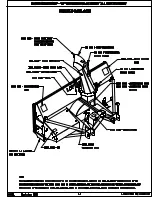
Page 30: ...oreign material before applying the new decal Refer to illustration drawing on page 4 3 for placement of below listed decals 4136 Oil 1 required 4256 Caution Do Not Start 1 required 4137 Grease 2 required 4257 Caution Keep Guards 1 required 4138 F E M A 1 required N12684 Loftness Small 3D 1 required 4189 Warning Rotating Parts 1 required N12686 Loftness Large 3D 1 required 4190 Danger Avoid Injury...

Page 31: ......

Page 32: ......

Page 33: ......

Page 34: ......

Page 35: ......

Page 36: ......

Page 37: ......

Page 38: ......

Reviews: