LOCO COOKERS SureSpark LCBFSKSS Owner'S Manual Download Page 15

14

lococookers.com

DISCONNECTING REGULATOR FROM LP 
TANK:

  1.  Turn regulator control knob 

counterclockwise to the OFF position.

  2.  Turn LP tank OFF by turning hand wheel 

clockwise to a full stop.

  3.  Turn the coupling nut counterclockwise to 

loosen the connector. Loosen by hand only. 
DO NOT use tools.

  4.  When disconnected, the regulator should be 
hung from the hook attached to the appliance.

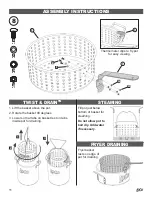
DETERMINING THE MAXIMUM FILL LEVEL 
WHEN USING A VESSEL WITHOUT A 
MAXIMUM FILL LINE:

  1.  Place your food into the basket.
  2.  Place the basket and food into the empty 

cooking vessel.

  3.  Fill the vessel with water just until the food 

is completely submerged. There must be 
a minimum of 3 inches (8 cm) between the 
water level and the top of the vessel.

  4.  Remove the food from the cooking vessel 

and either mark the water level on the 
side of the cooking vessel or measure the 
amount of water in the vessel.

  5.  This is the amount of cooking oil the vessel 

is to be 

fi

 lled with to cook your food.

  6.  Remove the water and completely dry the 

cooking vessel and your food.

OPERATING INSTRUCTIONS

PROPER CARE AND MAINTENANCE WILL 
KEEP YOUR APPLIANCE OPERATING 
SMOOTHLY

CAUTION

• Allow appliance to fully cool to 115ºF (46ºC) 

before performing any cleaning.

•  Keep the appliance area clear and free 

from combustible materials, gasoline and 
other 

fl

 ammable vapors and liquids.

•  Do not obstruct the 

fl

 ow of combustion and 

ventilation air.

•  Check burner and venturi tube for insects 

and insect nests. A clogged tube can 
obstruct gas 

fl

 ow and can result in a 

fi

 re 

beneath the appliance. Prevent blockages 
by inspecting and cleaning burner and 
venturi tube regularly.

NEVER insert any tool or foreign object into 
the LP tank valve outlet or safety relief valve. 
You may damage the valve or cause a leak 
which can lead to explosion, 

fi

 re, personal 

injury or death.

DANGER

CLEAN THOROUGHLY AFTER EVERY USE
 NOTE: 

Clean the entire appliance each year 

and tighten all hardware 1-2 times a year or 
more depending on frequency of use.

  1.  Turn the appliance OFF at the regulator 

control knob and at the LP tank valve before 
cleaning. Check that there is no 

fl

 ame or 

gas smell and that all valves are in the OFF 
position. Make sure that the regulator is 
properly disconnected from the LP tank prior 
to any cleaning.

  2.  Any component that has been in contact 

with food must be hand-washed with warm 
soapy water and a nylon pad. If the cooking 
pot(s) have black soot cooked onto the 
outside 

fi

 nish it can be scrubbed o

  with 

Summary of Contents for SureSpark LCBFSKSS

Page 1: ...TEMPTING TO ASSEMBLE OR OPERATE THIS PRODUCT Adult assembly required Keep screws and parts out of reach of children WARNING SureSpark TM 30 QT Boil Fry Steam Kit Model LCBFSKSS INSTALLER Leave this manual with the consumer CONSUMER Keep this manual for future reference LCBFSKSS IM 121321 ...

Page 2: ... 2017 Outdoor Cooking Specialty Gas Appliance This appliance is not for frying turkeys The stand and ignition panel do not contain mandatory safety features required to fry a turkey The 30 quart pot provided is only intended for heating water not oil or grease when used with this kit WARNING Never operate this appliance unattended Never operate this appliance within 10 ft 3 0 m of any structure co...

Page 3: ... Instructions Care and Maintenance Troubleshooting Warranty Information 1 3 6 7 8 8 11 12 14 15 16 17 Do not place an empty cooking pot on the appliance or allow a filled pot to boil dry while appliance is in operation Use caution when placing anything in the cooking pot while the appliance is in operation WARNING ...

Page 4: ...me circumstances contain the fire In the event of rain snow hail sleet or other forms of precipitation while cooking with oil or grease cover the cooking pot immediately and turn off the appliance burners and gas supply Never attempt to move the appliance or cooking pot When cooking the appliance must always be on a level stable noncombustible surface such as brick concrete or dirt and in an area f...

Page 5: ...lator and hose assembly supplied with the appliance must be used Replacement pressure regulators and hose assemblies shall be those specified by the appliance manufacturer Replace only with regulator Model No GYK 1 8 or JY70A9A T Hot cooking liquids can remain dangerously hot long after cooking Never handle the cooking appliance until the cooking liquid has WARNINGS cooled to less than 115ºF 46ºC ...

Page 6: ...LP tank inside a vehicle which may become overheated by the sun Dust Cap 5 When the appliance is not in use the gas must be turned off at the supply cylinder 6 Storage of an appliance indoors is permissible only if the cylinder is disconnected and removed from the appliance 7 The cylinder must be disconnected when the appliance is not in use LP TANK The LP tank must meet the following requirements ...

Page 7: ...d LP tanks in an upright position during use transit or storage Leak test new and exchanged LP tanks BEFORE connecting to the appliance LP TANK LEAK TEST For your safety a leak test must be repeated each time an LP tank is exchanged or refilled Do not smoke during leak test Do not use an open flame to check for gas leaks LP tank must be leak tested outdoors in a well ventilated area away from open...

Page 8: ...lator Hose Assembly 1 13 Ignition Panel 1 4 SureSparkTM Electrode 1 14 AA Battery 1 5 Thermometer 1 15 SureSparkTM Ignitor 1 6 10 QT Pot 1 16 30 QT Pot Lid 1 7 High Pressure Burner 1 17 30 QT Pot with Twist DrainTM 1 8 Match Holder 1 18 Boiling Steaming Basket 1 9 Burner Bracket 1 19 Basket Lifting Hook 1 10 Heat Shield 1 1 4 5 7 9 10 11 2 6 8 12 15 13 14 3 WARNING The stand and ignition panel do ...

Page 9: ...hillips head screwdriver Adjustable wrench Not included Assembly Hardware A M6x14 Screw 6 B M6 Flat Washer 6 C M6x22 Screw 2 D M5x12 Screw 2 2 Remove wing nut washer and hex nut from threaded stud on burner Burner exits side of stand with holes 7 7 Hex nut previously removed from burner Wrench tighten 1 A x4 B x4 11 B 9 B A A ...

Page 10: ...9 ASSEMBLY INSTRUCTIONS 3 10 One washer and wing nut previously removed from burner Hand tighten 4 A x2 B x2 B Cutout in venturi shield rests over burner A 12 ...

Page 11: ...10 lococookers com 15 4 Plug electrode wire into back of ignitor 7 14 15 15 5 ASSEMBLY INSTRUCTIONS 6 C x2 D x2 13 D D C ...

Page 12: ...G TWIST DRAINTM 1 Lift the basket above the pot 2 Rotate the basket 90 degrees 3 Lower so that tabs on basket rest on tabs inside pot for draining FRYER DRAINING 1 2 3 Fryer basket rests on edge of pot for draining Fill pot just below bottom of basket for steaming Do not allow pot to boil dry Add water if necessary ...

Page 13: ...ckwise to a full stop 4 Remove the protective cap from LP tank Always use cap and strap supplied with valve DO NOT use a POL transport plug It will defeat the safety feature of the valve 5 Hold regulator insert nipple into LP tank valve Hand tighten the coupling nut while holding the regulator in a straight line with LP tank valve so as not to cross thread the connection 6 Turn the coupling nut cl...

Page 14: ...ctronic Ignitor Lighting Press and hold the ignition button while rotating the regulator control knob clockwise until the burner is lit DO NOT stand with head or arms over burner Match Lighting Using a long ignited match fireplace match place flame directly over the burner If using a short paper book match first place the unlit match into the match holder which is attached by a chain to the stand ...

Page 15: ...MOOTHLY CAUTION Allow appliance to fully cool to 115ºF 46ºC before performing any cleaning Keep the appliance area clear and free from combustible materials gasoline and other flammable vapors and liquids Do not obstruct the flow of combustion and ventilation air Check burner and venturi tube for insects and insect nests A clogged tube can obstruct gas flow and can result in a fire beneath the app...

Page 16: ...h to loosen corrosion from the burner exterior Clean clogged gas ports with an open paper clip Replace corroded or damaged burners that would emit excess gas 5 To clean the burner tube venturi first disconnect the regulator hose from the burner tube Look inside the burner tube for nests webs or mud To remove obstructions use a flexible brush or bend a small hook on the end of a flexible wire When ...

Page 17: ...ke sure threads are aligned and engaged fully Burner does not stay lit Excessive wind conditions When appliance is cool move appliance to different location where high wind is not a factor Relight burner The LP tank is empty Refill LP tank at an authorized dealer or purchase new filled LP tank Oil does not reach desired cooking temperature Regulator control knob is not fully opened Fully open regul...

Page 18: ...umer s purchaser s expense Defects or damage caused by the use of other than genuine parts are not covered by this warranty This warranty shall be effective from the date of purchase as shown on the purchaser s receipt This warranty is valid for the original consumer purchaser only and excludes industrial commercial or business use of the product product damage due to shipment or failure which resu...

Page 19: ...18 lococookers com ...

Page 20: ...LoCo Crazy Good Cookers LLC 506 Manchester Expressway Suite A2 Columbus Georgia 31904 800 391 0436 Email customerservice lococookers com Connect with us lococookers lococookers com Made in China ...

Reviews: