background image

3

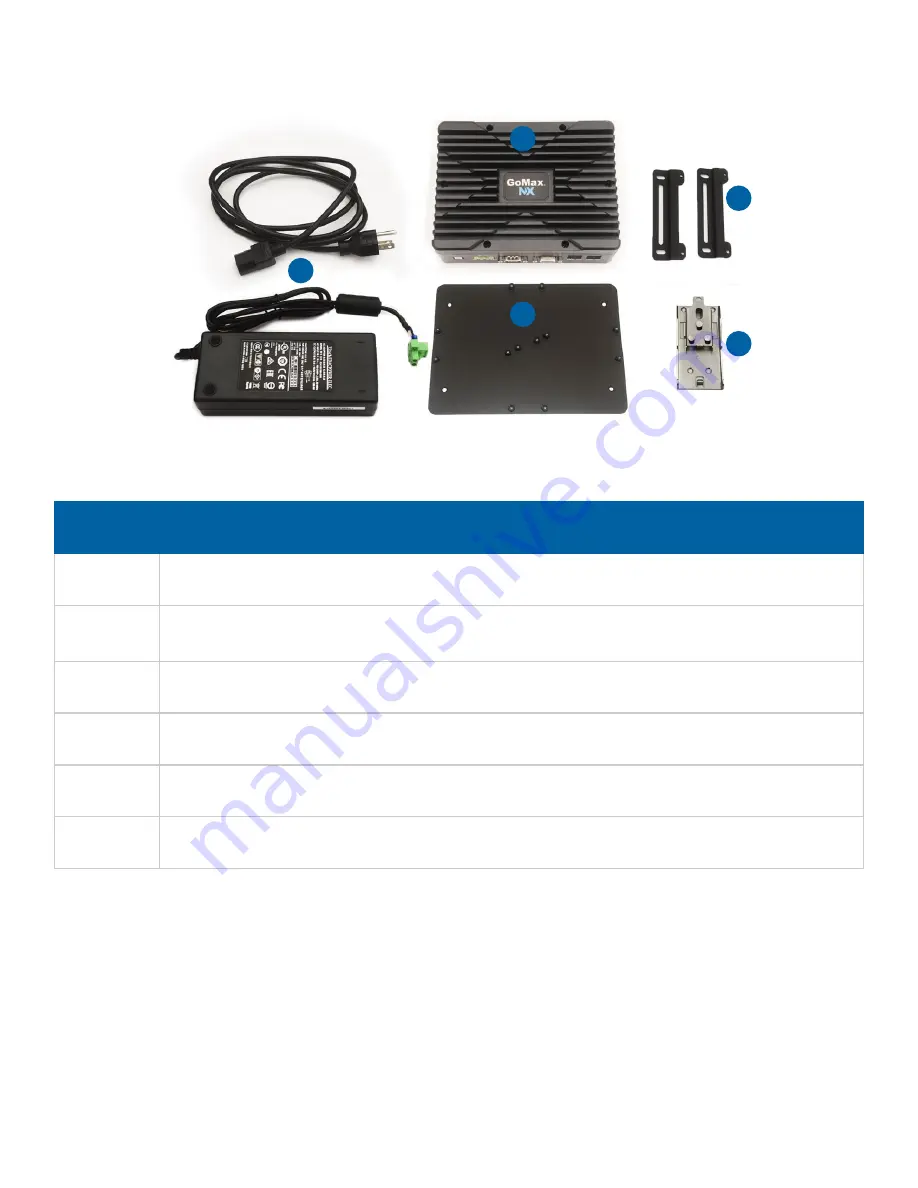
Hardware Included with GoMax NX

Number

Description

1

GoMax NX unit

2

Power supply, cord (plug depends on part number of the kit), and Phoenix 
connectors

3

DIN rail clip plate

4

DIN rail clip

5

Wall mount brackets (x2)

6

Screws (x7, not shown)

Before connecting the GoMax NX unit to a sensor system, follow the instructions in “Connecting 
Power” and “Setting the IP Address”.

When you receive your GoMax NX unit, check that all components are included:

1

2

3

4

5

Summary of Contents for GoMax NX

Page 1: ...Quick Start Guide 15266 01 02_MANUAL_Quickstart_GoMax_NX GoMax NX Smart Vision Accelerator...

Page 2: ...mer Support If you have any installation issues please contact AMERICAS LMI Technologies Head Office Burnaby Canada 1 604 636 1011 EMEAR LMI Technologies GmbH Berlin Germany 49 0 3328 9360 0 ASIA PACI...

Page 3: ...kit and Phoenix connectors 3 DIN rail clip plate 4 DIN rail clip 5 Wall mount brackets x2 6 Screws x7 not shown Before connecting the GoMax NX unit to a sensor system follow the instructions in Conne...

Page 4: ...e following WARNING Use only the provided power supply with the GoMax NX unit Using a higher voltage power supply will damage the unit 1 Connect the power supply connector to the unit 2 Plug the power...

Page 5: ...5 3 Press the power button The power button LED indicator lights...

Page 6: ...the IP addresses of the GoMax NX rightmost Ethernet port is set to 192 168 1 6 To set the IP address of a GoMax NX unit do the following 1 Using an Ethernet cable connect a computer to the ETH1 port o...

Page 7: ...IP address and click Save The GoMax NX unit power cycles after you confirm you want to change any IP addresses Changing network settings disconnects the GoMax unit and stops the acceleration of any a...

Page 8: ...oMax NX on a DIN rail The plate allows multiple orientations of the unit using different sets of standoffs Attach the DIN rail clip plate to the back of the unit and attach the DIN rail clip to the pl...

Page 9: ...or to a frame To use the wall mount brackets remove the DIN rail clip plate from the back of the unit and attach the wall mount brackets to the back of the unit using the provided screws Make sure th...

Page 10: ...r system through the Gigabit switch the sensor is connected to Connect the unit to the switch using an Ethernet cable and the ETH1 port on the unit NOTE Before connecting GoMax NX to a sensor system m...

Page 11: ...11 Using GoMax NX To accelerate a sensor do the following 1 Connect a computer to the switch using an Ethernet cable...

Page 12: ...web browser connect to the GoMax NX web interface using the unit s IP address The GoMax NX web interface is displayed The Sensor System category is preselected in the Manage panel In the following a...

Page 13: ...ensor do the following Under Sensors in the Accelerated list click the sensor s serial number to the left A page providing a link to the accelerated sensor s web interface opens in a new tab Configure...

Page 14: ...Technologies their partners and resellers accept no liability for any damages personal or to property incurred as a result of improper use incorrect assembly failure to adhere to safety precautions a...

Reviews: