background image

21

20

DVD player operation,

continued

1. GENERAL SETUP PAGE

In STOP mode press the SETUP button and highlight Gen-

eral setup then press the ENTER button to confirm.

Select the desired item by using the direction  /  ,  /

button. Always press  the ENTER  button  to  confirm the

selection.

TV  Display

•     Normal/PS

This is selected when the DVD player is connected  to a

normal (4:3) TV. W ide-screen images  are shown  on the

screen but with the sides clipped so the full height of the

screen is filled.

•     

Normal/LB

This is selected when the player is connected to a normal

TV. W ide-screen images are  shown  on the  screen, but

with a black bar on the top and bottom.

•      

Wide

This is selected when the player is connected to a wide-

screen TV.

OSD Language

This used to select the OSD language.

-

English

-

French

-

German

-

Spanish

-

 Italian

Screen  Saver

Start the  screen saver,  the screen saver image appears

when the player  stops  or the image is  frozen for a few

minutes. This saver will keep the screen from being

damaged.

 •     

On

 (Enable the screen saver).

 •    

Off

 (Disable the screen saver).

- - General  Setup  Page - -

TV Display         LB

OSD Lang         ENG

Screen Saver     On

TV Mode

P-Scan

Go To General Setup Page

- - General  Setup  Page - -

TV Display         LB

              Normal/PS

OSD Lang         ENG    

      Normal/LB

Screen Saver     On               W ide

TV Mode       P-Scan

Set  TV  Display  Mode

- - General  Setup  Page - -

TV Display         LB

OSD Lang        ENG

Screen Saver     On

Screen  Saver

On

Off

TV Mode       P-Scan

- - General  Setup  Page - -

TV Display         LB

OSD Lang        ENG

Screen Saver     On

Set  OSD Language

English

French

German

Spanish

Italian

TV Mode       P-Scan

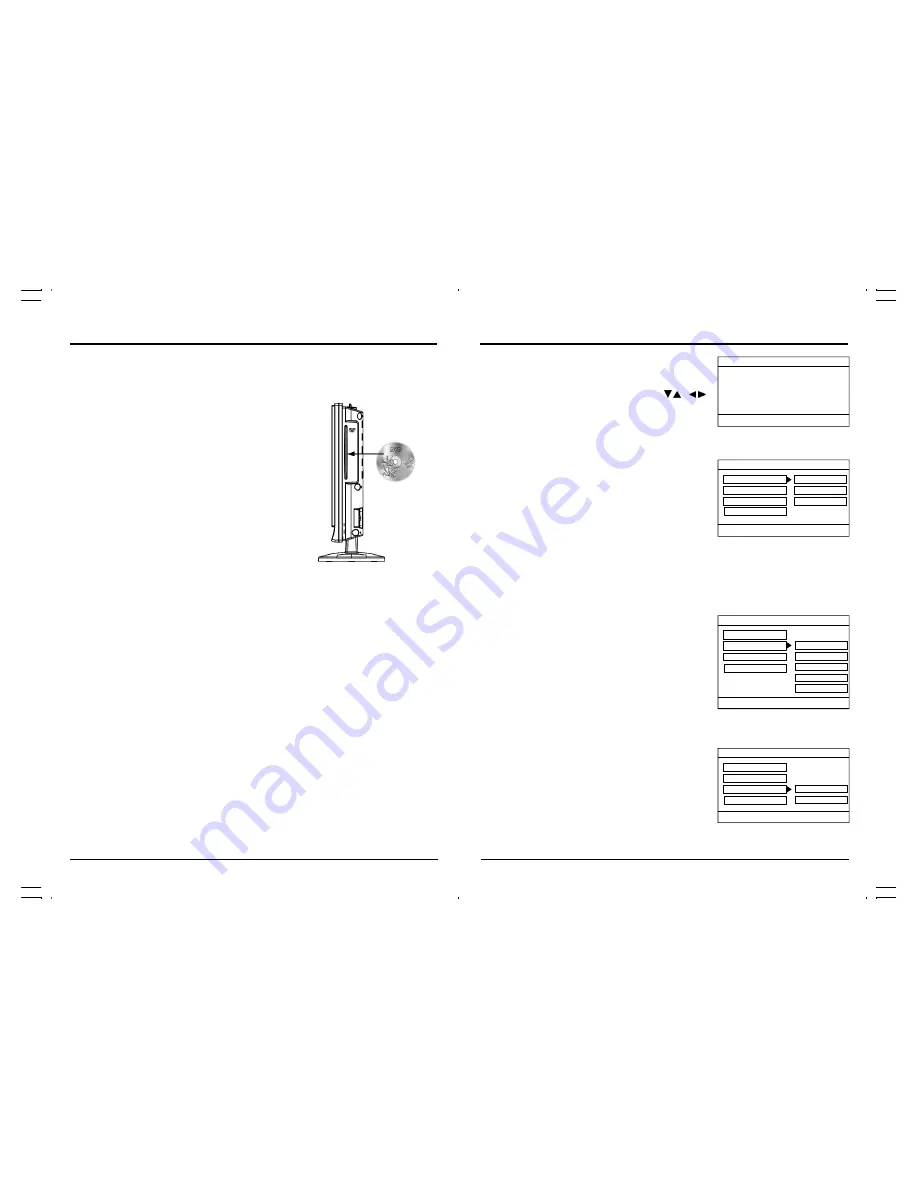
Playing Disks

1.

Place the Disc in to the disc slot.

The label side should be facing frontward. For a Double-sided DVD Disc, put the disc with

label A/1 up.

2.

The Disc will be played automatically.

If it is a DVD disc, it will show the Menu/Title Page on the screen.

If it is a CD, it will play the first track directly.

3.

Press the “

STOP

” button  if you want to stop the Disc playback You can resume playback

by pressing  the  “

PLAY

”  button  and it  will  start at the  location  where you  pressed stop

(Resume Play).

4.

Press the “

STOP

” Button twice to completely stop the DVD.

DVD Setup M ode

•     Setup Mode provides a menu for the configuration of general setup page, audio setup page,

preference page, exit setup page.

      To enter the 

SETUP

 Menu press the “

SETUP

” button on the remote control.

       The full setup menu is only available if the DVD is in the stop mode. If a DVD is playing,

      and 

SETUP

 is selected, certain menu items will be greyed out and unavailable.

      The available menu items depend on whether the DVD is in the prestop or play mode.

•     Item selection in the 

SETUP

 menu is done by using the “

NAVIGATION

” buttons and the

ENTER

” button.

•     To exit the SETUP mode, press the “

SETUP

” button again or select the 

EXIT


SETUP

 and press

the “

ENTER

” button.

Basic  Operation

1.

Switch the unit out of standby by pressing the “

STANDBY

” button then press the “

SOURCE

button on the unit or press the “

TV/DVD

” button on the remote handset to turn DVD mode to

"ON".

2.

 Place a disk insert to the disc slot.

Hold the disc without touching either of its surfaces,

position it with the printed title side frontward.

3.   Press the “

EJECT

”button to eject the disc from disc

slot.

Note:

The disc will load into slot again after 30 seconds

without taking out the disc from the disc slot.

Suggest on take out the disc after disc is ejected,

otherwise the same disc cannot load into disc slot

by pressing the disc.

DVD  Player  Operation

LDVD2212NH V36+NTSC+DVD IB 12402-11.p65

?2010/4/15, 下午 01:56

20-21

Summary of Contents for LDVD2210W

Page 1: ...D2210W 22 LCD TV User Guide THIS INSTRUCTION BOOK MAY CONTAIN ERRORS AND OMISSIONS DESIGNANDSPECIFICATIONARESUBJECT TO CHANGEWITHOUTNOTICE DIAGONAL LDVD2212NH V36 NTSC DVD IB 12402 11 p65 2010 4 15 01...

Page 2: ...OR BACK NO USER SERVICE ABLE PARTS INSIDE REFER SERVICING TO QUALIFIED SERVICE PERSONNEL The exclamation point within an equilateral triangle is intended to alert the user to presence of i m p o r tan...

Page 3: ...ted in the vicinity of overhead power lines or other electric light or power circuits or where it can fall into such power lines or circuits When installing an outside antenna system extreme care shou...

Page 4: ...ow of the unit by placing it in a place with poor ventilation by covering it with a cloth or by placing it on a carpet ON CONDENSATION When left in a heated room where it is warm and damp water drople...

Page 5: ...URE This product incorporates copyright protection technology that is protected by U S patents and other intellectual property rights Use of this copyright protection technology must be authorized by...

Page 6: ...n of Controls Rear View 1 AC Cord 2 HDMI 1 Input 3 Component Input 4 S Video Input 5 PC Input 6 Rear AV Output 7 Rear AV Input 8 75 ohm Antenna Socket LDVD2212NH V36 NTSC DVD IB 12402 11 p65 2010 4 15...

Page 7: ...nd and a PC monitor by connecting a DVD player video game system or computer to the inputs located on the rear of the LCD TV set For the cable use a commercially available audio video cable For more i...

Page 8: ...f picture size Full 4 3 Original Zoom To select Input mode Press the INPUT button to select Source Model AUTO POWER OFF If no signal is continuously detected from the antenna or broadcasting for more...

Page 9: ...nt panel Make sure your TV is plugged in before you try to turn it on Programming Your TV s Channel Memory Your TV s memory determines the channels that are available using the CH buttons If a channel...

Page 10: ...l be restored Changing the blue background When there is no TV reception you can avoid the snow background on the screen by selecting Blue Screen from the menu Press the button to select Blue Screen t...

Page 11: ...DVD Disc put the disc with label A 1 up 2 The Disc will be played automatically If it is a DVD disc it will show the Menu Title Page on the screen If it is a CD it will play the first track directly 3...

Page 12: ...ge Audio ENG Subtitle ENG Disc Menu ENG Default Preferred Audio Language English French German Spanish Italian English French German Spanish Italian Off Preference Page Audio ENG Subtitle ENG Disc Men...

Page 13: ...ction 3 Press the ENTER button to confirm the selection Audio This function is applicable for DVD and CD audio but with different effects Pressing the AUDIO button will change the Audio channel Scan T...

Page 14: ...GRAM 06 07 08 09 10 05 03 08 01 02 03 04 05 EXIT START NEXT Display Remain Time This function is applicable for DVD only It will display the timing information of the playback on the screen For DVD pl...

Page 15: ...CH TT CH 03 TT CH TT CH 04 TT CH TT CH 05 TT CH TT CH EXIT START NEXT 06 07 08 09 10 PROGRAM 01 TT 01CH 01 TT CH 02 TT 02 CH 01 TT CH 03 TT 03 CH 01 TT CH 04 TT 04 CH 01 TT CH 05 TT 05 CH 01 TT CH EXI...

Page 16: ...olor or has ghosts Try another station If the other stations are OK it may be a station problem Check that the antenna is connected adjusted correctly in good working order and has no broken wires See...

Page 17: ...h it should be treated with care We offer the following suggestions so you will enjoy this product for many years to come Keep it dry If water should get on it wipe if off immediately Water contains m...

Page 18: ...ation caused by the failure to follow the operating instructions provided with the product C Routine adjustments to the product which can be performed by the customer as outlined in the owner s manual...

Reviews: