background image

35

EN

Bowl:

Clean the inside of the bowl with a non-abrasive 

cloth dampened with soap and water, then wipe 

with a clean, slightly damp cloth. To remove 

residue from cooked food, fill the bowl with hot, 

soapy water and wash it after allowing it to soak.
You can also wash the bowl in the dishwasher.
Once cleaned, dry the bowl thoroughly with a 

clean cloth.

Cleaning your Super Cooker

Inner lid seals

The covers have rubber seals.
When washing the covers in the dishwasher or 

by hand, remove the seals by pulling them off.
Wash the seals in hot soapy water, then dry 

them before reinstalling them.

TROUBLESHOOTING

If your Super Cooker malfunctions or fails to operate


˛ Is the Super Cooker plugged into a grounded outlet?

Plug the Super Cooker into a grounded outlet.


˛ Is the fuse in the circuit to the Super Cooker in working order?

If you have a circuit breaker box, make sure the circuit is closed. Try unplugging the Cook 

Processor, then plug it back in.


˛ Unable to close the lid

Check the seal position


˛ Error messages:
•  E1

: Motor overload - Unplug the Super Cooker and allow it to cool for one hour. Then it is ready 

to be used again.

•  E2

: No weight is detected or the scale sensor is damaged. Contact the service center.

•  E3

: The mixer bowl is not correctly positioned or a motor drive part is damaged. Correctly 

reposition the mixer bowl on the base.

•  E5

: Lack of water in the tank. Add water.

If you cannot resolve the problem:
Contact your usual reseller for the return or exchange conditions.

You have a warranty on this product which is valid for 2 years from the date of purchase

Imported by:

DELTA

BP61071

67452 Mundolsheim 

France

Summary of Contents for DOP210W

Page 1: ...Super cooker DOP210W Manuel d utilisation version_2020 FR p2 p18 EN p19 p35 ...

Page 2: ...ncher cuire pas à pas des recettes et peser des aliments et ingrédients Cette notice décrit les fonctions essentielles mixer hacher broyer et cuisson vapeur Vous trouverez des informations sur la préparation des recettes dans le livre de cuisine fourni avec l appareil L appareil est conçu pour un usage domestique L appareil doit être utilisé uniquement à l intérieur Cet appareil ne peut pas être u...

Page 3: ...otentiels Les surfaces de l appareil peuvent devenir chaudes lors du fonctionnement Lorsque l appareil est en marche utilisez toujours des maniques ou des gants de cuisine pour saisir l ensemble cuisson vapeur ainsi que le couvercle pour ensembles cuisson vapeur Toujours déconnecter l appareil de l alimentation si on le laisse sans surveillance et avant montage démontage ou nettoyage Sachez que le...

Page 4: ... secteur sur une prise de courant que si l appareil est complètement monté Ne branchez la fiche secteur qu à une prise de courant facilement accessible installée dans les règles dotée de contacts de protection et dont la tension correspond aux indications de la plaque signalétique Après avoir branché l appareil la prise de courant doit rester facilement accessible Évitez toute détérioration du câb...

Page 5: ...peur commencez par ouvrir légèrement l arrière du couvercle pour que le jet de vapeur ne soit pas dirigé vers vous Placez l appareil uniquement sur une surface plane sèche antidérapante et imperméable afin qu il ne puisse ni basculer ni tomber Ne placez pas l appareil sur une surface très chaude comme les plaques de cuisson Le Fouet ne peut être utilisé que sur les niveaux de vitesse 1 à 4 Ne touc...

Page 6: ...igueur dans le pays d utilisation Recyclage du produit Cet appareil porte le symbole de recyclage conformément à la Directive Européenne 2012 19 UE concernant les déchets d équipements électriques et électroniques DEEE ou WEEE en anglais Par une mise au rebut correct de l appareil vous contribuerez à éviter tout préjudice à l environnement et à la santé publique Le symbole présent sur l appareil o...

Page 7: ...7 FR PIÈCES ET FONCTIONS Pièces et fonctions Bol mixeur en acier inoxydable Panneau de commande Bouton marche arrêt I O non illustré Panneau de commande 88 88 888 C 888 18 888 ...

Page 8: ...res Couvercle Plateau vapeur Panier Joint du panier Panier vapeur interne Pale de mélange Couteau hachoir Fouet Couvercle de mixage Couvercle avec cheminée Disque réversible pour râper et trancher Axe d entrainement ...

Page 9: ... 3L limite du bol mixeur Hacher des légumes ou fruits Couteau hachoir 5 15s 30s 500g d ingrédients Pétrissage Couteau hachoir 1 120s 500g de farine 250g d eau et 20g d huile Trancher et râper Lames pour trancher et râper 5 6 30 s 500g d ingrédients Soupe Pale de mélange 1 30 90 min 2 0L respecter le trait de niveau sur le bol MISE EN PLACE Installation du Super Cooker 1 Posez le Super Cooker sur u...

Page 10: ...un incendie ou une électrocution Branchez l appareil sur une prise de terre Veillez à ce que le robot multifonction Super Cooker soit le seul appareil branché sur ce circuit électrique Le robot multifonction est prêt à être utilisé MISE EN MARCHE Écran d accueil 1 L écran d accueil s affiche dès que vous allumez le Super Cooker après l avoir branché à une prise de courant 2 Appuyez sur un bouton d...

Page 11: ...s propres recettes Fixez correctement l arbre d entrainement au bol mixeur Placez le bol en acier inoxydable sur la base en vous assurant qu il se verrouille correctement Si celui ci n est pas parfaitement verrouillé le message E3 s affiche à l écran ce qui signifie que le bol n est pas correctement verrouillé 1 2 Sélectionnez et insérez l accessoire indiqué dans la recette dans le bol en le faisa...

Page 12: ...sson définis dans le livre de recettes ou ajustez les selon vos besoins Voir page 15 pour plus d informations sur l utilisation du panneau de commande 7 Pressez les boutons Temps Température Vitesse puis ajustez le paramètre souhaité avec le bouton de commande rotatif pour définir les paramètres Pressez le bouton de commande rotatif pour valider chaque paramètre Après avoir défini l ensemble des p...

Page 13: ...n au programme 9 End Enfilez des maniques ou des gants de cuisine déverrouillez le couvercle et ouvrez le Ôtez tout accessoire éventuel retirez le bol et servez 10 Utilisation du Super Cooker avec le panier de cuisson vapeur interne Placez le bol du mixeur en acier inoxydable sur la base en vous assurant qu il se verrouille correctement Si celui ci n est pas parfaitement verrouillé le message E3 s...

Page 14: ...atif pour commencer à utiliser le Super Cooker 4 Utilisation du Super Cooker avec le panier de cuisson vapeur Placez le bol du mixeur en acier inoxydable sur la base en vous assurant qu il se verrouille correctement Si celui ci n est pas parfaitement verrouillé le message E3 s affiche à l écran ce qui signifie que le bol n est pas correctement verrouillé 1 Ajoutez de l eau dans le bol mixeur Ne dé...

Page 15: ... cuisson débutera 5 Pendant le réglage d un paramètre appuyez longuement sur le bouton pour l annuler 6 Une fois la cuisson terminée le panneau de commande indique End Appuyez 1 fois sur le bouton pour passer en mode veille 7 Après avoir pesé un ingrédient appuyez longuement sur le bouton pour quitter le programme balance Utilisation du panneau de commande Utilisation du Super Cooker avec le panie...

Page 16: ...bouton de commande rotatif le programme souhaité numéroté de 1 à 30 Chaque programme possède des paramètres de cuisson prédéfinis 3 Appuyez sur le bouton de commande rotatif pour commencer le programme Temps 1 Appuyez 1 fois sur le bouton Temps pour définir le temps nécessaire ajustable de 0 à 90 minutes 2 Réglez les secondes puis appuyez 1 fois sur le bouton Temps pour passer au réglage des minut...

Page 17: ...eut être utilisé avec une vitesse réglée de 1 à 3 Couteau hachoir 1 Le symbole Couteau hachoir s allume par défaut 2 Peut être utilisé avec une vitesse réglée de 1 à 12 Verrou Lorsque le symbole verrou fermé est allumé cela signifie que le couvercle est correctement en mode Standby et est prêt à être utilisé Lorsque le symbole verrou ouvert est allumé cela signifie que le couvercle n est pas corre...

Page 18: ... cordon d alimentation du robot multifonction sur une prise de terre Le fusible du circuit électrique du Super Cooker fonctionne t il normalement Si vous disposez d un disjoncteur assurez vous que le circuit est fermé Essayez de débrancher puis rebrancher le Super Cooker Impossible de fermer le couvercle Assurez vous que le joint du couvercle est bien monté dans le couvercle Messages d erreur E1 S...

Page 19: ...braising and cooking foods and food products These user instructions describe basic functions such as blending chopping and steaming You can find details on preparing specific recipes in the recipe book supplied This appliance may be used only in dry rooms It may not be used out of doors or in wet rooms This appliance is intended for private use and is not suitable for commercial purposes USER MAN...

Page 20: ...d and before assembling disassembling or cleaning The heating element surface is subject to residual heat after use Remember that the blades of the blade assembly are extremely sharp never touch them with your bare hands to avoid cutting yourself when washing up by hand the water should be clear enough for you to be able to see the blade assembly easily to prevent you cutting yourself on its extre...

Page 21: ...e the appliance repaired by a qualified technician Never touch the appliance the power cable or the mains plug with wet hands To disconnect the power cable always take hold of the plug Never pull on the cable Make sure that the power cable is never kinked or compressed Keep the mains power cable away from hot surfaces e g cooker hob If you are not using the machine for a prolonged period of time r...

Page 22: ...y be used only at speeds 1 to 4 The pulse button may not be used together with the mixer attachment Never use the blender jug without the lid in place as liquid might otherwise be thrown out Do not move the appliance while food or dough is still inside Do not overfill the blender jug as the contents might otherwise be thrown out Overflowing liquid will run onto the underlay which is why this needs...

Page 23: ... with the crossed out rubbish bin on wheels means that within the European Union the product must be disposed of to a sorted rubbish collection This applies to the product and all accessories which are marked with this symbol Marked products must not be disposed of via the regular domestic waste but must be handed in to a recycling centre for electrical or electronic devices Recycling helps to red...

Page 24: ...24 EN PARTS AND FEATURES Parts Stainless steel cooking bowl Control pannel On Off button Control pannel 88 88 888 C 888 18 888 ...

Page 25: ...5 EN Accessories Steamer lid Upper steamer basket Lower steamer basket Seal Inner steamer basket Stir paddle Blade assembly Egg beater Blender lid Blender lid with pusher Slicer shred disc Driving shaft ...

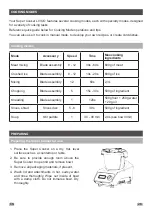
Page 26: ...0g of ice Mixing Blade assembly 12 60s 2 3L Chopping Blade assembly 5 15s 30s 500g of ingredient Kneading Blade assembly 1 120s 500g floor 250g water 20g oil Slices shred Slices disc 5 6 30 s 500g of ingredient Soup Stir paddle 1 30 90 min 2 0L see bowl limit PREPARING Preparing the Super Cooker for use 1 Place the Super Cooker on a dry flat level surface such as a countertop or table 2 Be sure to...

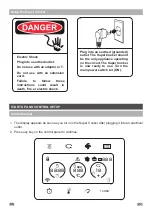
Page 27: ...c shock Plug into an earthed grounded outlet The Super Cooker should be the only appliance operating on the circuit The Super Cooker is now ready to use Turn the main power switch to I ON START UP AND CONTROL SETUP Control pannel 1 The display appears as soon as you turn on the Super Cooker after plugging it into an electrical outlet 2 Press any key on the control panel to continue 88 88 888 C 888...

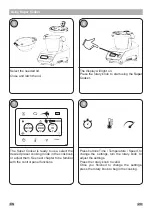
Page 28: ...ual mode to develop your own recipes or create cold dishes Insert the drive shaft into the bowl Place the bowl on the base making sure it locks into place If the bowl is not locked in place E3 will show in the display 1 2 Insert the accessory indicated by the recipe into the bowl sliding it onto the drive shaft 3 Add the ingredients for the first step of cooking Do not exceed the MAX FILL line 4 ...

Page 29: ...d preset cooking mode in the cookbook or adjust them See next chapter to be familiar with the control panel functions 7 Press buttons Time Temperature Speed to change the settings turn the rotary knob to adjust the settings Press the rotary knob to valid Once you finished to change the settings press the rotary knob to begin the cooking 8 Using Super Cooker 88 88 888 C 888 18 888 TURBO ...

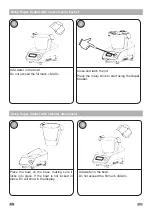
Page 30: ...nds to cancel definetly cooking or preparation 9 End Put on oven gloves or oven mitts unlock the lid and open it Remove all accessories before removing the bowl and serve 10 Using Super Cooker with inner steamer basket Place the bowl on the base making sure it locks into place If the bowl is not locked in place E3 will show in the display 1 Place the inner steam basket in the bowl Lock the inner s...

Page 31: ... 3 Close and latch the lid Press the rotary knob to start using the Super Cooker 4 Using Super Cooker with steamer attachment Place the bowl on the base making sure it locks into place If the bowl is not locked in place E3 will show in the display 1 Add water in the bowl Do not exceed the fill mark MAX 2 ...

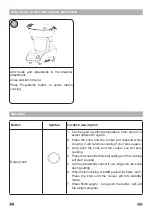
Page 32: ...ss the knob after finish all setting and the cooking will start cooking 5 It will automatically cancel if you long push the knob during setting 6 When finish cooking the IMD panel will shows end Press the knob and the cooker will into standby mode 7 When finish weight Long push the button will exit the weight program Operating Using Super Cooker with steamer attachment Add foods and ingredients in...

Page 33: ...esired program numbered from 1 to 30 with the rotary control Each program has predefined cooking parameters 3 Press the rotary control button to start the program Time 1 Press the Time button once to set the time required adjustable from 0 to 90 minutes 2 Set the seconds then press the Time button once to go to the minute setting 3 Turn the rotary control to confirm the time Temperature 1 Press th...

Page 34: ...peed set from 1 to 3 Blade assembly 1 The chopping knife symbol lights up by default 2 Can be used with a speed set from 1 to 12 Lock When the closed lock symbol is lit it means that the cover is correctly in Standby mode and is ready to be used When the open lock symbol is lit it means that the lid is not properly locked and the Super Cooker cannot be used Operating CARE AND CLEANING Cleaning you...

Page 35: ...outlet Plug the Super Cooker into a grounded outlet Is the fuse in the circuit to the Super Cooker in working order If you have a circuit breaker box make sure the circuit is closed Try unplugging the Cook Processor then plug it back in Unable to close the lid Check the seal position Error messages E1 Motor overload Unplug the Super Cooker and allow it to cool for one hour Then it is ready to be u...

Reviews: