-3-
3
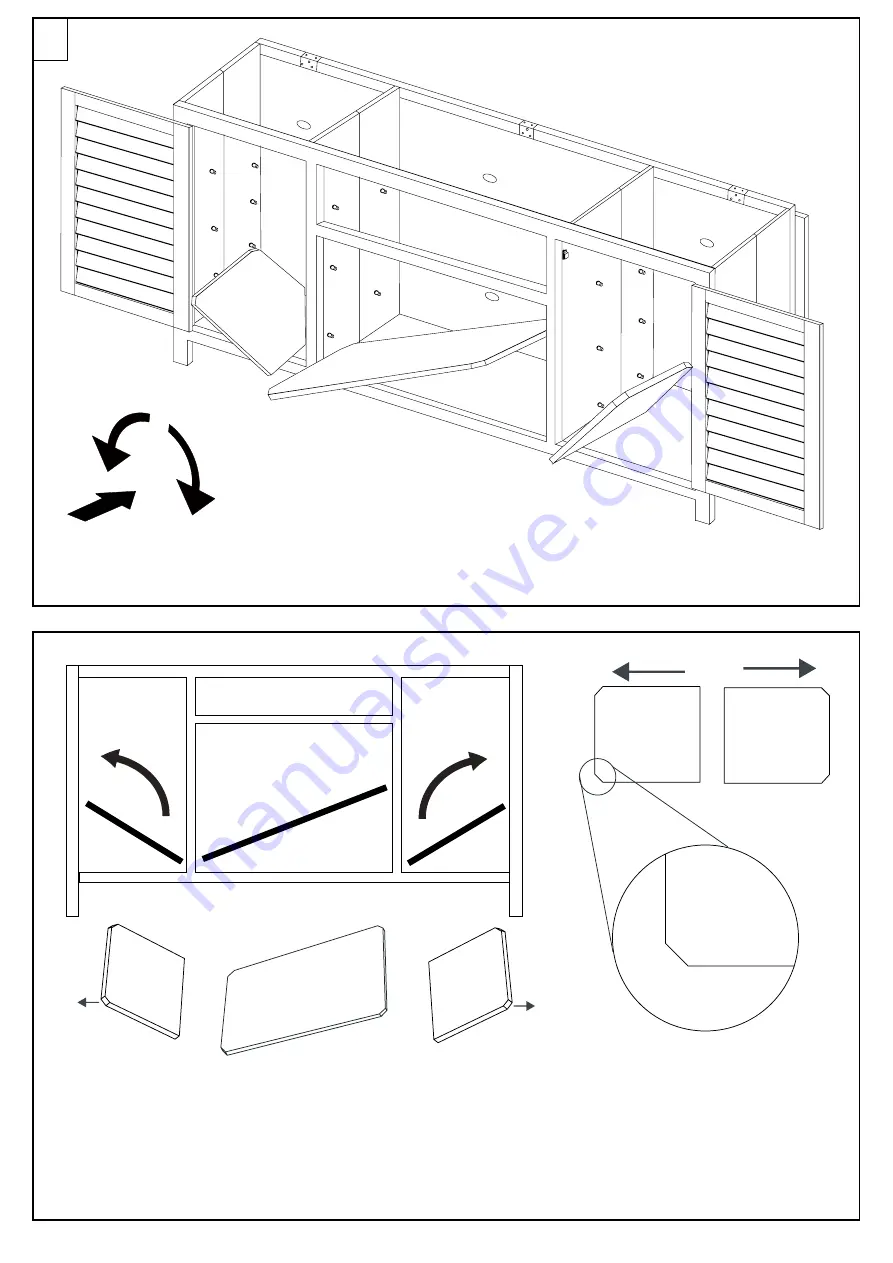
B
x 2 pcs
C
x 1pc
When Installing part “B”,
make sure to place the
cut corners facing to the
left or the right accordingly.
See sample above.
Tilt Shelves
hen installing
Page 1: ...Assembly Instructions SKU CFWGM0473 TIMBER CONSOLE ...
Page 2: ...y you believe the product is defective For any parts request it must include images of the defective part s Please do not ship your product back to us unless we specifically request you to do so If it is necessary for your product to be returned all returns or exchanges must be made through the original store of purchase Proof of purchase must accompany the returned product LIVING ESSENTIALS is no...
Page 3: ...s fully assembled Por favor apretarlos tornillos hasta que haya asemblado el producto completamente A x 1pc 2 X4 pcs 1 X 2 pcs 3 X 4 pcs Extra parts for your convenience B x 6pcs C x 3pcs Instructions Instrucciones Moded emploi TIMBER CONSOLE SKU CFWGM0473 ...
Page 4: ... 2 2 1 2 A A x 1pc Slightly tilt console to open ...
Page 5: ... 3 3 B B B B B x 2 pcs C x 1pc When Installing part B make sure to place the cut corners facing to the left or the right accordingly See sample above C Tilt Shelves hen installing B C B ...
Page 6: ... 4 4 5 Tilt Shelves when installing B x 4 pcs C x 2 pcs Tilt Shelves when installing B x 4 pcs C x 2pc B C B ...
Page 7: ... 5 6 7 x 2 Pcs 1 x 4 Pcs 2 ...
Page 8: ... 6 8 once the top is in place Push pin to Lock Push lower red button to unlock ...
Page 9: ...elow make sure NOT to place any pins on the middle or top shelf Tilt towards back of console when installing for easier placement If you purchased our Moscow Speaker and our Moscow Electric Fireplace Please follow these steps when installing them into our Console ...
Page 10: ...11 Place the top shelf before installing speaker 8 C 10 Place the holders after installing each component 4 X 2 pcs 3 X 2 pcs ...
Page 11: ...12 Place the speaker from the top as shown in the image above 9 13 Place the holders after installing each component Back View 4 X 2 pcs 3 X 2 pcs ...