SECTION 3 : INSTALLATION
Leveling Your Table
Leveling, or balancing, your table is very important during initi al setup and routi ne maintenance.
Your Pro Salon™ table is equipped with leveling feet that can adjust to uneven fl oors.
To adjust the leveler feet:
1. Place the table in the positi on you plan to use it.
2. To determine which foot needs adjusti ng, att empt to “rock” your table. If there is any
movement, the leg that is lift ing is the one that will need adjusti ng.
3. Raise table height approximately 6 inches.
4. Using your hand, or a wrench if necessary, turn the leveling foot in the needed directi on.
(Counterclockwise will lower the overall height, clockwise will raise the overall height)
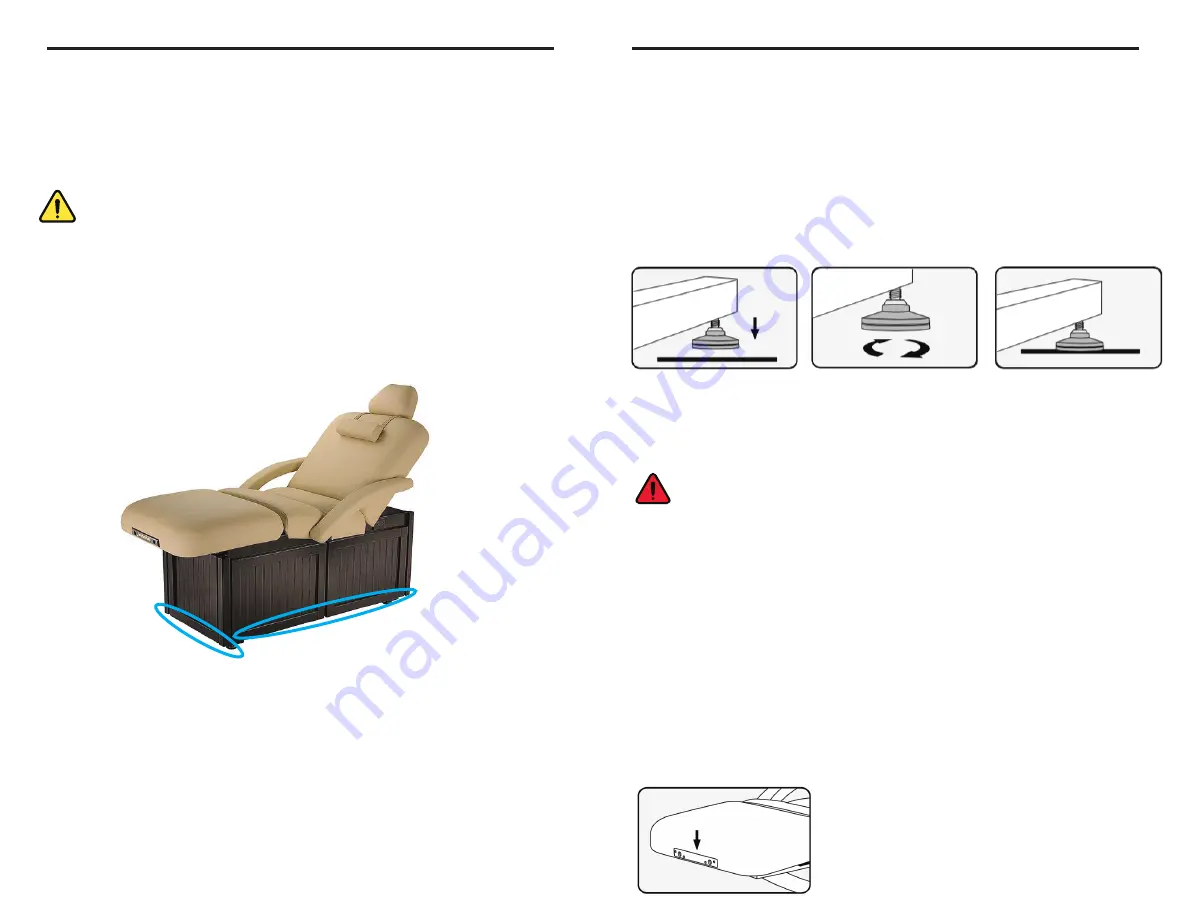
Moving Your Table
•
To avoid damage to your Pro Salon™ table, it is very important that it only be lift ed from
certain positi ons on the table (marked with
BLUE
circles below)
•
You may need to plug in your table and raise the table, the back secti on, and/or the leg
secti on for easier access to the base for lift ing purposes.
•
Lift your table by grasping fi rmly from the bott om of the frame. Do not try to lift from
the fi ns on the Cuvee cabinet or the cabinet doors.
CAUTION
Your Pro Salon™ table is very heavy - extreme cauti on should be used to avoid injury to
yourself, others around you, and your table. DO NOT lift or move without using proper
safety procedures/equipment. DO NOT turn the table on its side for any reason.
SECTION 3 : INSTALLATION
Your Pro Salon™ table comes completely assembled and ready to use.
Ensure you read and follow the unpacking instructi ons included with your shipment.
If you did not receive unpacking instructi ons, please contact LEC customer service before
unpacking your table.
Once the table is unpacked, follow the “Moving Your Table” instructi ons below.
Basic Setup Instructions
Once your Pro Salon™ table is positi oned for use, follow these steps:
•
Plug the power cord into a grounded outlet that is properly rated for the table.
•
Arrange and secure the power cord so it will not create a tripping hazard.
•
Place the hand and foot controls in locati ons where they are safe and accessible.
•
Ensure the controls are not in danger of being crushed by the lift or ti lt mechanisms.
•
Follow the “Leveling Your Table” instructi ons on the next page.
Table Accessories
All Pro Salon™ tables come with outlets at both ends, specifi cally designed for providing a
fi xed locati on for FacePillow platf orms, salon pillows, and other accessories.
For all available accessories, please visit the Living Earth
Craft s website at www.livingearthcraft s.com, or contact
Living Earth Craft s customer service to request a catalog.
6
7
Rolling Casters/Wheels
If you ordered the opti onal rolling caster wheels, it is important that you read this secti on.
1. To engage the wheels, lower table to its lowest positi on. Your table is ready to be moved.
2. To disengage the wheels, raise table 1 or more inches. Your table is now ready to use.
WARNING
Failure to disengage the wheels when client is getti ng on or off the table could result in
injury. Keep wheels disengaged at all ti mes when a client is entering or exiti ng the table,
as well as while a client is on the table.
Wheels are intended for smooth surfaces only. Tables with wheels are not intended to
roll over thresholds, cords, or other obstacles. Tables wti h wheels are not inteded for
use on stairs. Rolling your table over obstacles can damage your table as well as the
obstacle. Rolling your table over cords can damage the cord insulati on.
Use cauti on when rolling your table near walls or doors as damage can occur to the wall
or door, as well as the table.
Living Earth Craft s will not be responsible for damage to your table or other objects damaged
by misuse of wheels. Failure to use the wheels in any other manner than described above
could damage your table and void your warranty. Damage to table frame caused by misuse
will not be covered under warranty.


