3
C
A
1
B1
2
B2
100656_livx_LED-Lichtleisten-Set_content_SK.indd 3
14.07.14 12:45
Page 1: ...ED LIGHTSTRIP KIT Operation and Safety Notes LED LICHTLEISTEN SET Bedienungs und Sicherheitshinweise S PRAVA LED SVETELN CH L T Pokyny pre obsluhu a bezpe nostn pokyny 100656_livx_LED Lichtleisten Set...
Page 2: ...Operation and Safety Notes Page 6 SK Pokyny pre obsluhu a bezpe nostn pokyny Strana 18 DE AT CH Bedienungs und Sicherheitshinweise Seite 31 100656_livx_LED Lichtleisten Set_cover_SK indd 3 14 07 14 12...
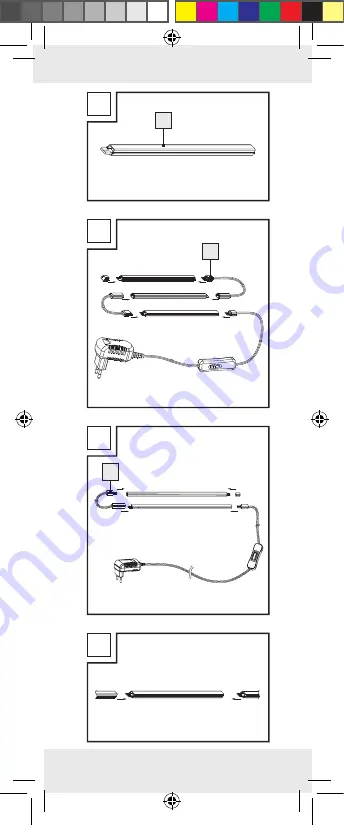
Page 3: ...3 C A 1 B1 2 B2 2 100656_livx_LED Lichtleisten Set_content_SK indd 3 14 07 14 12 45...
Page 4: ...4 D F1 8 6 7 E 3 4 5 ca approx 20cm 100656_livx_LED Lichtleisten Set_content_SK indd 4 14 07 14 12 45...
Page 5: ...5 F2 G2 8 6 7 G1 3 MAX 2x 3 MAX 2x 100656_livx_LED Lichtleisten Set_content_SK indd 5 14 07 14 12 45...
Page 6: ...e 9 Safety information Page 10 Safety advice for installation Page 13 Installation Mounting the product on a cupboard Page 14 Mounting the product on a wall Page 15 Operation Page 15 Cleaning and care...
Page 7: ...her uses or modification of the product shall be considered as improper use and could lead to injury or damage The manufacturer accepts no liability for loss or dam age arising from improper use Descr...
Page 8: ...d Mains adapter Nom voltage primary 100 240V 50 60Hz Nom voltage secondary 12V 0 25A 3W Protection class Mains adapter Model No SPZ1200250VW T V GS tested 100656 14 02 LED light strip Operating voltag...
Page 9: ...strip sets 1 Mains adapter 3 Interconnection cables 6 Dowels 6 Fastening clips 6 Screws 6 Double sided adhesive tapes 1 End cap 1 Operating instructions 100656 14 02 2 LED light strip sets 1 Mains ad...
Page 10: ...ised with the packaging material The packaging material represents a danger of suffocation Children frequently underestimate the dangers Please keep children away from the device at all times This dev...
Page 11: ...y of its aspects please seek the advice of an electrical equipment specialist Do not pull on the product lead Ensure that it is positioned to avoid creating a trip hazard The product can be used on al...
Page 12: ...and disposed of in the proper way This article does not contain any parts which can be serviced by the user The bulbs cannot be replaced Never open any of the electrical parts or insert any kind of ob...
Page 13: ...fficially classified as being of normal flammability CAUTION RISK OF ELECTRIC SHOCK Ensure that you do not strike any elec trical cables gas or water pipes in the vicinity of where you are drilling If...
Page 14: ...The surface must be clean dry and free of grease Otherwise the self adhesive foil may not stick properly 1 Using a pencil mark the position on the wall on to which you intend to attach the LED light...
Page 15: ...he drilled holes Fig E 3 Fix the fastening clips 3 to the wall with the screws 5 4 Connect the LED light strip 1 to the mains adapter 8 Fig F1 F2 or connect the LED light strip 1 to the connection lea...
Page 16: ...materials which you may dispose of at local recycling facilities Contact your local refuse disposal authority for more details of how to dispose of your worn out product To help protect the envi ronme...
Page 17: ...chase we will repair or replace it at our choice free of charge to you The warranty period begins on the date of purchase Please keep the original sales receipt in a safe loca tion This document is re...
Page 18: ...d vky Strana 21 Bezpe nostn upozornenia Strana 22 Bezpe nostn upozornenia t kaj ce sa mont e Strana 25 Mont Mont skrinky Strana 26 Mont na stenu Strana 27 Pou vanie Strana 28 istenie a dr ba Strana 28...
Page 19: ...ie In pou vanie v robku alebo zmeny na v robku nie s v s lade s ur en m a predsta vuj riziko poranenia alebo vzniku vecn ch k d V robca nepreber ru enie za kody vzniknut v d sledku pou vania v rozpore...
Page 20: ...ochrany Sveteln li ta s LED di dami model 100656 14 01 s certifik tom T V GS Sie ov zdroj Sie ov nap tie prim rne 100 240V 50 60Hz Sie ov nap tie sekund rne 12V 0 25A 3W Trieda ochrany Sie ov diel mo...
Page 21: ...m rne 100 240V 50 60Hz Sie ov nap tie sekund rne 12V 0 50A 6W Trieda ochrany Sie ov diel model SPA1200500VW s certifik tom T V GS Obsah dod vky 100656 14 01 3 sveteln li ty s LED di dami 1 sie ov adap...
Page 22: ...ch nepreber v robca ru enie Pri vecn ch ko d ch alebo poraneniach os b ktor boli zapr inen neodbornou mani pul ciou alebo nedodr iavan m bezpe nostn ch upozornen nepre ber me iadnu z ruku NEBEZPE ENS...
Page 23: ...ou van m Deti sa s pr strojom nesm hra is tenie a dr bu pr stroja nesm vykon va deti bez dozoru Dbajte na to aby bol v robok namontovan iba kvalifikova n mi osobami Pred mont ou prekontrolujte i je po...
Page 24: ...na pou vanie vo vn torn ch priestoroch Zabr te nebezpe enstvu ohrozenia ivota v d sledku z sahu elektrick m pr dom Pred pou it m sa ubezpe te e sa sie ov nap tie v z suvke zhoduje s potrebn m prev dz...
Page 25: ...Pred mont ou demont ou alebo isten m v dy vytiahnite z str ku zo z suvky Sie ovej z str ky ani v robku sa nikdy nedot kajte mokr mi rukami Zapojte LED sveteln li tu iba na prilo en adapt r Sveteln v...
Page 26: ...Ak m te pochybnosti pora te sa s pracovn kmi pe cializovanej elektropredajne Na upevnenie nepou vajte ostr a alebo picat predmety ako dr t klince alebo svorky Zabr te oh baniu produktu Vedie to k po k...
Page 27: ...ritla te obr D 4 Spojte sveteln li tu s LED di dami 1 so sie ov m adapt rom 8 obr F1 F2 alebo spojte sveteln li tu s LED di dami 1 so spojovac m k blom 2 aby ste zapojili dodato n svietidlo obr B1 B2...
Page 28: ...apnutie osvetlenia stla te sp na ON OFF na n rovom vyp na i 7 istenie a dr ba POZOR NEBEZPE ENSTVO Z SAHU ELEKTRICK M PR DOM Najprv vytiahnite sie ov z str ku zo z suvky Nepou vajte rozp adl ben z n a...
Page 29: ...nej spr ve Z ruka Tento pr stroj bol d kladne vyro ben pod a pr snych akostn ch smern c a pred dodan m svedomito testovan V pr pade nedostatkov tohto v robku V m prin le ia z konn pr va vo i predajco...
Page 30: ...n alebo neodborne udr iavan Poskytnutie z ruky sa vz ahuje na chyby materi lu a v robn chyby T to z ruka sa nevz ahuje na asti produktu ktor s vystaven norm l nemu opotrebovaniu a preto ich je mo n po...
Page 31: ...te 33 Lieferumfang Seite 34 Sicherheits hinweise Seite 35 Sicherheits hinweise zur Montage Seite 38 Montage Schrankmontage Seite 39 Wandmontage Seite 40 Anwendung Seite 41 Reinigung und Pflege Seite 4...
Page 32: ...re Verwendungen oder Ver n derungen des Produkts gelten als nicht bestimmungsgem und k n nen zu Risiken wie Verletzungen und Besch digungen f hren F r aus bestimmungswidriger Verwen dung entstandene S...
Page 33: ...LED Lichtleiste Modell Nr 100656 14 01 T V GS gepr ft Netzteil Nennspannung prim r 100 240V 50 60Hz Nennspannung sekund r 12V 0 25A 3W Schutzklasse Netzteil Modell Nr SPZ1200250VW T V GS gepr ft 10065...
Page 34: ...tzteil Modell Nr SPA1200500VW T V GS gepr ft Lieferumfang 100656 14 01 3 LED Lichtleisten 1 Netzadapter 3 Verbindungskabel 6 D bel 6 Befestigungsclips 6 Schrauben 6 doppelseitige Klebefolien 1 Endkapp...
Page 35: ...cht werden wird keine Haftung ber nommen LEBENS UND UNFALLGEFAHR F R KLEINKINDER UND KINDER Lassen Sie Kinder niemals unbeaufsichtigt mit dem Verpackungsmaterial Es besteht Erstickungsgefahr durch Ver...
Page 36: ...n Personen montiert wird berpr fen Sie vor der Montage ob der Untergrund f r das Befestigungsmaterial und das Gewicht f r den Leuchtartikel geeignet ist Wenn Sie sich nicht sicher sind fragen Sie eine...
Page 37: ...ich vor der Benutzung dass die vorhan dene Netzspannung mit der ben tigten Betriebsspannung des Ger tes bereinstimmt 100 240V berpr fen Sie vor jedem Netz anschluss das Produkt auf etwaige Besch digun...
Page 38: ...der Steckdose Fassen Sie niemals den Netz stecker oder das Produkt mit nassen H nden an Schlie en Sie LED Lichtleiste nur an den mitgelieferten Adapter an Verwenden Sie den Leuchtartikel nur mit den...
Page 39: ...t Wenn Sie sich nicht sicher sind fragen Sie einen Elektrofachbetrieb um Rat Verwenden Sie zur Befestigung keine scharfen und oder spitzen Gegenst nde wie Draht N gel oder Klammern Vermeiden Sie Verbi...
Page 40: ...olie an der R ckseite der LED Licht leiste 1 ab 3 Kleben Sie die Klebefolie auf die Markierungen und dr cken Sie sie fest an Abb D 4 Verbinden Sie die LED Lichtleiste 1 mit dem Netzadapter 8 Abb F1 F2...
Page 41: ...dapter 8 in die Steckdose Um die Beleuchtung einzu schalten dr cken Sie den ON OFF Schalter am Schnurschalter 7 Abb F1 F2 Zum Ausschalten der Beleuch tung dr cken Sie den ON OFF Schalter am Schnurscha...
Page 42: ...f hren Sie es einer fachgerech ten Entsorgung zu ber Sammelstellen und deren ffnungszeiten k nnen Sie sich bei Ihrer zust ndigen Verwaltung informieren Garantie Das Produkt wurde nach strengen Qualit...
Page 43: ...s nach unserer Wahl f r Sie kostenlos repariert oder ersetzt Diese Garantie verf llt wenn das Produkt besch digt nicht sach gem benutzt oder gewartet wurde Die Garantieleistung gilt f r Mate rial oder...
Page 44: ...e 1 D 74167 Neckarsulm Model No 100656 14 01 100656 14 02 Version 07 2014 Last Information Update Stav inform ci Stand der Informationen 07 2014 Ident No 100656 14 01 02072014 SK 100656_livx_LED Licht...