24
littleseedskids.com
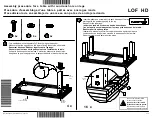
Step 17
For Masonry, Concrete, or other
wall materials:
Consult your local hardware store
for appropriate anchors to securely
attach the safety bracket.
IMPORTANT:
THIS
UNIT
MUST
BE
SECURE
TO
THE
WALL
TO
HELP
PREVENT
TIPOVER.
FOLLOW
THESE
INSTRUCTIONS
TO
INSTALL
THE
ANTI
‐
TIPPING
SAFETY
BRACKET
PROVIDED
WITH
THIS
PRODUCT.
OPTION
1:
Attachment
into
a
wall
stud
(preferred
method)
Using
a
stud
finder,
locate
a
stud
in
the
wall.
Place
your
unit
against
the
wall,
with
the
safety
bracket
aligned
in
this
location.
To
make
driving
the
screw
easier,
you
can
drill
a
1/8"
diameter
pilot
hole
(3mm)
through
the
safety
bracket
into
the
stud.
Drive
the
screw
through
the
safety
bracket
into
the
wall
stud.
Tighten
the
screw
that
was
not
fully
tightened
in
step
7.
OPTION
2:
Attachment
into
drywall
Locate
your
unit
where
desired
against
a
wall
and
mark
the
wall
through
the
safety
bracket,
then
move
your
unit
aside.
Drill
a
3/16"
diameter
hole
(5mm)
into
the
wallboard.
Tap
the
wall
anchor
into
the
hole
until
it
is
flush.
Move
your
unit
into
location
and
fasten
the
wall
bracket
to
the
wall
anchor
with
the
screw.
Tighten
the
screw
that
was
not
fully
tightened
in
step
7.
stud
wallboard
hole
13c
13c
13d
13d
Summary of Contents for B341860015COM0
Page 1: ...B341860015COM0 ...
Page 12: ...12 littleseedskids com Step 5 x4 A21960 E E 6 6 6 6 6 ...
Page 13: ...13 littleseedskids com Step 6 end view end view B A E E ...
Page 16: ...16 littleseedskids com Step 9 UNLOCK LOCK A B C ...
Page 17: ...17 littleseedskids com Step 10 x4 A23030 B A D 4 4 4 4 4 finished edge ...
Page 19: ...19 littleseedskids com Step 12 x4 A12120 x2 A54520 DWR SIDE DWR SIDE 8 8 8 8 8 14 14 14 ...
Page 20: ...20 littleseedskids com Step 13 DWR SIDE DWR SIDE x4 A12120 F 8 8 8 ...
Page 21: ...21 littleseedskids com Step 14 DWR SIDE F DWR SIDE DWR BTM finished surface ...
Page 22: ...22 littleseedskids com Step 15 x4 A21970 DWR SIDE DWR BACK DWR SIDE F 7 7 7 7 7 ...