background image


23 


Nº ECOEMBES: 93297 

RII-AEE Nº 6318 


Summary of Contents for BERLIN

Page 1: ...USER S MANUAL AND WARRANTY BERLIN Model READ THIS GUIDE BEFORE USING THE BIKE WWW LITTIUMBYKAOS COM ...

Page 2: ...1 ...

Page 3: ...s_____________________________________________ 11 Precautions with the battery____________________________________ 12 DAO System________________________________________________ 13 APP for Smartphones_________________________________________ 13 PAS Sensor__________________________________________________ 14 Maintenance_________________________________________________ 15 Height adjustment___________...

Page 4: ...s com Recomendations Check the brakes before using the bike every time you use it and remember that it will not stop equally in wet or icy conditions as you would on a dry road Check the tire pressure frequently It must be 60 psi or 4 1 bar Low tire pressures can damage them If you take the wheels with little pressure it generates more friction and reduces the performance of the bicycle Before usi...

Page 5: ...e HANDLEBAR SEE NEXT IMAGE TIJA FRONT LED LIGHT V BRAKE FRONT WHEEL FRONT AXLE FRAME HANDLE SHANK AND SEAT PLATE PEDAL CHAIN KICKSTAND REMOVABLE BATTERY REAR CARRIER V BRAKE REAR LED LIGHT MOTOR DIVERTER AND GEAR REAR AXLE MOTOR CONNECTION ...

Page 6: ...nsor and hidden brake sensor in the frame Wiring hidden in rear Fender Bluetooth system control APP available for IOS and Android DAO automatic power distribution system patented by Littium by Kaos Pack of rear suitcases air pump tool kit extra leather saddle support for smartphone and lights included For the rest it s a bicycle like any other LEFT HANDLE LEFT BRAKE HANDLEBAR ADJUSTMENT MANILLAR B...

Page 7: ...ions Handlebar Fender and front Wheel disassembles Box with 2A charger Accelerator and tool kit 2 security keys for the battery 2 rear suitcases Air pump Extra leather saddle Smartphone holder User manual and warranty Charger and battery ON BUTTON CHARGE CONNECTION BATTERY LED INDICATOR SECURITY LOCK WITH KEY BATTERY LEVEL CONTROLLER ...

Page 8: ...u do not have minimal mechanical knowledge it is advisable to go to a specialized center 1 Before starting make sure the battery is off 2 Hold the bicycle on its kickstand 3 Mount the handlebar centered Once centered adjust it with the upper part using two Allen screws Use the tool that is included in the box 4 The adjustment of the steering stem is made by placing the handlebars well aligned with...

Page 9: ...rew The support must be placed on the front of the fork 7 You will see that there are two rods that connect with the supports that are near the axis of the front wheel Once you insert the front wheel adjust these rods so that the mudguard is approximately 1cm away Carefully tighten the small Allen screws that you will see on the plastic brackets TOP SUPPORT ...

Page 10: ...e lower the bicycle from the stand so that the wheel is firmly fixed in position with the full weight of the bicycle 10 Connect the front brake 11 Check that all other nuts bolts and fasteners are tight 12 Check the motor connection 13 Check the brakes and brake levers work correctly 14 Check the pressure of the wheels are 60 psi 4 1bar 15 Make sure the battery is fully charged It is 50 factory ch...

Page 11: ...e removed as it has an anti theft system Use of the bycicle The battery of the rear grill has a switch on its left side Pressing this switch activates the bicycle and lights The battery has a charge indicator on its upper face Using the button with the battery on the status of the load can be checked ON BUTTON CHARGE CONNECTION BATTERY LED INDICATOR BATTERY LEVEL CONTROLLER ...

Page 12: ...le remember to turn it off Since it does not disconnect alone and the lights are connected Complete features of the bycicle Weight 22 Kg Battery included Aluminum chassis Max load 130 Kg Recommended minimum height of use 1 60 mts Measures 185x61x88 cms minimum Assisted speed up to 25 Km h Scope based on weight and height difference 70 Kms approx Maximum recommender slope 12 ...

Page 13: ... Do not attempt to open or repair the charger Avoid liquids and blows on the charger you could cause damage Do not place any object on top of the charger during charging It must be well ventilated to allow the generated heat to dissipate During charging if there is a peculiar odor or the temperature is too high please stop charging immediately To avoid premature wear of the battery and loss of war...

Page 14: ... of a good electric bicycle but the interface between the bicycle and the user has disappeared Thanks to this technology the behavior of the bicycle is semi automatic We do not have to be aware of engine management This adapts to our driving And in this way we avoid cable buttons and complications However you have an App for iOS and Android that you can download directly from the respective offici...

Page 15: ...rd 0000 for the first time if necessary PAS sensor The Berlin model is equipped with a PAS sensor of 12 magnets This device serves to detect the movement of the pedals and thus send the signal to the controller to activate the motor BATTERY INDICATOR MANUAL SPEED ADJUSTMENT SETTINGS INDICADOR ERRORES DISTANCE AND OBJECTIVE SENSOR PAS OF 12 MAGNETS ...

Page 16: ...weather in periods of rain could damage the electrical circuits 3 The spokes of the wheels must be adjusted after the first 300 km of driving 4 The saddle must not be used beyond the maximum indicated by a safety line around the tubes 5 The cranks of the pedals should be tightened after the first days of use 6 Do not clean the bicycle with pressurized water as it may cause a short circuit Repair a...

Page 17: ...ement of the same since the axis has up and down Look closely and you will see some washers with a thick one This has to be at the bottom V BRAKE The brakes are installed according to the standard format where the left one acts on the front wheel and the right one on the rear in reverse of a motorcycle If you wish you can invest them under your responsibility The wear of the brake pads must be tak...

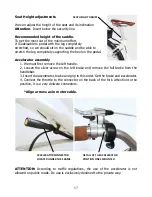
Page 18: ...e the left handle 2 Loosen the silver screw on the left brake and remove the full brake from the handlebar 3 Insert the accelerator brake and grip in this order Set the brake and accelerator 4 Connect the throttle to the connector on the back of the fork Attention to the position it is a very delicate connectors Align arrows as in motor cable ATTENTION According to traffic regulations the use of t...

Page 19: ...Possible accelerator failure E The bicycle only works with accelerator and pedal assistance does not work Possible damage to the control panel The Pas sensor is failing it must be replaced F The bicycle only works with pedal assistance and the accelerator does not work Possible driver fault Possible breakdown in the accelerator G When connecting the bicycle the engine activates itself Check that t...

Page 20: ...zed dealer The warranty period begins on the date of acquisition To exercise the right to it the original purchase invoice is required This guarantee covers the cost of parts labor of repairs necessary to restore the complete functioning of the product or its replacement as well as the collection and delivery of the product at your home or in an official service during the first 6 months After thi...

Page 21: ...Protection of Personal Data we inform you that your personal data will be processed and will be included in the files of Littium by Kaos registered in the Spanish Agency of Data Protection with the purpose of commercial services The data requested is necessary so that if it is not provided the provision of the required service will not be possible in this sense you expressly consent to the collect...

Page 22: ...21 ...

Page 23: ...22 THANK YOU VERY MUCH FOR YOUR CONFIDENCE ENJOY THE EXPERIENCE FOR AN ECOLOGICAL MOVEMENT ...

Page 24: ...23 Nº ECOEMBES 93297 RII AEE Nº 6318 ...

Reviews: