22
V.7.0
23
V.7.0
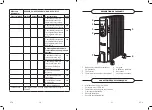
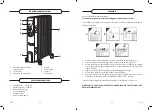
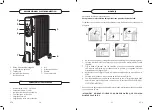
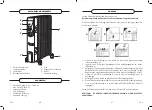
APPLIANCE DESCRIPTION
5
4
1
2
7
6
3
TECHNICAL FEATURES
•
Voltage: 230 V~ 50/60 Hz
•
Maximum power: 1500 W
•
Power indicator light
•
3 heating powers
•
Thermal safety
•
Anti-tilt safety device
1. On/off button and power
selector knob
2. Thermostat
3. Power on indicator light
4. Handle
5.
Radiator fins
6. Castors
7. Cord winder
ASSEMBLY
Unpack the radiator and accessories.
To install the appliance, it must be unplugged from the power socket.
The radiator is supplied with the castors removed. You must assemble them before
using the appliance.
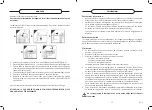
1. Turn the radiator over and place it on a flat and stable surface (Figure A).
2.
Place the metal U-shaped flange on the castor mounting bar (Figure B).
3.
Fasten the flange to the radiator using the bolts and nuts supplied by passing
it with the castor fixing bar between the first and second fins of the appliance
(Figure C and D).
4.
Tighten the nuts (Figure E) loosely to avoid damaging the flange.
5. Secure the 4 castors to each end of the 2 mounting bars.
6. Put the heater back in the right direction for use (the cord winder must be near
the bottom as indicated in the “APPLIANCE DESCRIPTION
” section).
Once the feet are properly installed, the appliance is stable and ready for use.
WARNING! YOU SHOULD NEVER USE YOUR RADIATOR IF THE FEET HAVE NOT
BEEN ASSEMBLED FIRST.
A
B
C
D
E

