Listen Technologies Personal Listening Installation Manual Download Page 10

PAGE 10


PERSONAL LISTENING


MANUAL


How to Connect the System

From TV cable boxes to the PL-ADC-10/20 panel

There are several different ways to connect DVDs, TVs or Cable/Satellite boxes to the PL-ADC, depending 

on the existing setup. Basically you can connect any audio source (nominal input level is -10dBu), it does 

not have to have an associated video screen. If you have special setups we recommend that you consult 

with our Technical Support department at 1.801.233.8992 or email support @listentech.com.

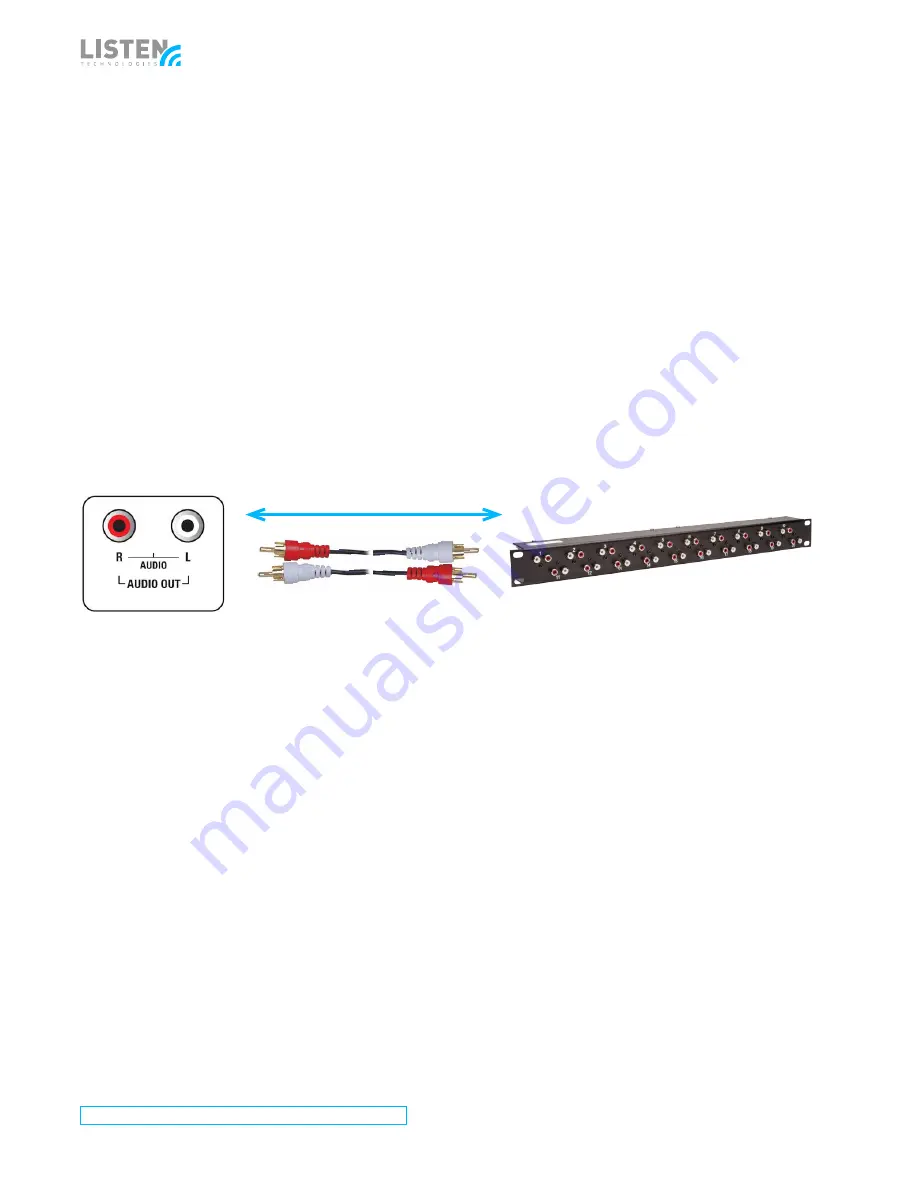
Locate the audio output connections from you cable box or TV (usually the analog RCA connections 

labeled ‘Audio Out’ and typically one red and one white in color). Using RCA cables, or RCA splitter cables 

if necessary and connect the Audio Out connections of your source device to the PL-ADC. 

Connect the first cable box to the ADC marked “1” and move to “2” and so on (depending on the number 

of cable boxes, all of the RCA input terminals on the ADC may not be used).  

Note:  

for cable boxes or TVs with digital audio outputs, such as NDMI or DIVX, use the conversion cables, 

such as HDMI to USB to connect from the digital audio output directly to the USB input on the server. There 

is no need to use the PL-ADC in this case, you can connect your device via USB directly to the server.

Summary of Contents for Personal Listening

Page 1: ...Personal Listening Audio Distribution Systems I N S T A L L A T I O N M A N U A L 20150302...

Page 2: ...er Setup Using Tablet 6 Monitor Display 6 System Display 7 PL ADC 10 or PL ADC 20 8 PL WAP2 9 PL POEA 9 How to Connect the System 10 From TV cable boxes to the PL ADC 10 20 panel 10 ADC to PLS server...

Page 3: ...2...

Page 4: ...erence by placing the unit away from speakers Safety Place the unit in a well ventilated area Do not open the top cover When not in use for an extended period of time unplug from the power source Do n...

Page 5: ...USB Port 8 12 Wireless Network Port LAN 13 Not used 14 USB Port 9 15 USB Port 10 16 Internet Connection 17 Not used 18 USB Port 11 19 USB Port 12 20 USB Port 13 21 USB Port 14 22 USB Port 15 23 USB Po...

Page 6: ...when selected provides real time status of the audio channel levels channel name sever name access point SSID name and received signal strength 1 Monitor button press to select Monitor Display mode 2...

Page 7: ...ress to select Monitor Display Mode 2 System button press to select System Display Mode 3 Server name press and use keyboard to change server name 4 Channel names press and use keyboard to change chan...

Page 8: ...digital converter connection panels provide the interconnection from the external audio sources to the Digital USB inputs on the server 1 RCA audio inputs 1 10 2 RCA audio inputs 11 20 PLS ADC 20 onl...

Page 9: ...ple installation by enabling the wireless access point to be installed without being located near a power outlet 1 Data In connection 2 Data Power Out connection Note PoE adaptor is used in place of t...

Page 10: ...ns from you cable box or TV usually the analog RCA connections labeled Audio Out and typically one red and one white in color Using RCA cables or RCA splitter cables if necessary and connect the Audio...

Page 11: ...Wi r e l e s s A c c e s s P o i n t v i aP O E P L WA P 2...

Page 12: ...annels for each venue location for easy recognition by customers and managers Press the Apply to save changes To test the functionality of the PLS server using a smartphone device On your smartphone s...

Page 13: ...u of personal listening channels will appear select desired channel and volume If the Personal Listening app does not successfully connect to the PLS server press the refresh button to try again Troub...

Reviews: