Listen Technologies LT-800-216 User Manual Download Page 15

11

Operating Instructions

Setup InstructionsQuick Reference

Specifications

Package ContentsPackage Contents

Operating Instructions

-   +

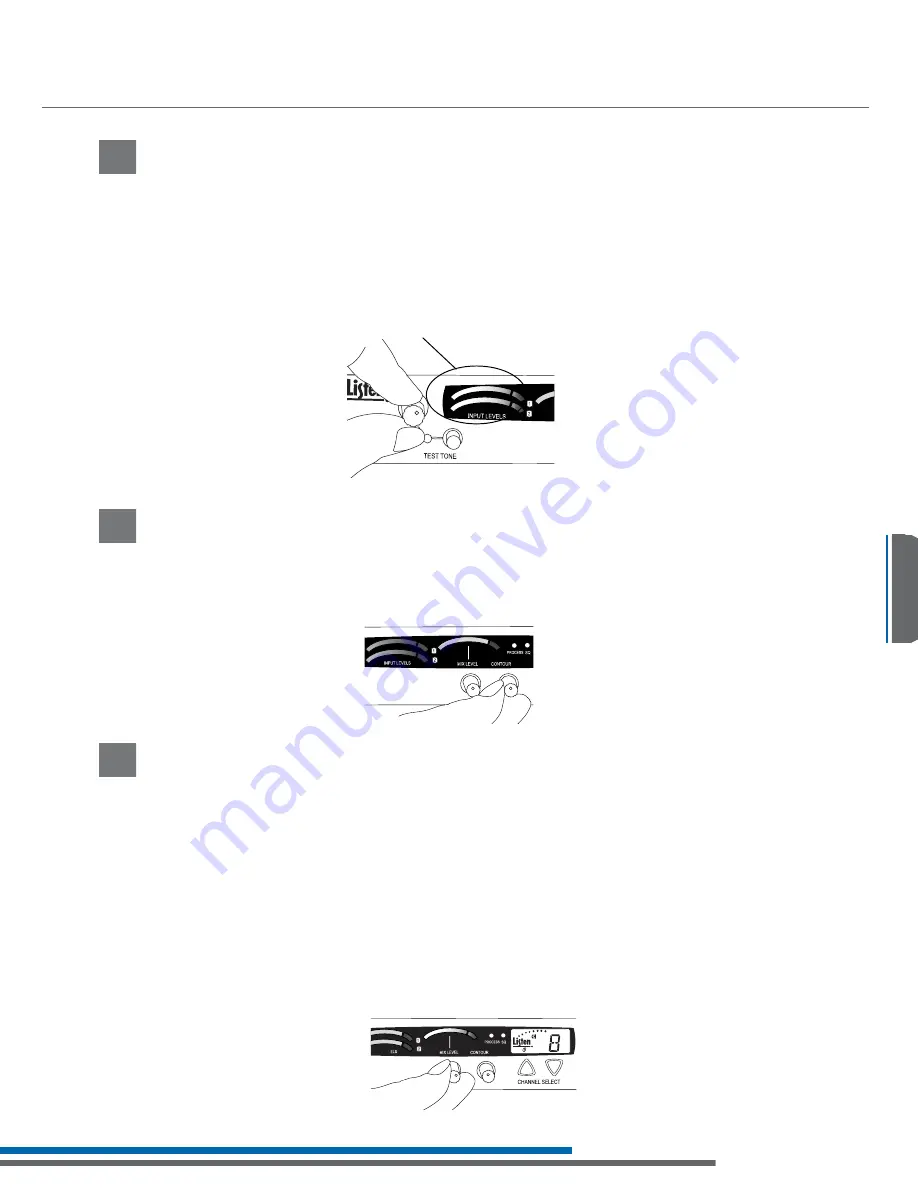
Adjust Mix Level

Adjust the mix level until the right VU meter occasionally illuminates the red LED. This is the 

level adjustment for the combined output from Input 1 and Input 2.

If you are using another manufacturers’ receivers with the LT-800, determine the frequency 

of their receivers then refer to Listen’s Frequency Compatibility Tables (pages 15-16) to find 

the LT-800 channel that corresponds with the receiver’s frequency. We recommend 


verifying corresponding channel designations on these tables to ensure compatibility  

and provide the best possible reception.

The LT-800 is Phonak compatible and can be set to display Phonak specific channels. See 

page 8 to set Channel Mode and page 14 for specific channel designations.

1

Adjust Audio Input Level

Adjust the input knob counterclockwise to add gain to Input 1. This will decrease gain 

to Input 2. Adjust input knob clockwise to add gain to Input 2. This will decrease gain 

to Input 1. If you have two audio sources connected to both Input 1 and 2, adjust the 

level of one input using the VU meter, then adjust the output level of the other audio 

source. Adjust the input level until the left VU meter(s) occasionally illuminate the red 

LEDs. Illumination of the red LEDs indicates the unit is in limiting. Limiting is required so 

that the unit does not over-modulate the transmitter. If you don’t want any audio 

limiting to occur, make sure the red LEDs never illuminate. If you want a highly limited 

signal, turn the audio gain up so the red LEDs illuminate often.

Adjust Contour

Adjust the Contour knob counterclockwise if your audio source is mostly voice. Adjust 

the knob clockwise if your audio source is mostly music. The Contour knob adjusts the 

relative equalization of the unit. This equalization boosts or cuts frequencies above 5 kHz.

-   +

-   +

LT-800 Audio Control

2

3

Summary of Contents for LT-800-216

Page 1: ......

Page 2: ......

Page 3: ...you have any comments on how we might improve our products or our service we re here to listen Here s how to reach us 1 801 233 8992 1 800 330 0891 North America 1 801 233 8995 fax support listentech...

Page 4: ......

Page 5: ...Contents 3 Specifications 4 Architectural Specifications 4 Specifications 4 Block Diagram 5 Quick Reference 6 Setup Instructions 7 Operating Instructions 10 Audio Control 11 Listen SQ Super Quiet 12...

Page 6: ......

Page 7: ...ontents Package Contents LT 800 Package Contents Optional Accessories See page 22 Listen Part Number LT 800 072 72 MHz LT 800 216 216 MHz LT 800 Contents LT 800 072 72 MHz or LT 800 216 216 MHz or 12...

Page 8: ...essing Process Compression can be turned on off Slope internally adjustable from 1 1 to 4 1 Default 2 1 Contour Cuts and boosts frequencies above 5 kHz Combined Audio Output Mix Input 1 and Input 2 Mi...

Page 9: ...Module Volume Up Down Remote Antenna Connection On Off Compression Ratio internal adjustment Red LED Green LED Green LED CONTOUR MIX LEVEL CHANNEL SELECT On Off Low High Mid Female XLR 1 4 Combo Conne...

Page 10: ...els Input 2 Connect unbalanced audio to these phono connectors input level 10dBu or 10dBu Input 2 Set switch to match the level of your Input 2 audio source not used to increase or decrease level by 1...

Page 11: ...power supply is the approved power supply for this unit Connect Antenna Connect the antenna not included according to the installation instructions Only use an antenna supplied by Listen If you are co...

Page 12: ...n button while powering on the unit When the Basic Mode is enabled L O lockout will be displayed on the LCD display as shown below This indicator is extinguished when in the Expanded Mode Set SQ Super...

Page 13: ...ons Input 1 and Input 2 Input 1 is a balanced connection using either an XLR or 1 4 phono connector Input 2 has two unbalanced mixing phono connectors Use Input 1 if you are using a microphone or if y...

Page 14: ...Unit On Turn power on by pressing the power button Select a Channel Select the transmit channel by pressing the channel select UP and DOWN buttons See Channel Selection on page 14 for more information...

Page 15: ...io Input Level Adjust the input knob counterclockwise to add gain to Input 1 This will decrease gain to Input 2 Adjust input knob clockwise to add gain to Input 2 This will decrease gain to Input 1 If...

Page 16: ...is used for Audio Gain Control AGC With the process mode enabled the LT 800 will automatically adjust for inconsistent signal input levels by raising or lowering the signal level accordingly to provid...

Page 17: ...lections of your signal that will result in poor listening conditions NOTE There are many varieties of 50 ohm RG 58 and RG 8 cables You may purchase a cable that is better or worse than this value Ple...

Page 18: ...case as long as the adjacent channel transmitter is at least 50 further away from the receiver than the original transmitter Example The transmitter for the receiver on channel E is 100 feet from the...

Page 19: ...y Charts Parenthesis indicate T35 and T20 narrowband Wideband frequencies are indicated in highlighted rows The highlighted channels also indicated those channels available in the basic mode default A...

Page 20: ...49 49 G 9 18 216 4375 3J 18 18 216 5125 1K 21 61 216 5250 2K 51 51 29 H 10 3 216 5375 3K 22 62 216 5625 1L 23 28 216 5750 2L 52 52 52 I 11 12 216 5875 3L 24 64 C24 N64 216 6125 1M 25 65 C25 216 6250...

Page 21: ...216 137 3C 22 216 162 1D 23 216 175 2D 44 216 188 3D 8 216 213 1E 9 216 225 2E 45 216 238 3E 24 216 262 1F 25 216 275 2F 46 216 287 3F 12 216 312 1G 13 216 325 2G 47 216 338 3G 26 216 363 1H 27 216 37...

Page 22: ...t level select switches in the proper position You may be providing too much audio level for the input stage to handle Make sure the SQ mode is set correctly on both the LT 800 and the receivers you a...

Page 23: ...nel If this does not work try a different frequency band i e if you are using 72 MHz try 216 MHz or vice versa Please contact Listen support for assistance and a return authorization RMA number to exc...

Page 24: ...n with non approved equipment or unshielded cables is likely to result in interference to radio and TV reception The user is cautioned that changes and modifications made to the equipment without the...

Page 25: ...sult of a manufacturing defect Listen is not liable for consequential damages due to any failure of equipment to perform as intended Listen shall bear no responsibility or obligation with respect to t...

Page 26: ...ultiple mount ing configurations and 25 feet 7 6m of RG 58 coax cable Includes components for single and dual rack configuration and a security cover NOTE Rack mounted units cannot use the LA 106 LA 1...

Page 27: ...led Coaxial Cable per ft LA 390 RG 8 50 Ohm Preassembled Coaxial Cable per ft LA 127 RG 58 BNC Connector LA 128 RG 8 BNC Connector LA 112 RG 58 50 Ohm Coaxial Cable per ft LA 113 RG 8 50 Ohm Low Loss...

Page 28: ...24 Notes...

Page 29: ...25 Notes...

Page 30: ...26 Notes...

Page 31: ...27 Notes...

Page 32: ...es Corporation 14912 Heritagecrest Way Bluffdale Utah 84065 4818 U S A 1 801 233 8992 1 800 330 0891 North America 1 801 233 8995 fax www listentech com 2008 Listen Technologies Corporation All Rights...

Reviews: