3
lci1.com
574-537-8900
CCD-0001391
Rev:09.18.18
Quick Drop Tongue
Jack
®
Installation and Owner’s Manual
(For Aftermarket Applications)
Installation
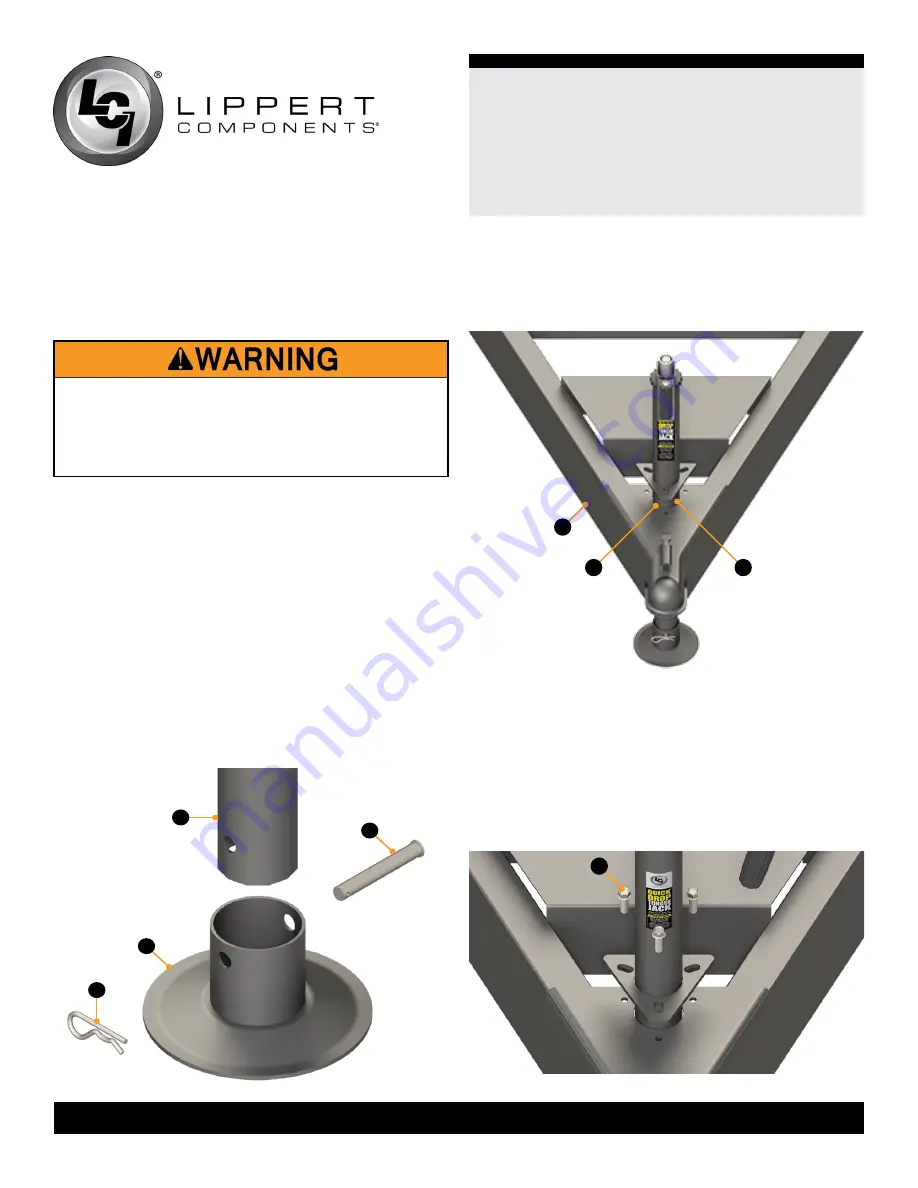
1.
Carefully slide the jack leg
(Fig.2A)
through the hole in
the coupler
(Fig.2B)
of the trailer’s A-frame
(Fig.2C)
.
A
B
C
D
Fig.1
C
A
B
Fig.2
2.
Align the three holes in the Quick Drop Tongue Jack’s
mounting plate with the three holes in the coupler.
3.
Secure the Quick Drop Tongue Jack to the coupler with
three supplied
3/8
” - 16 x 1” bolts
(Fig.3A)
.
4.
Reattach the footpad to the jack leg by sliding the footpad
over the bottom of the jack leg and securing it with the
previously-removed clevis pin and hairpin cotter pin.
Fig.3
A
1.
Make sure trailer is parked on level ground.
2.
Chock all tires.
3.
Support the trailer according to the manufacturer’s
recommendations.
4.
Remove existing tongue jack from A-frame and properly
dispose of jack and old mounting hardware.
5.
If necessary, remove footpad from the Quick Drop
Tongue Jack.
A.
Remove the hairpin cotter pin
(Fig.1A)
from the clevis
pin
(Fig.1B)
, which holds the footpad
(Fig.1C)
to the jack
leg
(Fig.1D)
.
B.
Set aside the hairpin cotter pin, clevis pin and footpad.
Preparation
NOTE:
To operate the crank handle, it is required to have
an existing 6” to 6
1/2
” radius clearance from the center
point of the jack leg to the area around it.
THE TRAILER MUST BE SUPPORTED PER THE
MANUFACTURER'S RECOMMENDATIONS BEFORE
WORKING UNDERNEATH. FAILURE TO DO SO MAY
RESULT IN DEATH, SERIOUS PERSONAL INJURY OR
SEVERE PRODUCT OR PROPERTY DAMAGE.


