background image

Rev: 11.09.20

  Page 

10    

CCD-0001450

C. 

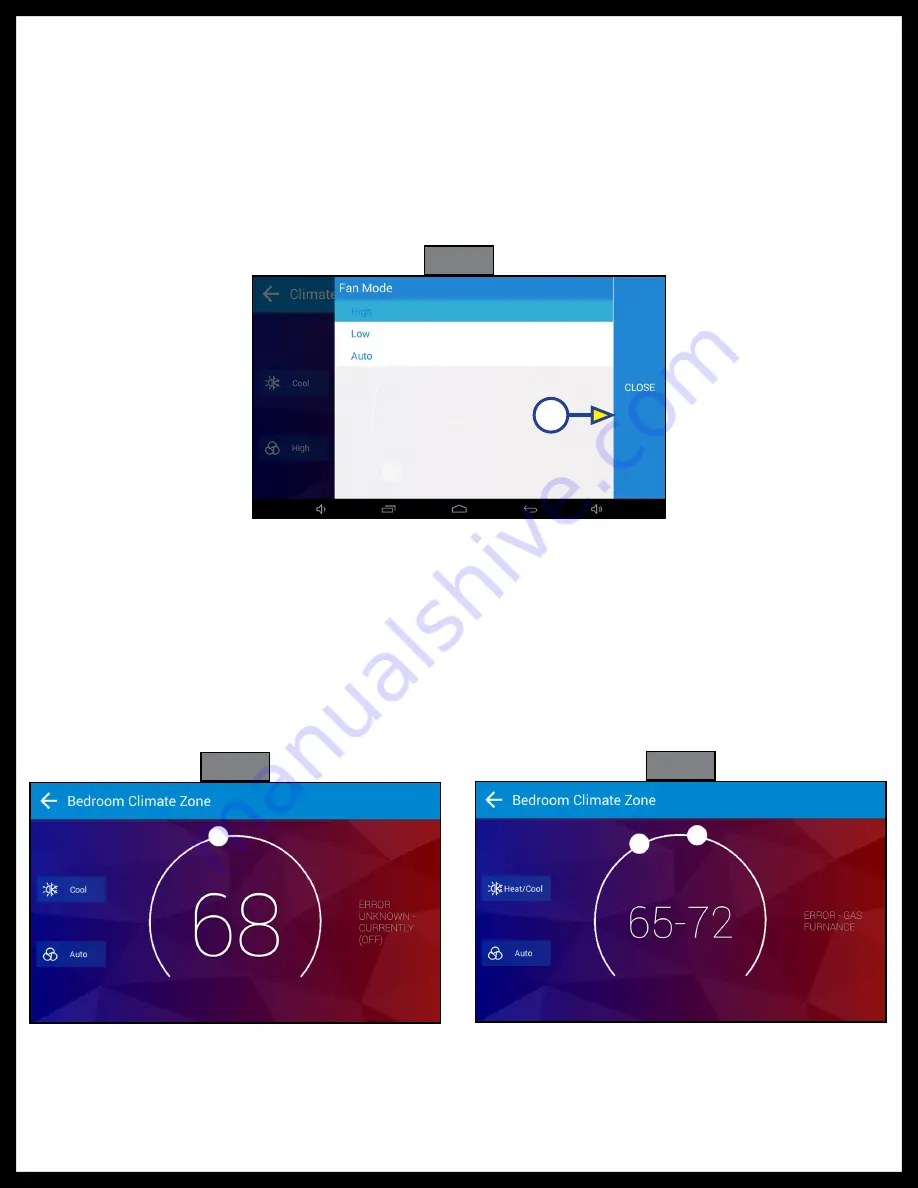
Press the bottom of the two boxes on the right. A large box will populate with all available fan 

settings (Fig. 15). Choose from the following:

I.  High 

– The high fan will run continuously until another setting is chosen

II.  Low 

– The low fan will run continuously until another setting is chosen

III.  Auto

 – The fan will run when the HVAC system calls for heating or cooling and then shut off 

after the set point is reached.

NOTE: 

The fan will continue to run for two minutes after the set-point has been reached in order to cool 

the compressor/furnace.

D. 

Once you select the desired fan setting, press the "Close" button (Fig. 15A).

4. 

In the center of the screen there will be a temperature with a radius around it (Fig. 16). On that radius 

will be a white circle. To adjust the set-point:

A. 

Press and hold the white circle to drag it around the radius. Clockwise around the radius will raise 

the set temperature. Counterclockwise around the radius will lower the set temperature.

B. 

Once the desired set-point is reached, remove finger from the white circle.

NOTE: 

In "Heat/Cool" mode will be two white circles (Fig. 17). One to the left sets the low end of the 

temperature range and one to the right sets the high end of the temperature range.

5. 

To the right of the set temperature and radius the system status is displayed, 

e.g. currently 78° F cooling, currently 65° F heating with gas, currently 72° F idle.

Fig. 16 

Fig. 17 

Fig. 15 

A

Summary of Contents for OneControl HVAC Control 2.0

Page 1: ...Rev 11 09 20 OneControl HVAC Control 2 0 OEM INSTALLATION MANUAL ...

Page 2: ...th the following appliances 1 Single stage LP gas furnaces with self contained fan control 2 Conventional air conditioning systems with one or two speed fans 3 Combination air conditioning heat pump systems with one or two speed fans TABLE OF CONTENTS Introduction 2 Compatability 2 Specifications 3 Safety 3 Resources Required 3 Preparation 4 Prior to Installation 4 Connections 4 Installation 4 Con...

Page 3: ...op A C System includes HP Orange wire Air Conditioning No A C system in this zone This zone has A C HP setting ignored LP Gas Heat No gas furnace installed Gas furnace installed Furnace has own fan Specifications The HVAC control system includes a capabilities switch which must be set to correspond with the attached equipment The switch settings are as follows Ensure that power is properly disconn...

Page 4: ... the switch to the left for any function not used in each zone For example a zone with an air conditioner dual speed fan and LP gas heat would be A Dual Speed Fan ON B Heat Pump OFF C Air Conditioning ON D LP Gas Heat ON Installation The HVAC controller is a CAN bus network enabled module that allows integration of up to three zones of HVAC plus generator with hour meter and auto start with the On...

Page 5: ... or Zone2 to prevent accidental swapping Utilize Zone3 for Triple zone 4 Connect both CAN bus cables Fig 4 from the CAN ports in controller Fig 1B 1C in order to link the module into the CAN network Fig 3 Note Heat pump system must have a single wire heat demand configuration The controller does not support independent contacts for the heat pump reversing valve but rather drives a single lead for ...

Page 6: ...nance Note The controller implements an automatic priming cycle at the beginning of the startup sequence A solenoid priming click will be heard a few seconds before the generator engine is started Fig 5 Fig 6 B B A A Note Figures 5 and 6 illustrate all harness connections to the controller 1 12V DC power and ground Fig 5C 6C 2 CANBUS data wires Fig 5D 6D in proper sequence with OneControl system c...

Page 7: ...rol HVAC control system Use the following guidelines to determine the location for the sensor A The sensor should be mounted at least 54 but no higher than 66 above floor height B Install the zone sensor on an interior wall Avoid installation on outside walls Note Do not mount the sensor in close proximity less than 36 to direct heat or cold air sources Avoid locations close to outside doors windo...

Page 8: ...evice Fig 9 Note It will take a few moments to start up and load the system Fig 9 Fig 11 Fig 10 A Operation Adhere to all local and national codes Disconnect all external A C power to the unit before installing removing or cleaning 2 To enter or exit sleep mode press and release the power button Touch Panel 1 Locate OneControl control panel Fig 10 2 Press the icon of the system you wish to operate...

Page 9: ...te zone Choose from the following I Heat Cool In this mode choose a high and low set point and the HVAC system will operate to keep the temperature between those 2 set points II Heat In this mode choose your desired set point and the furnace or heat pump will operate to keep the temperature at that set point If equipped with a heat pump you will be prompted to choose a heat source The options are ...

Page 10: ...ting press the Close button Fig 15A 4 In the center of the screen there will be a temperature with a radius around it Fig 16 On that radius will be a white circle To adjust the set point A Press and hold the white circle to drag it around the radius Clockwise around the radius will raise the set temperature Counterclockwise around the radius will lower the set temperature B Once the desired set po...

Page 11: ...d 12V to Zone 12V to Zone Compressor Rev Valve High Fan Low Fan Heat Demand LP Gas Supply Zone T Sense Outdoor T Sense optional Color Signal Zone Connect Red Common 6 White Gas Heat 2 Green High Fan 8 Yellow Compressor 3 Orange Rev Valve 4 Gray Low Fan 7 Blue Zone Temp Input 1 Sensor Power 5 Blue w stripe 8 7 6 5 4 3 2 1 OEM will connect red common wire to 12v or 12v ground depending on manufactur...

Page 12: ... AC Neut AC Hot AC Neut Gnd Gnd 12V to Zone 12V to Zone Compressor Rev Valve High Fan Low Fan Heat Demand LP Gas Supply Zone T Sense Outdoor T Sense optional Color Signal Zone Connect Brown Gnd 1 Red Zone Power 12V DC 7 White Gas Heat 2 Green High Fan 8 Yellow Compressor 3 Orange Rev Valve 9 Gray Low Fan 4 Pink Reserved 10 Blue Zone Temp Input 5 Purple Freeze Detect Input 11 Blue w stripe Sensor P...

Page 13: ...Rev 11 09 20 Page 13 CCD 0001450 Notes ...

Page 14: ...tive has been provided Any unauthorized use shall void any applicable warranty The information contained in this manual is subject to change without notice and at the sole discretion of LCI Revised editions are available for free download from lci1 com Please recycle all obsolete materials For all concerns or questions please contact Lippert Components Inc Ph 574 537 8900 Web lci1 com Email custom...

Reviews: