background image

10

Installing LCS with Legacy AND TrainMaster Command Bases 

(continued)

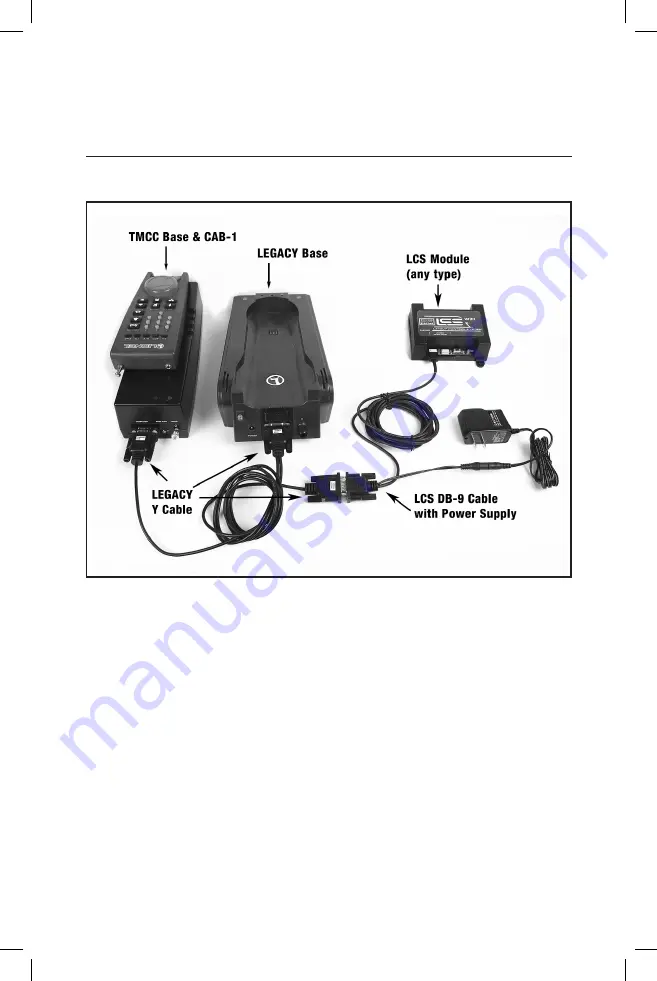
Your system should resemble the figure below. 

Once connected and powered-up, the yellow LED on the Legacy Base will blink once every second. 

With this setup, you can control Lionel locomotives and Layout Control System products using any 
combination of LEGACY Remotes, CAB-1L remotes and original CAB-1 remotes. 

If you have additional LCS devices to install, see “Installing additional LCS devices”. If not, skip 

ahead to the next section of this manual, “Configuring your LCS Device.”

Figure 6. Installing LCS with Legacy AND TrainMaster Command Bases

Installing Your First LCS Device

Summary of Contents for LCS BPC2

Page 1: ...78 1640 250 8 14 Lionel Block Power Controller 2 BPC2 Owner s Manual LCS PDI CABLES use either connector AC Power PROGRAM A U A U BPC2 BLOCK BLOCK COMM COMM 8 7 6 5 4 3 2 1 6 81640...

Page 2: ...d Bases 9 10 Installing a new LCS system with NO Command Base 11 Installing additional LCS devices Installing additional LCS devices 12 Configuring Your BPC2 Configuring your BPC2 13 Connect accessory...

Page 3: ...nel ZW ZW MagniVision TMCC Lionelville Wireless Tether Powerhouse LionMaster Conventional Classics Postwar Celebration Series TruRail PH 1 Powerhouse Powermaster Powerstation Powerhouse Accessory Moto...

Page 4: ...ER2 for computer control and use of existing Lionel serial devices like the TPC 300 and TPC 400 How it works As you know your Lionel Cab Remote sends commands to your Command Base In turn the base con...

Page 5: ...Power PROGRAM A U A U BPC2 BLOCK BLOCK COMM COMM 8 7 6 5 4 3 2 1 6 81640 Figure 2 LCS BPC2 Module Wiring your railroad for blocks has several advantages By turning off track power blocks when not in...

Page 6: ...CS DB 9 Cable with Power Supply Every LCS system requires exactly one 6 81499 LCS DB 9 Cable with Power Supply This special cable has three connectors A a DB 9 with a pig tail cable mount power supply...

Page 7: ...Restore power to your layout and Legacy Base 6 Plug in the LCS wall pack power supply If using a Legacy command base it must have software rev 1 52 or higher installed Your system should resemble the...

Page 8: ...SensorTrack or any other Layout Control System product 5 Restore power to your layout and Base 1L 6 Plug in the LCS wall pack power supply Your system should resemble the figure below Once connected a...

Page 9: ...h a Legacy Command Base an original TMCC Command Base and a Legacy Serial Y Cable 1 Turn off power to your layout Legacy Base and TMCC TrainMaster command base 2 Connect the DC wall pack to the female...

Page 10: ...tup you can control Lionel locomotives and Layout Control System products using any combination of LEGACY Remotes CAB 1L remotes and original CAB 1 remotes If you have additional LCS devices to instal...

Page 11: ...E 4 Leave the DB 9 connector of the LCS DB 9 Cable unconnected 5 Plug in the LCS wall pack power supply With this setup you can control other Layout Control System products using compatible software o...

Page 12: ...ch new device is connected via LCS PDI cables in a daisy chain fashion one to the next and so on The order of devices in the chain is up to you The only exception is that an LCS WiFi must be the first...

Page 13: ...ew terminals C LCS PDI cable inputs Use either connector D Red LCS PDI activity indicator E Program switch used to set the BPC2 s TMCC ID base address F Relay Power terminals Figure 8 BPC2 call outs T...

Page 14: ...equired by your locomotives or any other device drawing power from the track That is the job of the Track Power transformer not included Proper connection of Track Power transformers to a BPC2 is desc...

Page 15: ...will be automatically turned on at power up 4 Sub mode setting The 8 TMCC ID choice is recommended The 1 TMCC ID sub mode is reserved for future use and won t work with a Cab remote PGM TRACK 8 TMCC I...

Page 16: ...id for 1 second and then continue flashing 6 Now you may optionally press the Coupler R button Doing so turns on the restore last relay settings on power up feature 7 Finally set the 8 TMCC ID sub mod...

Page 17: ...ion with a Cab remote To operate your BPC2 in ACCESSORY address mode 1 Press the ACC button on your remote 2 Enter the ID number matching the address range set in the configuration step above Hint thi...

Page 18: ...he BPC2 Refer to Figure 8 letter B The label Block shows which terminals correspond to power blocks 1 through 8 Power block 1 through 4 share one common connection and 5 8 share another Keep in mind t...

Page 19: ...wer block to your BPC2 1 Attach one wire to the Power A terminal on your power supply and connect it to the COMM terminal of the BPC2 2 Attach another wire to the Common Ground U terminal on the power...

Page 20: ...former must be jumpered to both the COMM terminals on the BPC2 Your Track Power transformer must have sufficient capacity to operate the combined current draw of all operating locomotives on all activ...

Page 21: ...ion of your layout each locomotive is currently in In this example if the BPC2 had a TMCC ID base address of 10 Main 1 and Main 2 would be addressed via ID 10 and 11 The Sidings would be addressed via...

Page 22: ...ht TMCC ID Recall that each BPC2 has a base address that you must assign see page 15 Use the base address to determine the specific TMCC ID of each of up to four connected switches Switch 1 s ID is th...

Page 23: ...rs when commands are passing through the LCS PDI bus Specifications of the LCS BPC2 Mechanical Size 3 7 x 2 7 x 1 2 Mounting Two 4 pan head sheet metal screws Electrical Input PDI supply current 50 mA...

Page 24: ...not apply to you This warranty gives you specific legal rights and you may have other rights which vary from state to state Instructions for Obtaining Service If service for this Lionel LLC product is...

Reviews: