

A Division of Cisco Systems, Inc.
®
Model No.
Quick Installation
Model No.
Wireless
WRT55AG
Broadband Router
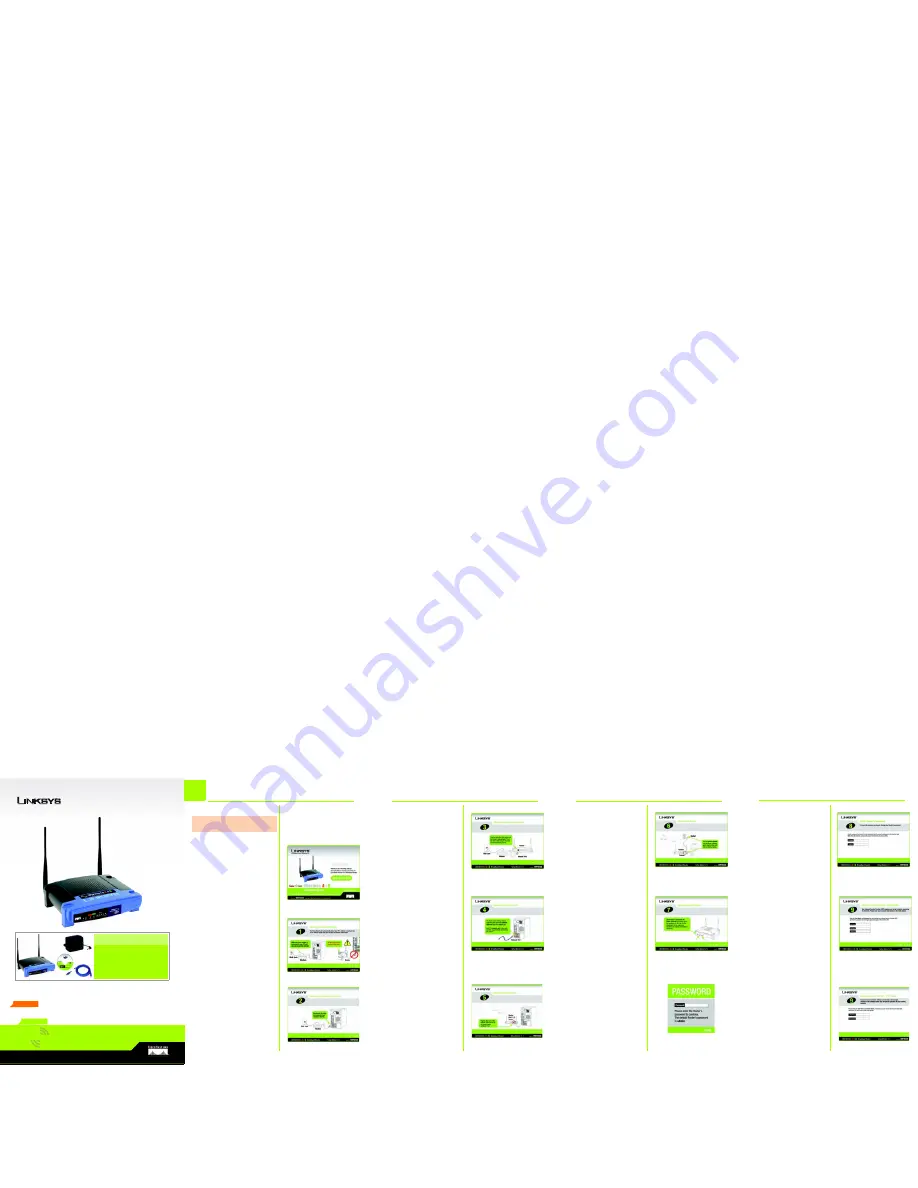
Package Contents
• Dual-Band Wireless A+G Broadband Router
• Setup CD-ROM with Symantec Internet Security
• User Guide on CD-ROM
• Power Adapter
• Ethernet Network Cable
• Quick Install Guide
• Registration Card
1
A
Locate your PC’s CD-ROM
drive and insert the Setup CD-
ROM. The Setup Wizard should
run automatically and the
Wel-
come
screen should appear. If
it does not, click the
Start
but-
ton and select
Run
. In the field
that appears, enter
D:\setup.exe
(if “D” is the letter
of your CD-ROM drive).
B
When the
Welcome
screen
appears, click the
Click Here
to Start
button in the middle of
the screen.
C
The first screen reminds you
that you need a
modem
con-
nected to your
PC
and an
Internet connection
before
you start.
D
Screen 2 asks you to discon-
nect the cable that connects
the
modem
to the
PC’s net-
work port
.
3
E
I
B
H
E
Then the next screen asks you
to reconnect the modem’s
cable to the
Internet
port on
the back of the Router.
F
Screen 4 asks you to locate
the supplied network cable
and the PC’s network port from
where you disconnected the
modem. Connect one end of
the network cable to the net-
work port.
G
Connect the other end of the
network cable to one of the
numbered ports on the back
of the Router.
J
K
Screen 8 asks you to change
the password to make your
Router more secure. Enter a
new password, which can be
between 1 and 32 characters,
in the
Password
field, then
repeat it in the
Confirm
field.
L
The Screen 9 you see will
depend on the Internet con-
nection that is detected by the
Setup Wizard.
If you have a DSL Internet con-
nection (L1) and your Internet
Service Provider (ISP) requires
you to log in to the Internet,
enter your Internet User Name
and Password in the fields, and
click
Next
.
If you have a cable Internet
connection (L2), your Host
Name and Domain Name will
appear in the fields. Click
Next
.
L2
H
Screen 6 asks you to locate
the supplied power adapter.
Connect one end to the power
port on the back of the Router,
and the other to an electrical
outlet.
I
Screen 7 asks you to look for
the LEDs on the front of the
Router. Make sure that the LEDs
are lit for Power, Internet, and
one of the numbered network
connections.
If an LED isn’t lit, check your
connections again.
If a Static IP Internet connec-
tion is detected, the Setup Wiz-
ard will help you configure the
network settings.
J
If your Router is connected
correctly, a
Password
screen
will appear. Enter the default
admin
in the field. Then, click
Enter
.
Router Installation using the Setup
Wizard
C
D
F
G
L1
K
Wireless
A
+
G
Dual-Band
Dual-Band
GHz
2.4
802.11g
+
GHz
802.11a
5
NOTE:
Do not connect the Router until
instructed to do so.


