

W W W . L I N K S Y S . C O M
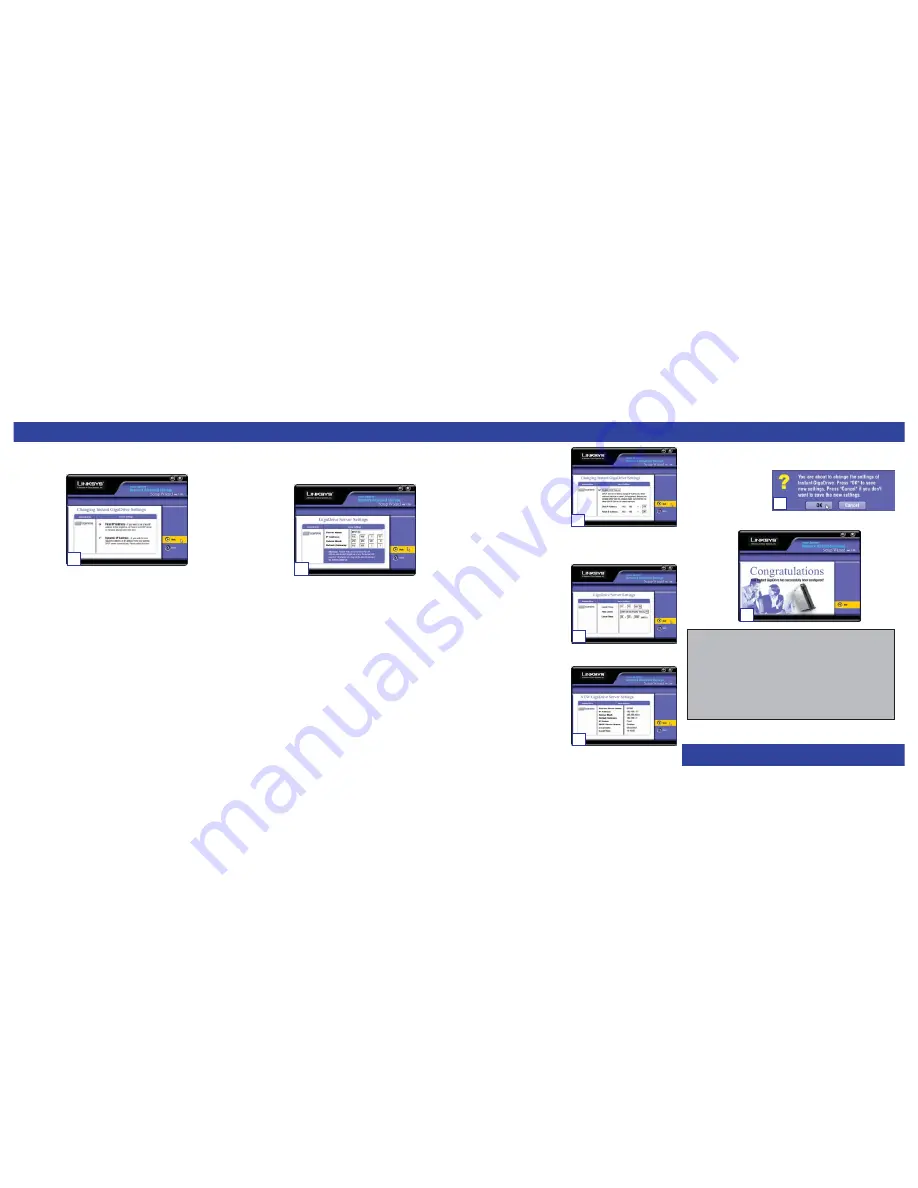
D. The first settings that you can change are the EFG120’s IP Address settings. As
shown, select the radio button beside either
Fixed IP Address
or
Dynamic IP
Address
.
The
Fixed IP Address
is set by default (
192.168.1.77
). Use this setting if there
is no DHCP server on your network and you want the EFG120 to use a static IP
Address. With the Fixed IP Address setting, you can also use the EFG120 as your
network’s DHCP server. Use the
Dynamic IP Address
setting if you already
have a DHCP server setting IP Addresses on your network devices.
Click the radio button next to your selection. Then, click the
Next
button on the
right to proceed or the
Back
button to return to the previous screen.
Proceed to the next step if you are selecting the Fixed IP Address setting. If
selecting Dynamic IP Address, proceed to Step 7.
E. If you chose Fixed IP Address in the previous step and clicked the
Next
button,
you will see the screen shown below. On this screen, you will set the EFG120’s IP
Address and network information. Enter the following information and click the
Next
button on the right to proceed or the
Back
button to return to the previous
screen.
Server Name.
This is the name used to identify the EFG120 on your network.
This name can be up to 12 alphanumeric digits long.
IP Address.
Set the EFG120’s IP Address here, making sure that it is on the same
LAN segment as the PC running the Setup Wizard.
Subnet Mask.
The Subnet Mask must match the other devices on your network. It
is set by default to 255.255.255.0.
Default Gateway.
This value is left blank by default. If you have a router on your
network, however, enter its IP Address here.
F. From the next screen, you can set the
EFG120 as your network’s DHCP serv-
er if no other device is functioning as a
DHCP server on your network. If you
wish to use the EFG120 as a DHCP
server, click the box next to
Enable
DHCP Server
. Then, enter the range
of IP Addresses you want to assign on
your network. The first three
Start
and
Finish
fields must match the
EFG120’s IP Address with the final
fields ranging from 2 to 250.
Click the
Next
button on the right to proceed or the
Back
button to return to the
previous screen.
G. From the next screen, you can change
the time and date on the EFG120.
Time Zone.
Select your local time
zone from the drop-down menu here.
Local Date.
Set your current date here.
Local Time.
Set your current time
here.
Click the
Next
button on the right to proceed or the
Back
button to return to the
previous screen.
H. On the next screen, review the
EFG120’s settings. If they are correct,
click the
Save
button on the right. If
you would like to change them, click
the
Back
button to return to a previous
screen.
I. A screen will appear cautioning you that changes to the EFG120’s settings are
being made. To save these changes, click the
OK
button or click the
Cancel
but-
ton to return to the previous screen.
J. You have now successfully set up the EFG120 with the Setup Wizard. Click the
Exit
button to exit the Setup Wizard.
F
E
G
D
QI-efg120-30606A KL
For additional information or troubleshooting help, refer to the User Guide
on the Setup CD-ROM. You can also call or email for further support.
24-hour Technical Support
800-326-7114 (toll-free from US or Canada)
E-mail Support
Website
http://www.linksys.com or
http://support.linksys.com
RMA (Return Merchandise
http://www.linksys.com/support
Authorization)
FTP Site
ftp://ftp.linksys.com
Sales Information
800-546-5797 (800-LINKSYS)
H
I
J


