Copyright
©
2013 Linear LLC
. All rights reserved.
233191 AX1
3 August 2013
3
Make a Network Connection
STEPS
Before connecting the system to the corporate network, you must make a network
connection to a local PC or laptop, which you will use to set the controller’s IP
values.
1. Pull the Ethernet cable through a knockout in the
eMerge
cabinet.
Cable specification: CAT 5 or better with an RJ-45 connector wired straight
through connecting to a network hub, switch, or router.
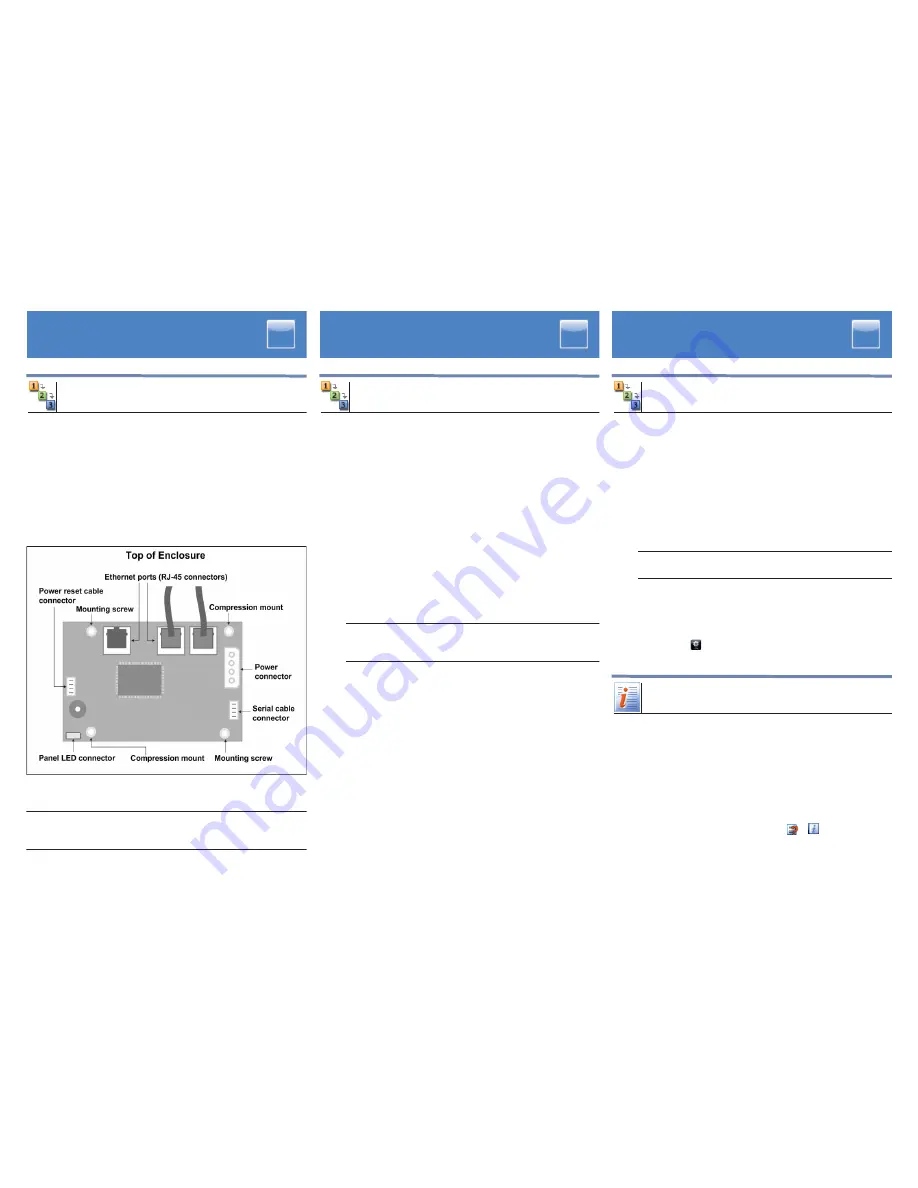
2. Open the enclosure and locate the SAM-E module, which is attached to
the upper left side of the cabinet and is shown below.
3. Plug the RJ-45 connector into the available Ethernet port on the
SAM-E module.
4. Connect the other end of the Ethernet cable directly to a local laptop or PC
that is not connected to the network.
Important:
Do not connect the system to the corporate network until you have set the
controller IP values using this local connection.
5
Log Into the System
STEPS
1. Set the laptop or PC back to an IP address on the corporate network. All
further configuration work can be done through the corporate network.
2. Open a browser on the laptop or PC, point it to the IP address you set for
the controller, and press
ENTER
.
3. On the page that appears, the
Activation Key
and
Product Key
boxes should contain the correct keys for your system.
If these keys are not entered into the system, you will need to enter them
manually. They are included on a license label that is shipped with the
system.
4. After reviewing the license agreement, click
Apply
to accept it.
Important:
Click
Apply
only once.
5. At the login page, enter the username
admin
and enter the password
admin
.
6. Click
Go
.
7. To use the provided setup wizards, click the Setup button in the
navigation bar
and click the link for the wizard you want to use.
8.
MORE INFORMATION
Documentation Resources
Locations
Hardware Installation Guide
Initial Software Setup Guide
Network Node Hardware Installation Guide
MicroNode Hardware Installation Guide
User Guide
Download guides in PDF format from
www.
FNFSHF11FMJOLT
.com
.
Online help
Click
or
to open the online
help.
4
Set the Controller’s IP Values
STEPS
1. Momentarily press the
Power
button, located on the outside left panel of
the
eMerge
cabinet.
The front panel LED will blink red, then turn solid red. You will hear one
beep when the system has started.
2. Make sure the local laptop or PC you will use for the configuration is
connected to the controller via an Ethernet switch, and that its IP address
has been changed to a static value of 192.168.0.X (where X is a number
between 2 and 254, but not including 249, 250, or 251).
3. Open a browser window on the laptop or PC, and enter in the address field
the default IP address for the
eMerge
controller:
192.168.0.250
.
4. Press
ENTER
.
5. If the Initmode page is not displayed, log into the system, select
Setup :
Site Settings : Network Controller
from the Main Menu, then
click the link in the Initmode Settings section.
6. Fill in the Network Settings section, using values obtained from the
network administrator.
Important:
If you change the IP address of the controller, record the new address,
because you will need it to log into the system later.
7. (optional) Enter values for any of the Time Settings options. You can
change Email Settings values later, if you decide to use email alerts.
8. In the Web Server Settings section, DO NOT change the default HTTP port
number (80) unless the network administrator provides a different
number.
9. In the Initmode Settings section, select
No
from the drop-down list, to
ensure that the Initmode page will not appear after each reboot.
10. Click
Save
.
The system displays a “restarting Web Server” message and the front
panel LED blinks red. It may take several minutes for the system to shut
down and restart. When it restarts, you will hear a single beep and see a
“Data saved” message.
11. Connect the system to the corporate network.If the system is functioning
properly, the amber LED on the Ethernet port will light.


