background image

69

DO9248J

www.domo-elektro.be

SK

PREDPRIPRAVENÉ OVOCIA A ZELENINY

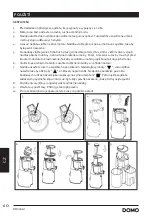
 · Ovocie / zeleninu očistite a nakrájajte na menšie kusy. Napríklad mrkva by mala byť pred 

odšťavovaním nakrájaná na tenké plátky o veľkosti 15 mm x 15 mm (alebo tenké prúžky).

 · Z ovocia odstráňte kôstky, tvrdé semená aj stopky, aby sa nepoškodil lisovacie šnek! Do 

odšťavňovacího otvoru (nádoby) nevkladajte žiadne pecky ako napríklat zo sliviek, z manga, marhúľ 
atď .. 

 · Suroviny s pevnou alebo nepožívateľnou šupkou sa musí predtým olúpať. Z citrusových plodov musí 

byť odstránená šupka aj semienka! Pri lisovaní melónov musíte odstrániť semienka!

 · Je zakázané spracovávať kokosové orechy s ich škrupinou ani celej stonky cukrovej trstiny alebo 

podobne tvrdé suroviny, pretože by to mohlo poškodiť motor.

 · Suroviny s pevným vláknami nakrájajte na kúsky s dĺžkou 3-5 cm (hrubé max 2 cm).
 · U listovej zeleniny a surovín s dlhými vláknami (ako je stonkový zeler alebo bylinky atď.): Stonky 

nakrájajte na plátky s dĺžkou 3 až 5 cm a listy byliniek tiež rozkrájajte alebo dobre stočte, aby sa vlákna 
čo najviac prerušila.

 · Zmrazené potraviny musíte predtým nechať povoliť / rozmraziť. Nikdy do prístroja nevkladajte kocky 

ľadu.

 · Nikdy nespracovávajte suroviny s vysokým obsahom rastlinného alebo živočíšneho oleja, aby nedošlo 

k degradácii a poškodeniu lisovacieho závitovky.

 · Nikdy do prístroja nedávajte kusy cukrovej trstiny, dužiny kokosu ani cereálie, bez toho aby ste ich 

namočili do vody (napr. Fazuľa či ryža).

 · Nikdy prístroj nepřplňujte a skôr vkladajte plynulejšie a menšie množstvo surovín. Potraviny s 

vláknami alebo nižším obsahom tekutiny musí byť nakrájané na menšie kúsky a lisované po malých 
častiach plynule.

 · Neodporúča sa spracovávať tvrdé ovocie alebo zeleninu vysokým obsahom škrobu.

POUŽITIE

Hlavný spínač má 3 pozície: 

 · Zapnuté - I 
 · Vypnuté - 0 
 · Spätný chod - R 

1. 

Zo začiatku by mal byť prístroj vypnutý a vytiahnutý z el. siete. 

2. 

Umiestnite obe nádoby pod oba otvory lisovacej komory.

3. 

Zapnite prístroj - “poloha I”.

4. 

Cez plniaci otvor vo veku vkladajte kúsky ovocia / zeleniny a pomocou tlačidielka tlačte do komory. 
Suroviny vkladajte do otvoru postupne (približne každých 5 sekúnd). Nesnažte sa ich zbytočne 
Pechová a ltačit do prístroja silou. Nikdy odšťavovač nepreplňujte a nepřehlcujte.

Tip. Začnite odšťavovať tvrdšie ovocie / zeleninu a potom prejdite na mäkšie.

!

 POZOR: do plniaceho otvoru nestrkajte prsiami ani iné predmety. Nevkladajte ani lyžičky, vidličky, 

nože a iné pevné predmety. Pre tlačenie potravín do komory používajte iba originálne vtláčadlo.

!

 Nikdy nepúšťajte prístroj na prázdno.

5. 

Po začatí odšťavovanie začne po niekoľko sekundách vytekať z výpustu čistý džús.

6. 

Ak sa prístroj počas procesu zastaví (zasekne) stlačte spätný chod R a chvíľu držte pre otáčanie v 
opačnom smere. To by malo uvoľniť akékoľvek zaseknutie. Uvoľnením spínača zastavíte spätný 
pohyb. Pozor: Nikdy počas prevádzky neprepínajte vypínačom priamo z polohy “I” do “R” alebo 
z “R” do “I”. Vždy vypnite do polohy “O” nechajte zastaviť a potom prepnite do opačného smeru. 

Summary of Contents for DOMO DO9248J

Page 1: ...ealth Booster Gebrauchsanleitung Slow Juicer Health Booster Instruction booklet Slow Juicer Health Booster Manual de instrucciones Slow Juicer Health Booster Istruzioni per l uso Slow Juicer Health Booster Návod k použití Slow juicer odšťavňovač BOOSTER Návod na použitie Slow juicer odšťavovač BOOSTER ...

Page 2: ...detenidamente todas las instrucciones Conserve este manual para futura referencia Leggere con attenzione le istruzioni conservarle per future consultazioni Před použitím si důkladně přečtěte tento manuál manuál si uschovejte i pro případ budoucího nahlédnutí Pred použitím si dôkladne prečítajte tento manuál manuál si uschovajte aj pre prípad budúceho nahliadnutie Required for R32 R290 Refrigerant ...

Page 3: ...in de winkel waar je het toestel hebt aangekocht De garantie op accessoires en onderdelen die onderhevig zijn aan slijtage bedraagt 6 maanden De garantie en verantwoordelijkheid aansprakelijkheid van de leverancier en fabrikant vervallen automatisch in de volgende gevallen Bij het niet naleven van de instructies in deze handleiding Bij verkeerde aansluiting vb te hoge elektrische spanning Bij verk...

Page 4: ...or gebruik na of het voltage vermeld op het toestel overeenkomt met het voltage van het elektriciteitsnet thuis De voedingskabel moet steeds aangesloten worden op een stopcontact dat geïnstalleerd en geaard is volgens de lokale standaarden en normen Laat het snoer niet op een heet oppervlak of over de rand van een tafel of aanrecht hangen Houd het snoer uit de buurt van scherpe randen en hete onde...

Page 5: ...eef beschadigd is Het mes is scherp Gebruik altijd de voedselduwer Gebruik alleen de voedselduwer om het voedsel in het toestel te geleiden Steek nooit je vingers of vreemde voorwerpen in de vultrechter als het apparaat aan staat of als de stekker in het stopcontact zit Als er voedsel vast komt te zitten in de opening gebruik dan de stopper of een ander stuk fruit of groente om dit omlaag te duwen...

Page 6: ...n maintain its pure color natural taste nutrients and vitamins T juice cup from the juice spout and the pulp will be ejected from collected by pulp container When using the juicer the pulp co must be assembled in position The details will be described in th FOR THE INITIAL USE 1 Unpack the appliance and place all parts on a horizontal surfac 1 2 4 5 9 10 11 8 3 6 7 13 12 12 FUNCTION DESCRIPTION Th...

Page 7: ...ing Fig 2 4 4 Do not put overmuch materials in the juicer each time with less moisture and hard fibre shall be put into the jar slices 5 Do not put overmuch materials in the juicer each time with less moisture and hard fibre shall be put into the jar slices 6 Assemble the buffer plate well in position The buffer plate shall be assembled well in the residue outle time ASSEMBLE YOUR SLOW JUICER 1 Pu...

Page 8: ...s kudzu of peulvruchten en graangewassen bv bonen rijst in deze slowjuicer zonder ze eerst te weken in water Doe nooit te veel voedingsmiddelen gelijktijdig in het apparaat Daarom moeten voedingsmiddelen met weinig vocht en harde vezels in schijfjes worden gesneden alvorens ze in de vultrechter te steken Het is niet aangeraden om harde vruchten of groenten die rijk zijn aan vezels en zetmeel te ve...

Page 9: ...het automatisch uitschakelen 2 Zet het toestel uit O 3 Wacht 10 min en druk daarna de resetknop onderaan het toestel in om het toestel terug in te schakelen 4 Druk daarna de aan uit en omkeerschakelaar naar stand R en houd de schakelaar gedurende enkele seconden ingedrukt Probeer dan het toestel opnieuw in te schakelen stand I Als de omkeerfunctie niet werkt zet het apparaat dan uit trek de stekke...

Page 10: ...sh the axis of 7 at the jar bottom with e grinding head out of the jar ontainer and then clean the jar lid grinding head strainer jar and running water When cleaning the strainer only need to brush the strainer under running water with the small cleaning brush for he whole strainer can be cleaned well arp so handle carefully during cleaning etal sponge to clean it will damage the machine the resid...

Page 11: ...at dit product op de correcte manier wordt verwijderd voorkom je mogelijk voor mens en milieu negatieve gevolgen die zich zouden kunnen voordoen in geval van verkeerde afvalbehandeling Voor meer details in verband met het recycleren van dit product neem je best contact op met de gemeentelijke instanties het bedrijf of de dienst belast met de verwijdering van huishoudafval of de winkel waar je het ...

Page 12: ...contraire brutale ou anormale Entretien insuffisant ou non conforme Réparation ou modification de l appareil par le consommateur ou un tiers non autorisé Utilisation d éléments ou d accessoires qui ne sont pas recommandés ou fournis par le fournisseur fabricant CONSIGNES DE SÉCURITÉ Les consignes de sécurité suivantes doivent être respectées lors de l utilisation de tout appareil électrique Lisez ...

Page 13: ...ée et mise à la terre conformément aux normes et standards locaux Ne laissez pas le cordon d alimentation pendre sur une surface chaude ni sur le rebord d une table ou d un plan de travail Tenez le cordon électrique à distance de parties chaudes et ne couvrez pas l appareil Déroulez complètement le cordon d alimentation Ne laissez pas le cordon d alimentation se coincer sous l appareil ou pendre a...

Page 14: ...areil N insérez pas à aucun moment vos doigts ou d autres objets étrangers dans l extracteur de jus à vitesse lente alors qu il est en fonctionnement et encore branché à la prise de courant Si l aliment est logé dans l ouverture utiliser le poussoir ou un autre morceau de fruit ou de légume pour le pousser vers le bas Lorsque cela n est pas possible cependant arrêtez le moteur débranchez la fiche ...

Page 15: ... juicer squeezes instead of grindin maintain its pure color natural taste nutrients and vitamins T juice cup from the juice spout and the pulp will be ejected from collected by pulp container When using the juicer the pulp co must be assembled in position The details will be described in th FOR THE INITIAL USE 1 Unpack the appliance and place all parts on a horizontal surfac 1 2 4 5 9 10 11 8 3 6 ...

Page 16: ...ut it into the jar There are g juice strainer jam strainer and frozen dish strainer for your he grinding head into the jar and ensure the grinding head is covered motor unit see Fig 3 ners including juice strainer jam strainer and frozen dish strainer Fig 2 ermuch materials in the juicer each time therefore the materials re and hard fibre shall be put into the jar lid after being cut into ermuch m...

Page 17: ...RÉPARATION DES FRUITS ET OU LÉGUMES Nettoyez les fruits et légumes et coupez les en morceaux Par exemple les carottes doivent être découpées en tranches minces d environ 15 mm x 15 mm avant d être insérées dans la machine Enlevez les graines ou noyaux durs avant le pressage pour éviter d endommager la vis de pressage Les noyaux de pêche de prune de mangue et d abricot ne doivent pas être insérés d...

Page 18: ... position R ou I Si cela ne donne pas le résultat escompté éteignez l appareil enlevez la fiche de la prise de courant démontez l appareil et remontez à nouveau l appareil conformément aux instructions Essayez ensuite d allumer à nouveau l appareil 7 Lorsque le verre doseur est plein max 400 ml ou si le jus a été pressé des aliments mettez l interrupteur en position Arrêt O puis videz le verre dos...

Page 19: ...les autres pièces en ordre inverse du montage 5 S il est difficile d enlever la vis de pressage mettez le bol sur la surface de travail et maintenez la vis de pressage d une main puis poussez sur l axe de la vis en bas du bol de l autre main jusqu à ce que la vis de pressage se détache nd grinding head from the detach the grinding head rking table and hold the and then push the axis of 7 at the ja...

Page 20: ... est éliminé correctement vous favorisez la prévention des conséquences négatives pour l environnement et la santé humaine qui sinon seraient le résultat d un traitement inapproprié des déchets de ce produit Pour obtenir plus de détails sur le recyclage de ce produit veuillez prendre contact avec le bureau municipal de votre région votre service d élimination des déchets ménagers ou le magasin où ...

Page 21: ... beträgt 6 Monate Die Garantie und dieVerantwortung Haftung des Lieferanten und Herstellers entfallen automatisch in den folgenden Fällen Bei Nichtbeachtung der Anweisungen in dieser Bedienungsanleitung Bei falschem Anschluss z B bei einer zu hohen Stromspannung Bei falscher grober oder abnormalerVerwendung Bei unzureichender oder falscherWartung Bei vomVerbraucher oder von nicht ermächtigten Drit...

Page 22: ...überprüfen ob die auf dem Gerät angegebene Spannung mit dem des Stromnetzes übereinstimmt Das Netzkabel muss stets an eine Steckdose angeschlossen werden die gemäß den örtlichen Standards und Normen isoliert und geerdet wurde Lassen Sie das Netzkabel nicht auf einer heißen Oberfläche oder über einenTischrand oder eine Arbeitsplatte herunter hängen Das elektrische Kabel von heißenTeilen entfernt ha...

Page 23: ...b beschädigt ist Das Messer ist scharf Verwenden Sie immer den mitgelieferten Stopfer Verwenden Sie nur den mitgelieferten Stopfer um Nahrungsmittel in das Gerät hineinzuschieben Niemals Ihre Finger oder andere Fremdkörper in den Slow Juicer stecken während dieser in Betrieb und noch in die Steckdose eingesteckt ist Werden Lebensmittel in die Öffnung eingeführt und bleibt ein Stückchen stecken ver...

Page 24: ...ow juicer squeezes instead of grindin maintain its pure color natural taste nutrients and vitamins T juice cup from the juice spout and the pulp will be ejected from collected by pulp container When using the juicer the pulp co must be assembled in position The details will be described in t FOR THE INITIAL USE 1 Unpack the appliance and place all parts on a horizontal surfa 1 2 4 5 9 10 11 8 3 6 ...

Page 25: ...he residue outlet See Fig 2 ner based on your demand and then put it into the jar There are g juice strainer jam strainer and frozen dish strainer for your he grinding head into the jar and ensure the grinding head is covered motor unit see Fig 3 Fig 2 ermuch materials in the juicer each time therefore the materials re and hard fibre shall be put into the jar lid after being cut into ermuch materi...

Page 26: ...mended to process hard fruit or vegetable rich in fiber and starch D The peel and pits should be removed from oranges lemons grapefruits and melons 4 Drop the prepared fruits or vegetables into the jar lid at an even speed and then let the Fig 5 9 VORBEREITUNG DER FRÜCHTE UND ODER GEMÜSE Putzen Sie das Obst und das Gemüse und schneiden Sie es in Stücke Karotten sollten zum Beispiel in dünne Scheib...

Page 27: ...ass fließen 6 Wenn das Gerät während des Gebrauchs klemmt stellen Sie den Ein Ausschalter in die R Position und halten Sie den Schalter gedrückt dann läuft das Gerät in die entgegengesetzte Richtung So lassen sich mögliche Behinderungen beseitigen Lassen Sie den Schalter wieder los um die Rückwärtsdrehung zu stoppen Achtung Während des Betriebs den Netzschalter niemals direkt von I auf R oder von ...

Page 28: ...ot work turn off the machine wing the instructions given After reassembly please try turning on the ntainer is full the max capacity is 400ml or the food has been urn the power switch to the O position and empty the juice container before continuing extracting Fig 6 REINIGUNG UND WARTUNG 1 Um das Auseinandernehmen des Slow Juicers zu erleichtern ihn ohne Inhalt etwa 30 Sekunden lang anschalten nac...

Page 29: ...sen vollständig mit der kleinen Reinigungsbürste reinigen Achtung Verwenden Sie keine Scheuerschwämme aus Metall diese würden das Gerät beschädigen Reinigen Sie das Sieb mit besondererVorsicht Das Sieb hat scharfe Kanten Geben Sie dieTeile niemals in die Spülmaschine HoheTemperaturen können dieTeile beschädigen 8 Reinigen Sie die Kunststoffteile der Motor Basis mit einem feuchtenTuch Tauchen Sie d...

Page 30: ...ity of the supplier and manufacturer lapse automatically in the following cases If the instructions in this manual have not been followed In case of incorrect connection e g electrical voltage that is too high In case of incorrect rough or abnormal use In case of insufficient or incorrect maintenance In case of repairs or alterations to the device by the consumer or non authorised third parties If...

Page 31: ...d and grounded in accordance with all local standards and requirements Do not let the power supply cord hang over the edge of a counter or touch hot surfaces Keep the power cord away from hot parts and don t cover the appliance Unwrap the cord completely to prevent overheating of the cord Do not allow the power cord supply to run underneath or around the unit The appliance may not be used with an ...

Page 32: ...Only use the food pusher to guide food into the juicer Do not put your fingers or other objects into the juicer opening while it is in operation If food becomes lodged in the opening use the food pusher or another piece of fruit or vegetable to push it down When this is not possible however switch off and unplug the appliance and disassemble the juicer to remove the remaining food Avoid contacting...

Page 33: ...tead of grindin maintain its pure color natural taste nutrients and vitamins T juice cup from the juice spout and the pulp will be ejected from collected by pulp container When using the juicer the pulp co must be assembled in position The details will be described in th FOR THE INITIAL USE 1 Unpack the appliance and place all parts on a horizontal surfac 1 2 4 5 9 10 11 8 3 6 7 13 12 12 FUNCTION ...

Page 34: ...e shall be put into the jar slices 5 Do not put overmuch materials in the juicer each time with less moisture and hard fibre shall be put into the jar slices 6 Assemble the buffer plate well in position The buffer plate shall be assembled well in the residue outlet time ASSEMBLE YOUR SLOW JUICER 1 Put the jar downwards and make sure that the residue outl position The jar shall be assembled well in...

Page 35: ...cut into slices before being put into the bowl lid It is not recommended to process hard fruits or vegetables rich in fibres and starch USAGE The on off switch has 3 positions On I Off O Reverse direction R 1 Make sure that the machine is turned off O and put the plug in the outlet 2 Position the 2 measuring cups under the 2 spouts 3 Turn on the on off switch I 4 Insert the pieces of vegetable and...

Page 36: ...rstly press the power switch to O position and top running completely and then turn the power switch from I to I rate the unit before feeding food to avoid damaging the grinding inding head and strainer your fingers or other foreign objects into the feeding opening while f the machine is stuck and irstly press the power n and then press the reset pped at the bottom of After it press and hold the p...

Page 37: ...y you shall firstly pull the buffer plate out of the residue outlet and then clean it completely with the cleaning brush Caution Do not use metal sponges which could damage the machine Be careful when you clean the sieve The sieve is sharp Do not put any parts in the dishwasher The high temperatures might damage the parts 8 Wipe the exterior of the motor block clean with a moist cloth Never submer...

Page 38: ...Lea detenidamente estas instrucciones Conserve este manual para consultarlo posteriormente Antes del primer uso retire todos los materiales de embalaje y etiquetas promocionales Asegúrese de que los niños no puedan jugar con el material de embalaje Este aparato es adecuado para su uso en el ámbito doméstico y entornos similares como Zona de cocina para el personal de tiendas oficinas y otros entor...

Page 39: ...do el aparato está dañado En el caso de que el aparato esté dañado llévelo al servicio de postventa de DOMO o al centro de servicio cualificado más cercano para su inspección reparación o para realizar ajustes eléctricos mecánicos Nunca intente reparar el aparato por su cuenta I INSTALACIÓN No coloque nunca el aparato cerca de materiales inflamables gases o explosivos No utilice el aparato al aire...

Page 40: ...s en la apertura use el empujador u otro trozo de fruta o verdura para presionarlo Cuando no sea posible apague el motor y desmonte el exprimidor para retirar los restos de alimentos No toque las partes móviles No haga funcionar nunca el aparato sin alimentos en su interior No utilice la licuadora más de 15 minutos de un tirón De lo contrario el motor se sobrecalienta Si sale olor a quemado o humo...

Page 41: ...h rather than grinding The slow juicer squeezes instead of grind maintain its pure color natural taste nutrients and vitamins juice cup from the juice spout and the pulp will be ejected fro collected by pulp container When using the juicer the pulp must be assembled in position The details will be described in FOR THE INITIAL USE 1 Unpack the appliance and place all parts on a horizontal surf 1 2 ...

Page 42: ... jar There are g juice strainer jam strainer and frozen dish strainer for your he grinding head into the jar and ensure the grinding head is covered motor unit see Fig 3 ners including juice strainer jam strainer and frozen dish strainer Fig 2 ermuch materials in the juicer each time therefore the materials re and hard fibre shall be put into the jar lid after being cut into ermuch materials in th...

Page 43: ...uld be removed from oranges lemons grapefruits and melons 4 Drop the prepared fruits or vegetables into the jar lid at an even speed and then let the Fig 5 9 PREPARACIÓN DE LAS FRUTAS O VERDURAS Limpie las frutas y las verduras y córtelas en trocitos Por ejemplo corte las zanahorias en rodajas finas de aproximadamente 15 mm x 15 mm antes de introducirlas en la exprimidora lenta Retire las semillas...

Page 44: ...a continuación ponga el interruptor de encendido en R o I Si esto no funciona apague el aparato desconecte el cable de alimentación y encienda la licuadora otra vez siguiendo las instrucciones A continuación trate de encender de nuevo la licuadora 7 Si el vaso medidor está lleno máx 400 ml o si ya se ha exprimido todo el alimento ponga el interruptor de encendido apagado en la posición apagado O y...

Page 45: ...rar el tornillo de prensado coloque el recipiente sobre la superficie de trabajo Sujete el tornillo de prensado con una mano y con la otra empuje el eje del tornillo de prensado en el fondo del recipiente para empujar el tornillo de presión hacia fuera nd grinding head from the detach the grinding head rking table and hold the and then push the axis of 7 at the jar bottom with e grinding head out ...

Page 46: ...ted ayudará a evitar posibles consecuencias negativas para las personas y el medio ambiente que serían causadospor un tratamiento de residuos inadecuado Para obtener información más detallada sobre el reciclaje de este producto póngase en contacto con su ayuntamiento o con la empresa o departamento responsable del servicio de recogida de basura doméstica o con la tienda donde adquirió el producto ...

Page 47: ...lli e gli eventuali adesivi promozionali Assicurarsi che i bambini non giochino con gli imballaggi Questo apparecchio è destinato unicamente all uso domestico e in ambienti analoghi quali Angoli cottura riservati al personale nei negozi negli uffici e in altri ambienti professionali Fattorie Camere di alberghi motel e altre strutture ricettive residenziali Camere per vacanze o ambienti analoghi L ...

Page 48: ...iammabili gas o esplosivi Non utilizzare o conservare l apparecchio all aperto Utilizzare sempre l apparecchio su una superficie stabile asciutta e in piano Non posizionare mai l apparecchio sopra o vicino a un fornello a gas o elettrico oppure in luoghi in cui possa venire a contatto con apparecchi a elevate temperature I UTILIZZO Utilizzare l apparecchio solo per lo scopo per cui è previsto L ap...

Page 49: ...blocco Non toccare le parti rotanti Non avviare mai l apparecchio se non contiene del cibo Non usare l estrattore per più di 15 minuti consecutivi Altrimenti il motore si surriscalda Se durante l utilizzo si avverte un odore di bruciato o si vede del fumo smettere immediatamente di usare l apparecchio Portare l apparecchio al servizio postvendita per controllo o riparazione Dopo ogni utilizzo assi...

Page 50: ... a unique system where fresh rather than grinding The slow juicer squeezes instead of grind maintain its pure color natural taste nutrients and vitamins juice cup from the juice spout and the pulp will be ejected fro collected by pulp container When using the juicer the pulp must be assembled in position The details will be described in FOR THE INITIAL USE 1 Unpack the appliance and place all part...

Page 51: ...ing head into the jar and ensure the grinding head is covered motor unit see Fig 3 ners including juice strainer jam strainer and frozen dish strainer ith each other when operate Juice strainer is used for extracting Fig 2 ermuch materials in the juicer each time therefore the materials re and hard fibre shall be put into the jar lid after being cut into ermuch materials in the juicer each time th...

Page 52: ...ns grapefruits and melons 4 Drop the prepared fruits or vegetables into the jar lid at an even speed and then let the Fig 5 9 PREPARAZIONE DI FRUTTA E O VERDURA Tagliare frutta e verdura in piccoli pezzi Per esempio le carote vanno tagliate in pezzi di circa 15 mm x 15 mm prima di inserirli nell estrattore Rimuovere qualsiasi seme duro dalla frutta o dalla verdura prima di inserirla nell estrattor...

Page 53: ... dalla presa elettrica smontare l apparecchio e rimontarlo seguendo le istruzioni Dopodiché provare a riaccendere l apparecchio 7 Quando il contenitore del succo è pieno la capacità massima è circa 400 ml o quando l estrattore ha terminato di processare il cibo posizionare l interruttore su O per spegnere l estrattore Svuotare il contenitore di succo e quello degli scarti prima di riusare l estrat...

Page 54: ...difficile rimuovere la coclea poggiare l apparecchio su un piano di lavoro Con una mano afferrare la coclea e con l altra spingere sull asse della coclea stessa sul lato inferiore della tazza per spingerla fuori nd grinding head from the detach the grinding head rking table and hold the and then push the axis of 7 at the jar bottom with e grinding head out of the jar ontainer and then clean the ja...

Page 55: ...odotto venga smaltito correttamente aiuterete a prevenire potenziali conseguenze negative per l ambiente e la salute dell uomo che potrebbero essere causate da uno smaltimento non corretto Per maggiori informazioni sul riciclo di questo prodotto consultare le autorità comunali l azienda o il servizio responsabili della raccolta dei rifiuti domestici o il negozio in cui il prodotto è stato acquista...

Page 56: ...a 24 měsíců Záruční doba počíná běžet od převzetí věci kupujícím Práva z vadného plnění uplatňuje kupující u prodávajícího na adrese jeho provozovny v níž je přijetí reklamace možné s ohledem na sortiment prodávaného zboží případně i v sídle nebo místě podnikání Za okamžik uplatnění reklamace se považuje okamžik kdy prodávající obdržel od kupujícího reklamované zboží Reklamaci lze také uplatnit v ...

Page 57: ...je Zástrčku přívodní kabel zapojujte vždy jen do zásuvky která je bez vad a nainstalována uzemněna v souladu se všemi místními normami Elektrický kabel nenechávejte viset přes hranu stolu nebo pracovního pultu a nedovolte Nedovolte aby kabel přišel do styku s horkými plochami tak aby se nepoškodil Přívodní kabel se nesmí dotýkat horkých teplých povrchů Přístroj nikdy nezakrývejte Rozviňte kompletn...

Page 58: ...Buďte velmi opatrní Lisované potraviny vkládejte do odšťavňovače pouze za pomocí originálního pěchovadla Pokud je přístroj zapojen a zapnutý tak nikdy nestrkejte prsty do otvoru pro suroviny Pokud v otvoru uvíznou kousky surovin tak pomocí pěchovadla a jiných surovin zkuste protlačit dolů Pokud se ani to nepovede tak přístroj vypněte odpojte z el sítě Následně rozeberte a vyčistěte Při čištění buď...

Page 59: ...or natural taste nutrients and vitamins juice cup from the juice spout and the pulp will be ejected from collected by pulp container When using the juicer the pulp c must be assembled in position The details will be described in FOR THE INITIAL USE 1 Unpack the appliance and place all parts on a horizontal surf 1 2 4 5 9 10 11 8 3 6 7 13 12 12 FUNCTION DESCRIPTION The low speed juicing juicer is a...

Page 60: ...at the residue outl position The jar shall be assembled well in position properly not operate Besides before operating please check the buff must be assembled well in the residue outlet See Fig 2 2 Then select the strainer based on your demand and then p three strainers including juice strainer jam strainer and froze selection After it put the grinding head into the jar and ensu well into the axis...

Page 61: ...in Potraviny s vlákny nebo nižším obsahem tekutiny musí být nakrájeny na menší kousky a lisovány po malých částech plynule Nedoporučuje se zpracovávat tvrdé ovoce nebo zeleninu vysokým obsahem škrobu POUŽITÍ Hlavní spínač má 3 pozice Zapnuto I Vypnuto 0 Zpětný chod R 1 Ze začátku by měl být přístroj vypnutý a vytažený z el sítě 2 Umístěte obě nádoby pod oba otvory lisovací komory 3 Zapněte přístro...

Page 62: ...ed firstly press the power switch to O position and top running completely and then turn the power switch from I to I rate the unit before feeding food to avoid damaging the grinding inding head and strainer your fingers or other foreign objects into the feeding opening while f the machine is stuck and irstly press the power n and then press the reset pped at the bottom of After it press and hold ...

Page 63: ...yčištění vyústění odpadu tak nejdříve vyjměte gumovou zarážku a celé vyústění pročistěte kartáčkem POZOR Nepoužívejte drátěné kartáče které by přístroj mohly poničít Při čistění sítka buďte velmi opatrní Sítko má ostré hrany Žádné části přístroje nevkládejte do myčky Vyšší teploty v myčce by mohly způsobit zkřehnutí materiálů a případně je poškodit 8 Tělo přístroje otřete vlhkým hadříkem s trochou...

Page 64: ... mesiacov Záručná doba začína plynúť od prevzatia veci kupujúcim Práva z chybného plnenia uplatňuje kupujúci u predávajúceho na adrese jeho prevádzky v ktorej je prijatie reklamácie možné s ohľadom na sortiment predávaného tovaru prípadne aj v sídle alebo mieste podnikania Za okamih uplatnenia reklamácie sa považuje okamih kedy predávajúci dostal od kupujúceho reklamovaný tovar Reklamáciu možno ti...

Page 65: ...m na informatívnym štítku prístroja Zástrčku prívodný kábel zapájajte vždy len do zásuvky ktorá je bez chýb a nainštalovaná uzemnená v súlade so všetkými miestnymi normami Elektrický kábel nenechávajte visieť cez hranu stola alebo pracovného pultu a nedovoľte Nedovoľte aby kábel prišiel do styku s horúcimi plochami tak aby sa nepoškodil Prívodný kábel sa nesmie dotýkať horúcich teplých povrchov Pr...

Page 66: ...pele nožov sú veľmi ostré Buďte veľmi opatrní Lisované potraviny vkladajte do odšťavovača iba za pomocou originálneho tlačidielka Pokiaľ je prístroj zapojený a zapnutý tak nikdy nestrkajte prsty do otvoru pre suroviny Ak v otvore uviaznu kúsky surovín tak pomocou tlačidielka a iných surovín skúste pretlačiť nadol Ak sa ani to nepodarí tak prístroj vypnite odpojte z el siete Následne rozoberte a vy...

Page 67: ...re color natural taste nutrients and vitamins juice cup from the juice spout and the pulp will be ejected fro collected by pulp container When using the juicer the pulp c must be assembled in position The details will be described in FOR THE INITIAL USE 1 Unpack the appliance and place all parts on a horizontal surf 1 2 4 5 9 10 11 8 3 6 7 13 12 12 FUNCTION DESCRIPTION The low speed juicing juicer...

Page 68: ... ASSEMBLE YOUR SLOW JUICER 1 Put the jar downwards and make sure that the residue outl position The jar shall be assembled well in position properly not operate Besides before operating please check the buff must be assembled well in the residue outlet See Fig 2 2 Then select the strainer based on your demand and then p three strainers including juice strainer jam strainer and froze selection Afte...

Page 69: ... bez toho aby ste ich namočili do vody napr Fazuľa či ryža Nikdy prístroj nepřplňujte a skôr vkladajte plynulejšie a menšie množstvo surovín Potraviny s vláknami alebo nižším obsahom tekutiny musí byť nakrájané na menšie kúsky a lisované po malých častiach plynule Neodporúča sa spracovávať tvrdé ovocie alebo zeleninu vysokým obsahom škrobu POUŽITIE Hlavný spínač má 3 pozície Zapnuté I Vypnuté 0 Sp...

Page 70: ... press the power switch to appliance starts to work After a few minutes the juice flow out n the power switch from I to R or from R to I directly at ation If required firstly press the power switch to O position and top running completely and then turn the power switch from I to I rate the unit before feeding food to avoid damaging the grinding inding head and strainer your fingers or other foreig...

Page 71: ...e vyústenie odpadu tak najskôr vyberte gumovú zarážku a celej vyústenie prečistite kefkou POZOR Nepoužívajte drôtené kefy ktoré by prístroj mohli poničiť Pri čistení sitka buďte veľmi opatrní Sitko má ostré hrany Žiadne časti prístroja nevkladajte do umývačky Vyššie teploty v umývačke by mohli spôsobiť skrehnutie materiálov a prípadne ich poškodiť 8 Telo prístroja utrite vlhkou handričkou s trocho...

Page 72: ...essoires en onderdelen online via of scan hier COMMANDEZ d authentiques accessoires et pièces Domo en ligne sur ou scannez ici BESTELLEN SIE die Domo Original Zubehör und Ersatzteile online über oder hier scannen ORDER the original Domo accessories and parts online at or scan here webshop domo elektro be Webshop ...

Reviews: