background image

26

DO9207I

DE

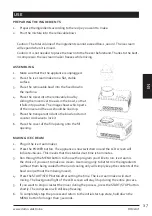
TEILE

1. 

Einfüllöffnung mit Deckel

2.  Durchsichtiger Deckel

3. 

Herausnehmbarer Behälter

4.  Fester Behälter

5. 

Mischer

6.  LCD-Display

7. 

Bedienfeld

8.  Lüftung

9.  Eisportionierer

10.  Messbecher

BEDIENFELD

1. 

LCD-Display

2.  POWER-Taste

3. 

Drehschalter: Zur Zeiteinstellung drehen Sie am Drehschalter. Drehen Sie nach links zur 
Verringerung der Zeit und nach rechts zur Verlängerung der Zeit. Die Standardzeiten 
für die Programme sind: Ice Cream (60 min.), Cooling only (30 min.) und Mixing only (10 
min.).

4.  START/PAUSE-Taste

5. 

MENÜ-Taste -  
Es gibt 3 Auswahlmöglichkeiten:

 · Ice Cream

 · Cooling only

 · Mixing only

VOR DER ERSTEN INBETRIEBNAHME

 · Lassen Sie das Gerät vor dem ersten Gebrauch zunächst 4 Stunden stabil stehen.

 · Reinigen Sie alle Teile der Eismaschine, die mit dem Eis in Berührung kommen: den festen 

Behälter, den herausnehmbaren Behälter, Mischer, Deckel, Deckel der Einfüllöffnung, 

Messbecher und Eisportionierer. Trocknen Sie die Einzelteile vor dem Gebrauch gut ab.

1

2

4

5

3

2

1

4

3

5

6

7

8

9

10

Summary of Contents for Domo DO9207l

Page 1: ...oi Sorbetière Gebrauchsanleitung Eismaschine Instruction booklet Ice cream maker Manual de instrucciones Máquina para hacer helados Istruzioni per l uso Macchina per gelato Návod k použití Zmrzlinovač s kompresorem Návod na použitie Zmrzlinovač s kompresorom ...

Page 2: ...ngen bewahren Sie die Gebrauchsanleitung für spätere heranziehung Read all instructions carefully save this instruction manual for future reference Lea detenidamente todas las instrucciones Conserve este manual para futura referencia Leggere con attenzione le istruzioni conservarle per future consultazioni Před použitím si důkladně přečtěte tento manuál manuál si uschovejte i pro případ budoucího ...

Page 3: ...en of gerepareerd worden De garantieperiode van 2 jaar zal op dit moment niet terug beginnen maar loopt verder tot 2 jaar na de aankoop van het toestel De garantie wordt verleend op basis van het kassaticket Indien je apparaat defect is binnen de garantietermijn van 2 jaar dan mag je het toestel samen met het originele kassaticket binnenbrengen in de winkel waar je het toestel hebt aangekocht De g...

Page 4: ...sen met een beperkte mentale capaciteit of gebrek aan ervaring of kennis op voorwaarde dat deze personen toezicht krijgen of instructies hebben gekregen over het gebruik van het toestel op een veilige manier en dat ze ook de gevaren kennen bij het gebruik van het toestel Kinderen mogen niet met het toestel spelen Het onderhoud en de reiniging van het toestel mogen niet door kinderen gebeuren tenzi...

Page 5: ...ververhitting op de kabel te voorkomen Laat de voedingskabel niet op een heet oppervlak of over de rand van een tafel of aanrecht hangen Laat de voedingskabel niet onder of rond het toestel hangen Sluit de voedingskabel pas op het stopcontact aan nadat het toestel zeker correct gemonteerd is Om het toestel te verwijderen van het stopcontact moet de bediening eerst in de OFF of 0 positie gezet word...

Page 6: ...or de programma s ice cream 60 min cooling only 30 min en mixing only 10 min 4 START PAUSE knop 5 MENU knop er zijn 3 keuzes Ice cream Cooling only Mixing only VOOR HET EERSTE GEBRUIK Laat het toestel eerst gedurende 4 uur staan op een stabiel oppervlak vooraleer het voor de eerste keer te gebruiken Maak alle onderdelen van de roomijsmachine die in aanraking zullen komen met het roomijs schoon de ...

Page 7: ...het te vergrendelen 6 Plaats het deksel van de vulopening op de vulopening ROOMIJS MAKEN 1 Steek de stekker in het stopcontact 2 Druk op de POWER toets Het toestel is nu ingeschakeld en er verschijnt 60 00 op het lcd scherm Dit betekent dat de standaard ingestelde tijd 60 minuten is 3 Kies aan de hand van de MENU knop het programma dat je wil laten lopen Ice cream kan je kiezen om roomijs te maken...

Page 8: ...nneer het toestel niet wordt uitgeschakeld en het ijs niet wordt verwijderd binnen de 10 minuten na het einde van het draaiproces schakelt de machine automatisch over naar de koelfunctie Het toestel zal dan nog in totaal 1 uur nakoelen in intervallen van 10 minuten 10 min koelen 10 min rusten om de consistentie van het roomijs te behouden Hierna schakelt het terug over naar de basisstatus TIJD AAN...

Page 9: ...Tijd in de roomijsmachine 60 minuten VANILLE IJS 1 vanillestokje 3 eierdooiers 3 1 2 dl melk 2 dl slagroom 150 g suiker Was het vanillestokje en snijd het overlangs door zodat het aroma beter tot zijn recht kan komen Klop de slagroom en de melk op en voeg het stokje toe aan het mengsel Maak het geheel warm en neem het van het vuur als het kookt Laat alles een beetje afkoelen Klop ondertussen het e...

Page 10: ...ng nog de cacao en de koffie toe Klop daarna alles goed door elkaar en giet het mengsel in de roomijsmachine Tijd in de roomijsmachine 60 minuten VRUCHTEN IJS 400 g fruit naar keuze eiwit van 1 ei 100 g suiker 1 dl melk 1 dl slagroom scheutje citroensap Mix het fruit samen met de suiker en de slagroom Als het geheel goed gemengd is voegt u de melk het geklopte eiwit en eventueel een beetje citroen...

Page 11: ...jsmachine 60 minuten CITROENIJS 3 à 4 citroenen 150 g suiker 2 dl melk 2 dl slagroom Pers de citroenen uit Mix het sap met de suiker en voeg dan de melk en de slagroom toe Roer alles goed door elkaar en giet het geheel in de roomijsmachine Tijd in de roomijsmachine 60 minuten CITROENSORBET Eiwit van 1 ei 2 dl citroensap 200 g suiker 3 dl water Schil een paar citroenen zonder het wit onder de schil...

Page 12: ... verpakking wijst erop dat dit product niet als huishoudafval mag worden behandeld Het moet naar een plaats worden gebracht waar elektrische en elektronische apparatuur wordt gerecycleerd Als je ervoor zorgt dat dit product op de correcte manier wordt verwijderd voorkom je mogelijk voor mens en milieu negatieve gevolgen die zich zouden kunnen voordoen in geval van verkeerde afvalbehandeling Voor m...

Page 13: ...de fonctionnement matériel ou de fabrication Si un tel problème survient l appareil sera remplacé ou réparé La période de garantie de 2 ans ne reprend pas à zéro mais se poursuit jusqu à 2 ans à compter de la date d achat de l appareil La garantie est accordée sur la base du ticket de caisse Pour les accessoires et les éléments d usure une garantie de 6 mois s applique La garantie et la responsabi...

Page 14: ...fants âgés de 16 ans ou plus et par des personnes présentant un handicap physique ou sensoriel une capacité mentale limitée ou un manque d expérience ou de connaissances à condition que ces personnes soient sous surveillance ou qu elles aient reçu des instructions sur la manière d utiliser l appareil en toute sécurité et qu elles connaissent les dangers liés à son utilisation Les enfants ne peuven...

Page 15: ...C UNE RALLONGE ÉLECTRIQUE Déroulez complètement le cordon d alimentation Ne laissez pas le cordon d alimentation pendre sur une surface chaude ni sur le rebord d une table ou d un plan de travail Ne laissez pas le cordon d alimentation se coincer sous l appareil ou pendre autour de celui ci Ne branchez le cordon d alimentation dans la prise de courant qu après être sûr que l appareil soit correcte...

Page 16: ...les suivants ice cream 60 minutes cooling only 30 minutes et mixing only 10 minutes 4 Bouton START PAUSE 5 Bouton MENU il y a 3 options Ice cream Cooling only Mixing only AVANT LA PREMIÈRE UTILISATION Avant d utiliser l appareil pour la première fois laissez le d abord sur une surface stable pendant 4 heures Nettoyez soigneusement toutes les pièces de la sorbetière qui entreront en contact avec la...

Page 17: ...les parties du mélangeur et de l axe qui correspondent les unes aux autres 5 Placez le couvercle transparent sur la cuve et tournez le dans le sens anti horlogique pour le verrouiller 6 Placez le couvercle de l ouverture de remplissage sur celle ci FAIRE DE LA CREME GLACÉE 1 Branchez l appareil 2 Appuyez sur le bouton POWER L appareil est maintenant branché et la mention 60 00 s affiche sur l écra...

Page 18: ...dir grâce à la fonction Cooling Only pendant environ 30 minutes elle aura alors une consistance plus dure Il va de soi que vous pouvez adapter cette méthode selon vos préférences FONCTION DE RÉFRIGÉRATION PROLONGÉE Si l appareil n est pas débranché ni la crème glacée retirée endéans les 10 minutes après la fin de la rotation l appareil bascule automatiquement vers la fonction de réfrigération L ap...

Page 19: ...paraîtra à la surface Retirez alors le mélange du feu laissez le refroidir et versez le ensuite dans la machine à crème glacée Temps de préparation 60 minutes GLACE DE VANILLE 1 gousse de vanille 3 jaunes d oeufs 3 1 2 dl de lait 2 dl de crème fraîche 150 g de sucre Battez ensemble la crème fraîche et le lait Lavez la gousse de vanille et coupez la dans la longueur pour permettre à l arôme de mieu...

Page 20: ...de cacao 2 jaunes d oeufs 150 g de sucre 2 dl de crème fraîche 3 dl de lait Préparez la glace de façon identique que la Crème glacée préparation à froid Ajoutez le cacao et le café en fin de préparation Mélangez bien le tout et versez ensuite le mélange dans la machine à crème glacée Temps de préparation 60 minutes GLACE AUX FRUITS 400 g de fruits au choix 1 blanc d oeuf 100 g de sucre 1 dl de lai...

Page 21: ...nc d oeuf les bananes broyées et les autres ingrédients Mélangez bien le tout et versez le mélange dans la machine à crème glacée Temps de préparation 60 minutes GLACE AU CITRON 3 à 4 citrons 150 g de sucre 2 dl de lait 2 dl de crème fraîche Pressez les citrons Mélangez le jus avec le sucre et ajoutez y le lait et la crème fraîche Bien mélanger et verser le tout dans la machine à crème glacée Temp...

Page 22: ...ISE AU REBUT Ce symbole sur le produit ou son emballage indique que ce produit ne peut être traité comme déchet ménager Il doit plutôt être remis au point de ramassage concerné se chargeant du recyclage du matériel électrique et électronique En vous assurant que ce produit est éliminé correctement vous favorisez la prévention des conséquences négatives pour l environnement et la santé humaine qui ...

Page 23: ...ionsfehler zurückzuführen sind Wenn derartige Mängel auftreten wird das Gerät wenn nötig ausgetauscht oder repariert Die Garantiezeit von 2 Jahren beginnt in diesem Moment nicht erneut sondern sie läuft bis 2 Jahre nach dem Kaufdatum weiter Die Garantie wird auf der Grundlage des Kassenbons gewährt Die Garantie auf Accessoires undVerschleißteile beträgt 6 Monate Die Garantie und dieVerantwortung H...

Page 24: ...von Kindern ab 16 Jahren und Menschen mit körperlichen oder sensorischen Behinderungen oder Menschen mit eingeschränkten geistigen Fähigkeiten oder mangelnder Erfahrung bzw Sachkenntnis unter der Bedingung verwendet werden dass diese Personen beaufsichtigt werden oder sie eine Anleitung zur sicherenVerwendung des Geräts erhalten haben und sich der Gefahren bei derVerwendung des Geräts bewusst sind...

Page 25: ...ERDEN Rollen Sie das Netzkabel vollständig ab um eine Überhitzung des Kabels zu vermeiden Lassen Sie das Netzkabel nicht auf einer heißen Oberfläche oder über einenTischrand oder eine Arbeitsplatte herunter hängen Lassen Sie das Netzkabel nicht unter oder rund um das Gerät hängen Schließen Sie das Netzkabel erst an die Steckdose an nachdem der Stecker korrekt montiert wurde Um das Gerät aus der St...

Page 26: ...Die Standardzeiten für die Programme sind Ice Cream 60 min Cooling only 30 min und Mixing only 10 min 4 START PAUSE Taste 5 MENÜ Taste Es gibt 3 Auswahlmöglichkeiten Ice Cream Cooling only Mixing only VOR DER ERSTEN INBETRIEBNAHME Lassen Sie das Gerät vor dem ersten Gebrauch zunächst 4 Stunden stabil stehen Reinigen Sie alleTeile der Eismaschine die mit dem Eis in Berührung kommen den festen Behäl...

Page 27: ...uf die Antriebsachse setzen bis er einrastet Die Abbildung zeigt wie der Mischer auf der Antriebsachse anzubringen ist 5 Setzen Sie den durchsichtigen Deckel auf den Behälter und drehen Sie ihn gegen den Uhrzeigersinn um ihn einzurasten 6 Schließen Sie die Einfüllöffnung mit dem dazugehörigen Deckel SPEISEEIS ZUBEREITEN 1 Stecken Sie den Netzstecker in die Steckdose 2 Drücken Sie die POWER Taste D...

Page 28: ...Minuten mit der Ice Cream Funktion noch weich sein können Sie es mit der Cooling Only Funktion für etwa 30 Minuten nachkühlen Dadurch erhält das Eis ein festere Konsistenz Sie können dies anpassen nach eigenem Geschmack ERWEITERTE KÜHLFUNKTION Wenn das Gerät nicht ausgeschaltet wird und das Eis nicht innerhalb von 10 Minuten nach dem Ende des Rührvorgangs entnommen wird schaltet das Gerät automati...

Page 29: ...wimmt die gelbe Creme oben Nehmen Sie denTopf vom Herd und lassen Sie das Gemisch abkühlen Gießen Sie es anschließend in die Eismaschine Dauer 60 Minuten VANILLEEIS 1Vanilleschote Eigelb von 3 Eiern 3 1 2 dl Milch 2 dl Schlagsahne 150 g Zucker Waschen Sie dieVanilleschote und schneiden Sie sie längs durch so dass das Aroma besser zur Geltung kommt Geben Sie dieVanilleschote in das vorbereitete Mil...

Page 30: ... 1 EL Kakao Eigelb von 2 Eiern 150 g Zucker 2 dl Schlagsahne 3 dl Milch Bereiten Sie Eis vor nach dem Rezept Milcheis kalte Zubereitung Fügen Sie zuletzt noch den Kakao und den Kaffee zu Rühren Sie alles sorgfältig und gießen Sie das Gemisch in die Eismaschine Dauer 60 Minuten FRUCHTEIS 400 g Obst nachWahl Eigelb von 1 Ei 100 g Zucker 1 dl Milch 1 dl Schlagsahne Zitronensaft Mischen Sie das Obst m...

Page 31: ...ten Bananen und die anderen Zutaten zum Gemisch hinzu Mischen sie alle Zutaten und geben Sie alles in die Eismaschine Dauer 60 Minuten ZITRONENEIS 3 4 Zitronen 150 g Zucker 2 dl Milch 2 dl Schlagsahne Pressen Sie die Zitronen Mischen Sie den Saft mit dem Zucker und fügen Sie anschließend die Milch und die Schlagsahne hinzu Mischen Sie alle Zutaten und geben Sie das Gemisch in die Eismaschine Dauer...

Page 32: ...NTSORGEN Dieses Symbol auf dem Produkt oder seinerVerpackung weist darauf hin dass dieses Produkt nicht als normaler Haushaltsabfall zu behandeln ist sondern an einem Sammelpunkt für das Recyling von elektrischen und elektronischen Geräten abgegeben werden muss Durch Ihren Beitrag zum korrekten Entsorgen dieses Produkts schützen Sie die Umwelt und die Gesundheit Ihrer Mitmenschen Umwelt und Gesund...

Page 33: ...ong use not following the instructions or repairs executed by a third party The guarantee is issued with the original till receipt All parts which are subject to wear are excluded from the warranty If your device breaks down within the 2 year warranty period you can return the device together with your receipt to the shop where you purchased it The guarantee on accessories and components that are ...

Page 34: ...nowledge if they have been given supervision or instruction concerning use of the appliance in a safe way and understand the hazards involved Children shall not play with the appliance Cleaning and user maintenance shall not be made by children unless they are older than 8 and supervised Keep the appliance and its cord out of reach of children younger than 16 years The appliance must be disconnect...

Page 35: ...unter or touch hot surfaces Do not allow the power cord supply to run underneath or around the unit Make sure the appliance is correctly assembled then plug the cord in the wall outlet To disconnect turn controls to OFF or 0 position then remove the plug from the wall Never pull the cord or appliance to remove the plug from the socket Do not use the appliance if there is any water in it or the par...

Page 36: ...he standard times for the programs are ice cream 60 min cooling only 30 min and mixing only 10 min 4 START PAUSE button 5 MENU button 3 choices Ice cream Cooling only Mixing only BEFORE THE FIRST USE Leave the appliance stable for 4 hours before using it for the first time Thoroughly clean all parts of the ice cream maker that will come into contact with the ice cream the fixed bowl the removable ...

Page 37: ...the bowl and turn it counter clockwise to lock it 6 Place the cover of the fill opening onto the fill opening MAKING ICE CREAM 1 Plug in the ice cream maker 2 Press the POWER button The appliance is now switched on and the LCD screen will indicate 60 00 This means that the standard set time is 60 minutes 3 Run through the MENU button to choose the program you d like to run Ice cream is the choice ...

Page 38: ...the appliance is not switched off and the ice cream is not removed within 10 minutes after the end of the mixing process the appliance will automatically switch to prolonged cooling The appliance will cool for another hour in total with intervals of 10 minutes cool for 10 min rest for 10 min to maintain the consistency of the ice cream After this hour the ice cream maker will switch back to its in...

Page 39: ...150 g sugar Wash the vanilla stick and slice it lengthwise so the aroma can spread better in the mixture Mix the milk and cream add the vanilla stick to it and heat it up Take it off the fire as soon as it boils Let it cool Mix the egg yolk and the sugar add the milk cream mixture after removing the vanilla stick Heat it up again but without boiling it When the mixture start to set take it of the ...

Page 40: ...e of 1 egg 100 g sugar 1 dl milk 1 dl whipping cream dash of lemon juice Mix the fruit together with the sugar and the whipping cream When thoroughly mixed add the milk the beaten egg white and a dash of lemon juice Pour the mixture into the ice cream maker Time in the ice cream maker 60 minutes ICE CREAM FROM WILD FRUITS 300 g fruit of choice egg white of 1 egg 150 g sugar 1 dl milk 1 2 dl cream ...

Page 41: ... dl milk 2 dl cream Squeeze the lemons mix the juice with the sugar and add the milk and cream Mix everything thoroughly and add it in the ice cream maker Time 60 min LEMON SORBET 1 egg white 2 dl lemon juice 200g sugar 3 dl water Peel 2 lemons without the white under the skin Let the skin soak in the 3 dl water for about 30 min Strain the water and the lemon juice Mix this fluid together with the...

Page 42: ...as household waste Instead it must be brought to the applicable collection point for recycling of electrical and electronic equipment By ensuring this product is disposed of correctly you will help prevent potential negative consequences for the environment and human health which could otherwise be caused by inappropriate waste handling of this product For more detailed information about recycling...

Page 43: ... compra La garantía se concede sobre la base del recibo de caja La garantía de los accesorios y componentes sujetos a desgaste es de 6 meses La garantía y la responsabilidad imputabilidad del proveedor y el fabricante expiran automáticamente en los siguientes casos Cuando no se cumplan las instrucciones que aparecen en este manual En el caso de una conexión inadecuada por ejemplo a una tensión elé...

Page 44: ...ental limitada o falta de experiencia o conocimiento siempre y en tanto en cuanto dichas personas estén vigiladas o hayan recibido instrucciones sobre el uso del aparato de manera segura y conozcan los peligros del uso del mismo Los niños no deben jugar con el ventilador El mantenimiento y la limpieza del dispositivo no deben ser realizados por niños a menos que tengan 8 años o más y estén supervi...

Page 45: ...No deje que el cable de alimentación cuelgue sobre superficies calientes o sobre el borde de una mesa o encimera No permita que el cable de alimentación cuelgue por debajo o alrededor del aparato Solo debe introducir el cable de alimentación en la toma de corriente después de que el aparato se haya montado correctamente Antes de retirar el cable del aparato de la toma de corriente el control se de...

Page 46: ...inutos para ice cream helados 30 minutos para cooling only solo enfriar y 10 minutos para mixing only solo mezclar 4 Botón de START PAUSE 5 En el botón MENU menú hay tres opciones Ice cream helado Cooling only solo enfriar Mixing only solo mezclar ANTES DEL PRIMER USO Antes de utilizarlo por primera vez el aparato debe estar estable durante al menos 4 horas Limpie todas las piezas de la máquina he...

Page 47: ... de mezcla y el eje deben encajar entre sí 5 Ponga la tapa transparente en el cuenco y gírela hacia la izquierda para bloquearla 6 Coloque la tapa de la boca de llenado en la boca de llenado HACER HELADO DE CREMA 1 Ponga el enchufe en la toma de corriente 2 Pulse el botón de ENCENDIDO Ahora el aparato está activado y muestra 60 00 en la pantalla LCD Esto significa que el tiempo predeterminado es d...

Page 48: ... darle una mayor consistencia Puede adaptar este uso conforme a sus preferencias FUNCIÓN DE REFRIGERACIÓN PROLONGADA Si el aparato no está apagado y el hielo no se retira dentro de 10 minutos después del final del proceso de giro la máquina cambia automáticamente al modo de refrigeración Entonces el aparato refrigera durante un total de 1 hora en intervalos de 10 minutos con el fin de mantener la ...

Page 49: ...iempo en la heladera 60 minutos HELADO DE VAINILLA 1 vaina de vainilla 3 yemas de huevo 3 1 2 dl de leche 2 dl de nata 150 g de azúcar Lave la vaina de vainilla y córtela longitudinalmente para que el aroma sea mejor Bata la nata y la leche y añada la vaina de vainilla a la mezcla Caliente todo y sáquelo del fuego mientras cuece Deje que se enfríe un poco Mientras tanto bata las yemas y el azúcar ...

Page 50: ...la mezcla en la heladera Tiempo en la heladera 60 minutos HELADO DE FRUTA 400 g de fruta a elegir La clara de 1 huevo 100 g de azúcar 1 dl de leche 1 dl de nata 1 pizca de zumo de limón Mezcle la fruta con el azúcar y la nata Cuando los ingredientes estén bien mezclados agregue la leche las claras de huevo y en su caso un poco de zumo de limón Vierta la mezcla en la heladera Tiempo en la heladera ...

Page 51: ...nata Exprima los limones Mezcle el zumo con el azúcar y añada la leche y la nata Mezcle bien y vierta todo en la heladera Tiempo en la heladera 60 minutos SORBETE DE LIMÓN La clara de 1 huevo 2 dl de zumo de limón 200 g de azúcar 3 dl de agua Pele un par de limones sin quitar la parte blanca de la corteza Deje las cortezas en 3 dl de agua durante unos 30 minutos Cuele el agua y el zumo de limón Me...

Page 52: ...ado como residuo doméstico Se debe llevar a un lugar en el que se reciclan equipos eléctricos y electrónicos Si se asegura de que este producto se desecha correctamente usted ayudará a evitar posibles consecuencias negativas para las personas y el medio ambiente que serían causadospor un tratamiento de residuos inadecuado Para obtener información más detallada sobre el reciclaje de este producto p...

Page 53: ...e dal cliente o da terzi non autorizzati uso di accessori o componenti non raccomandati o forniti dal negoziante o dal produttore INDICAZIONI DI SICUREZZA Quando si utilizzano dispositivi elettrici è necessario tenere presenti le seguenti istruzioni di sicurezza Leggere con attenzione le presenti istruzioni Conservare le istruzioni per possibili future consultazioni Prima di utilizzare il prodotto...

Page 54: ...In questi casi portare l apparecchio al servizio assistenza post vendita di DOMO o al centro assistenza autorizzato più vicino per farlo controllare riparare o per apportare le necessarie modifiche elettriche o tecniche Non cercare mai di riparare da soli l apparecchio Non immergere mai l apparecchio il cavo o la spina in acqua o in altri liquidi Questo per evitare scosse elettriche o incendi Non ...

Page 55: ...TRUZIONI PER POSSIBILI FUTURE CONSULTAZIONI COMPONENTI 1 Apertura di riempimento con coperchio 2 Coperchio trasparente 3 Contenitore rimovibile 4 Contenitore fisso 5 Spatola di miscelazione 6 Display LCD 7 Pannello di controllo 8 Ventilazione 9 Paletta per gelato 10 Misurino PANNELLO DI CONTROLLO 1 Display LCD 2 Tasto POWER 3 Manopola per impostare il tempo ruotare la manopola Ruotare verso sinist...

Page 56: ... gelatiera si raffredda da sola mentre è in funzione MONTAGGIO 1 Assicurarsi che la spina non sia inserita nella presa 2 Appoggiare la gelatiera su una superficie piana e stabile 3 Inserire il contenitore rimovibile in quello fisso della macchina 4 Mettere la spatola di miscelazione nel contenitore rimovibile inserendola sull asse del contenitore in modo che vada in posizione 5 Mettere il coperchi...

Page 57: ... di utilizzarla di nuovo lasciare che si raffreddi per 30 60 minuti Suggerimento se dopo 60 minuti di funzionamento il gelato è ancora troppo morbido è possibile raffreddarlo con la funzione Cooling only per circa 30 minuti in modo da aumentarne la consistenza Potete naturalmente scegliere ciò che preferite FUNZIONE DI RAFFREDDAMENTO PROLUNGATA Se la gelatiera non viene spenta e il gelato non vien...

Page 58: ... gialla si porta in superficie Togliere il composto dal fuoco lasciarlo raffreddare e versarlo quindi nella gelatiera Tempo di lavorazione 60 minuti GELATO ALLA VANIGLIA 1 bacca di vaniglia 3 tuorli d uovo 3 5 dl di latte 2 dl di panna montata 150 g di zucchero Lavare la bacca di vaniglia e tagliarla nel senso della lunghezza in modo che l aroma fuoriesca meglio Unire la panna montata e il latte e...

Page 59: ...cucchiaio di cacao 2 tuorli d uovo 150 g di zucchero 2 dl di panna montata 3 dl di latte Seguire le indicazioni date alla voce Preparazione fredda per gelato Al termine della preparazione aggiungere il cacao e il caffè Mescolare bene il composto e versarlo nella gelatiera Tempo di lavorazione 60 minuti GELATO ALLA FRUTTA 400 g di frutta a scelta un albume 100 g di zucchero 1 dl di latte 1 dl di pa...

Page 60: ...ume le banane sminuzzate e gli altri ingredienti Mescolare bene e versare il composto nella gelatiera Tempo di lavorazione 60 minuti GELATO AL LIMONE 3 4 limoni 150 g di zucchero 2 dl di latte 2 dl di panna montata Spremere i limoni Mescolare il succo dei limone con lo zucchero e aggiungere quindi il latte e la panna montata Mescolare bene il composto e versarlo nella gelatiera Tempo di lavorazion...

Page 61: ... sul prodotto o sulla confezione indica che esso non deve essere trattato come rifiuto domestico Deve al contrario essere conferito al punto di raccolta predisposto per il riciclo delle apparecchiature elettriche ed elettroniche Facendo in modo che questo prodotto venga smaltito correttamente aiuterete a prevenire potenziali conseguenze negative per l ambiente e la salute dell uomo che potrebbero ...

Page 62: ...é poškození b nesprávné používání v rozporu s návodem k použití 1 záruka zaniká při použití spotřebiče jinak než v domácnosti při provádění opravy nebo změny na spotřebiči osobou jinou než pověřenou naším servisem Na tento spotřebič poskytujeme záruku na nedostatky které jsou označeny jako výrobní chyby nebo chyby materiálu Záruční doba začíná dnem prodeje a je uznána po předložení potvrzeného toh...

Page 63: ... mladších 16 let Přístroj vždy plně odpojte od elektrického proudu pokud je s ním něco v nepořádku během bouřky nebo když už jej nechcete nadále používat či jej potřebujete vyčistit Nepoužívejte přístroj pokud má poškozený přívodní kabel neboVám upadl na zem Takto poškozený spotřebič musí být opraven zkontrolován vždy v odborném servise POZOR Aby se předešlo rizikům nesmí se přístroj používat se ž...

Page 64: ...motoru dostane voda nebo nějaký cizí objekt okamžitě přístroj vypněte vytažením zástrčky ze zásuvky Přístroj před dalším zapnutím pořádně zkontrolujte Přístroj nepoužívejte na prázdno pokud je nádoba prázdná Šlehací metlu můžete vyjmout až když přístroj vypnete Za běhu metlu z přístroje nevyndávejte Přístroj udržujte v čistotě Nečistoty by mohly způsobit zkrácení životnosti přístroje a hlavně vzni...

Page 65: ... snižuje a otáčením doprava zvyšuje standartní čas Standartní časy pro program zmrzliny 60 min chlazení 30 min míchání 10 min 4 START Pauza tlačítko 5 Menu výběr programu 3 volby zmrzlina chlazení pouze míchání pouze PŘED PRVNÍM POUŽITÍM Před prvním použitím nechte přístroj alespoň 4 hodiny stát v klidu na rovné ploše Očistěte všechny části stroje které přijdou do kontaktu se zmrzlinou pevnou nádo...

Page 66: ...ůhledné víko a otočte s ním po směru hodinových ručiček aby se zajistilo 6 Zakryjte i plnící otvor příslušným víčkem PŘÍPRAVA ZMRZLINY 1 Nyní můžete přístroj zapojit do elektrické sítě 2 Zapněte přístroj stiskem tlačítka POWER Po zapnutí se rozsvítí LCD displej s číslicemi 60 00 Tento údaj značí standardní nastavení času na 60 minut 3 Tlačítkem MENU si vyberte požadovaný program Lze si vybrat zda ...

Page 67: ...ÉHO CHLAZENÍ Pokud není přístroj vypnutý a zmrzlina vyndaná do 10 minut po dokončení míchání přepne přístroj automaticky na prodloužené chlazení Přístroj bude chladit ještě další hodinu v 10min intervalech aby udržel správnou konzistenci zmrzliny Po hodině se přístroj úplně vypne a vrátí do standartního nastavení ÚPRAVA ČASU BĚHEM MÍCHÁNÍ Za běhu přístroje můžete snadno upravovat čas otáčením otoč...

Page 68: ...ru Vanilkový lusk opláchněte a podélně rozřízněte aby se zesílilo vanilkové aroma Vložte ho do připravené směsi mléka a šlehačky Nechte ohřát ale jakmile začne vařit tak ho stáhněte ihned ze sporáku Hrnec se směsí nechte chvíli vychladnout Mezitím si utřete žloutky s cukrem do jemné směsi a přidejte k tomu mléko vanilkový lusk je třeba vyndat Znovu směs ohřejte ale neměla by už vařit Jakmile je sm...

Page 69: ... dle chuti 1 vaječný bílek 100 g cukru 1 dl mléka 1 dl šlehačky citrónová šťáva Promíchejte ovoce s cukrem a šlehačkou Když jsou všechny přísady zamíchané přidejte mléko sníh z bílku a trochu citrónové šťávy Směs nalijte do stroje Doba přípravy 60 minut BANÁNOVÁ ZMRZLINA 4 banány 1 5 dl mléka 1 5 dl smetany vaječného bílku špetka soli kapka citronové šťávy Nejdříve vyšlehejte bílek na tuhý sníh Po...

Page 70: ... vaječným bílkem a vložte do stroje Doba přípravy 60 minut OVOCNÝ SORBET 400 500 g ovoce dle výběru 1 dl vody 100 g cukru Smíchejte ovoce přidejte cukr a vodu je li to nutné tak rozmačkejte a přidejte vše do zmrzliny Čas 60 min ČIŠTĚNÍ A ÚDRŽBA Poznámka Před manipulací s přístrojem a čištěním vždy nejdříve přístroj odpojte od elektrického proudu Poznámka Nepoužívejte hrubé a agresivní čistící pros...

Page 71: ...ístech určených ke sběru a likvidaci elektrických a elektronických zařízení Dodržením tohoto doporučení chráníte životní prostředí a zdraví spoluobčanů Více informací o možnostech likvidace nebezpečného odpadu obdržíte na obecních nebo městských úřadech sběrných dvorech nebo v prodejně kde jste přístroj zakoupili Obalové materiály jsou recyklovatelné nakládejte s nimi podle předpisů pro životní pr...

Page 72: ...škodenie b nesprávne používanie v rozpore s návodom na použitie 1 záruka zaniká Pri použití spotrebiča inak ako v domácnosti Pri vykonávaní opravy alebo zmeny na spotrebiči osobou inou ako poverenou naším servisom Na tento spotrebič poskytujeme záruku na nedostatky ktoré sú označené ako výrobné chyby alebo chyby materiálu Záručná doba začína dňom predaja a je uznaná po predložení potvrdeného tohot...

Page 73: ...byť odpojený z el prúdu Prístroj musí byť uložený bezpečne mimo dosahu detí mladších ako 16 rokov Prístroj vždy plne odpojte od elektrického prúdu ak je s ním niečo v neporiadku počas búrky alebo keď už ho nechcete naďalej používať či ho potrebujete vyčistiť Nepoužívajte prístroj ak má poškodený prívodný kábel aleboVám spadol na zem Takto poškodený spotrebič musí byť opravený skontrolovaný vždy v ...

Page 74: ... el siete Prístroj vždy zo zásuvky odpájajte ťahaním za zástrčku nikdy nie za kábel Ak saVám do priestoru motora dostane voda alebo nejaký cudzí objekt okamžite prístroj vypnite vytiahnutím zástrčky zo zásuvky Prístroj pred ďalším zapnutím poriadne skontrolujte Prístroj nepoužívajte na prázdno ak je nádoba prázdna Šľahaciu metlu môžete vybrať až keď prístroj vypnete Za behu metlu z prístroja nevyb...

Page 75: ...ím doľava znižuje a otáčaním doprava zvyšuje štandardné čas Standartní časy pre program zmrzliny 60 min chladenie 30 min miešanie 10 min 4 START Pauza tlačidlo 5 Menu výber programu 3 voľby zmrzlina chladenie iba miešania iba PRED PRVÝM POUŽITÍM Pred prvým použitím nechajte prístroj aspoň 4 hodiny stáť na rovnej ploche Očistite všetky časti stroja ktoré prídu do kontaktu so zmrzlinou pevnú nádobu ...

Page 76: ...uje správne zostavenie prístroja a šľahacie metly 5 Umiestnite na nádobu priehľadné veko a otočte s ním po smeru hodinových ručičiek aby sa zabezpečilo 6 Zakryte aj plniaci otvor príslušným viečkom PRÍPRAVA ZMRZLINY 1 Teraz môžete prístroj zapojiť do elektrickej siete 2 Zapnite prístroj stlačením tlačidla POWER Po zapnutí sa rozsvieti LCD displej s číslicami 60 00 Tento údaj značí štandardné nasta...

Page 77: ...uhne Tuhosť si však môžete upraviť presne podľa vašich požiadaviek FUNKCIE OPAKOVANÉHO CHLADENIE Pokiaľ nie je prístroj vypnutý a zmrzlina vybratí do 10 minút po dokončení miešania prepne prístroj automaticky na predĺžené chladenie Prístroj bude chladiť ešte ďalšiu hodinu v 10min intervaloch aby udržal správnu konzistenciu zmrzliny Po hodine sa prístroj úplne vypne a vráti do štandardného nastaven...

Page 78: ... stroja na zmrzlinu Čas prípravy 60 minút VANILKOVA ZMRZLINA 1 struk vanilky žĺtky z 3 vajec 3 dl mlieka 2 dl šľahačky 150 g cukru Vanilkový struk opláchnite a pozdĺžne rozrežte aby sa zosilnelo vanilkovej aroma Vložte ho do pripravenej zmesi mlieka a šľahačky Nechajte ohriať ale akonáhle začne variť tak ho stiahnite ihneď zo sporáka Hrniec so zmesou nechajte chvíľu vychladnúť Medzitým si vymiešam...

Page 79: ...a kávu Starostlivo premiešajte a zmes nalejte do stroja Čas prípravy 60 minút ZMRZLINA Z LESNÉHO OVOCIA LESNÉ OVOCIE MALINY JAHODY ČUČORIEDKY ATĎ 400 g ovocia podľa chuti 1 vaječný bielok 100 g cukru 1 dl mlieka 1 dl šľahačky citrónová šťava Premiešajte ovocie s cukrom a šľahačkou Keď sú všetky prísady zamiešané pridajte mlieko sneh z bielka a trochu citrónovej šťavy Zmes nalejte do stroja Čas prí...

Page 80: ...utú tekutiny premiešajte s cukrom a vaječným bielkom a vložte do stroja Čas prípravy 60 minút OVOCNÝ SORBET 400 500 g ovocia podľa výberu 1 dl vody 100 g cukru Zmiešajte ovocie pridajte cukor a vodu ak je to nutné tak roztlačte a pridajte všetko do zmrzliny Čas 60 min ČISTENIE A ÚDRŽBA Poznámka Pred prácou s prístrojom a čistením vždy najskôr prístroj odpojte od elektrického prúdu Poznámka Nepouží...

Page 81: ...h určených na zber a likvidáciu elektrických a elektronických zariadení Dodržaním tohto odporúčania chránite životné prostredie a zdravie spoluobčanov Viac informácií o možnostiach likvidácie nebezpečného odpadu obdržíte na obecných alebo mestských úradoch zberných dvoroch alebo v predajni kde ste prístroj zakúpili Obalové materiály sú recyklovateľné nakladajte s nimi podľa predpisov pre životné p...

Page 82: ......

Page 83: ......

Page 84: ...cessoires en onderdelen online via of scan hier COMMANDEZ d authentiques accessoires et pièces Domo en ligne sur ou scannez ici BESTELLEN SIE die Domo Original Zubehör und Ersatzteile online über oder hier scannen ORDER the original Domo accessories and parts online at or scan here webshop domo elektro be Webshop ...

Reviews: