background image


Before Installation 


English


Check your PC requirements: DisplayLink software can be used on PCs, 
from Netbooks, Notebooks/Laptops to Desktops, with a wide range of 
supported processors including  Atom N270 based PCs, basic single Core 
CPUs, and of course the latest Dual, Core i3/i5/i7 CPUs. 
The performance of the software is dependent upon the processing power 
available  as  well  as  the  operating  use  (video  or  desktop),  more  capable 
systems will provide better performance. 
DisplayLink  software  is  available  for  the  following  Windows  operating 
systems: 


Windows 7 (32-bit or 64-bit) 


Windows Vista SP 1 or 2 (32-bit or 64-bit) 


Windows XP Home/Professional (incl. Tablet edition) SP 2 or 3 


Windows Server 2003, 2008 and 2008 R2 


Windows users may find most up to date information, DisplayLink manuals 
and driver software from 

www.displaylink.com

 
The recommended typical hardware requirements for the PC are: 


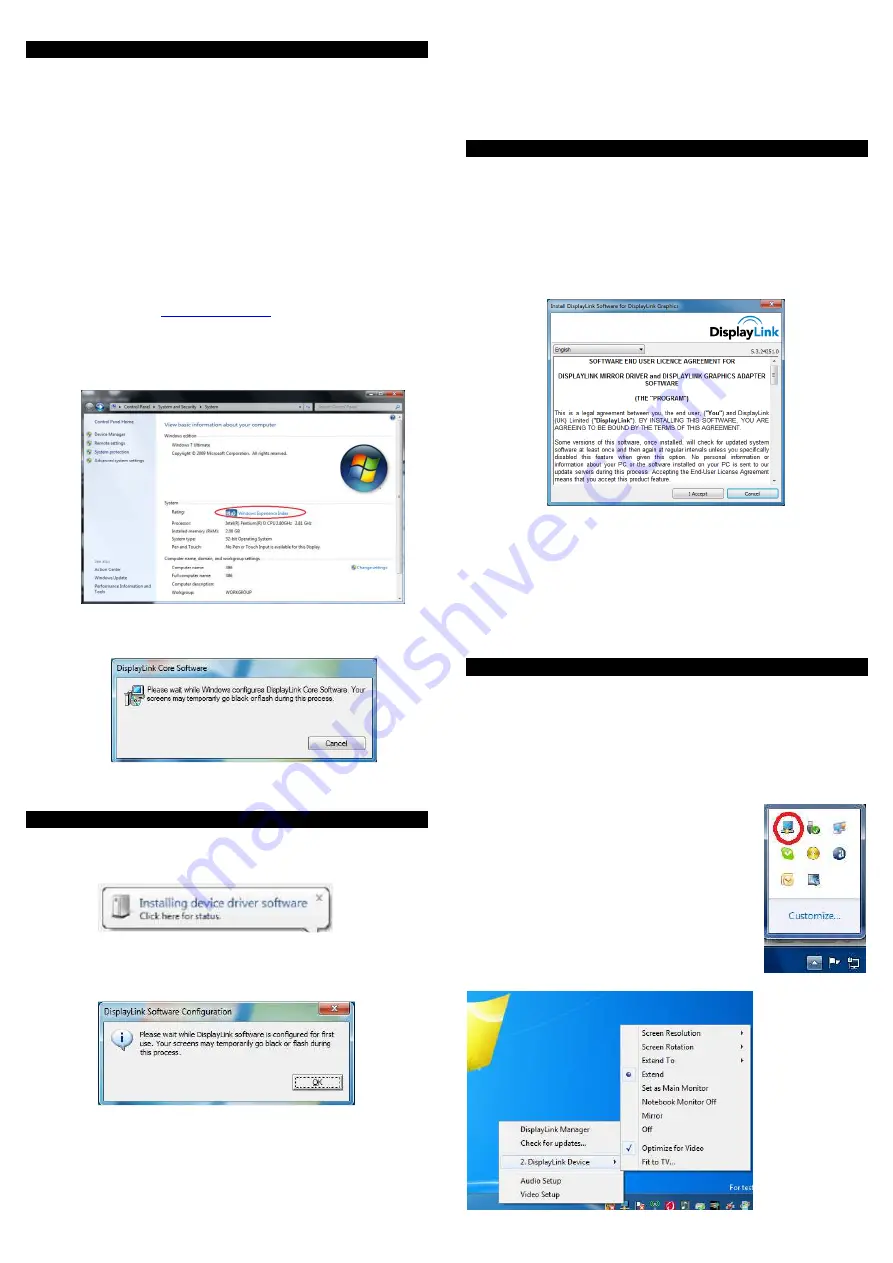
Overall  WEI  (Windows  Experience  Index)  score  of  at  least  3  as  rec-
ommended by Microsoft. 


Update driver by windows update.  


At least one USB 3.0 port. 


30 megabytes (MB) of free disk space. 


Computer screen for use with the USB 3.0 HDMI Adapter 


Network  access  for  software  downloads,  or  access  to  a  CD-ROM 
drive. 


Software Installation   


English


Install  the  software  application first  and  do  not  connect  the  USB  3.0 
HDMI Adapter to your PC before the installation has completed! 


a.  Insert  the  supplied  installation  CD  and  run  the    E:  \SETUP.EXE  file 

(Assuming your CD ROM drive is located at E:\)  

b.  Windows will pop up a “DisplayLink Software” screen as below, please 

click “I accept” to start installation process. The set-up program will in-
stall the device driver & software application. 


Note: The screen may flash or go black during the installation; no mes-

sage will be shown at the end of the installation process. 


Hardware Installation   


 E n g l i s h


a.  Connect your USB 3.0 HDMI Adapter via the USB cable to your PC. 

You will then see the following message: 


b.  When connecting the USB 3.0 HDMI Adapter, your system will initiate 

the driver and software application (the DisplayLink Software Config-
uration screen may flash or go black during the install). 


Note: On some machines you may need to reboot before you can begin to 
use your USB 3.0 HDMI Adapter. 
 

c.  Once the installation is complete connect your monitor to the USB 3.0 

HDMI Adapter. 


Controlling the Display 


 English


There are two ways to control the display: 

(1)

  Use the DisplayLink Manager Menu 

(2)

  Use Windows Display Properties 


(1)  To use the DisplayLink Manager Menu 
When devices are attached, an icon appears in the taskbar. This gives you 
access to the DisplayLink manager menu. 
 
a.  
From the taskbar, click the Show hidden 

icons arrow to show all available icons. 


b.  Click the DisplayLink icon (circled above).  
 
c.  A menu will appear (as shown below) with 

several options, these are described on the 
following pages. 


Summary of Contents for 43170

Page 1: ...tware that supports Video playback on an extended desktop Features E n g l i s h USB connectivity between PC notebook to additional display monitor via HDMI connector DVI Monitors supported via HDMI DVI Adapter Supports mirror extended and primary display modes SuperSpeed USB 3 0 delivers higher resolution and performance for video and 3D graphics Next generation DisplayLinkTM DL3 0 compression te...

Page 2: ...our PC before the installation has completed a Insert the supplied installation CD and run the E SETUP EXE file Assuming your CD ROM drive is located at E b Windows will pop up a DisplayLink Software screen as below please click I accept to start installation process The set up program will in stall the device driver software application Note The screen may flash or go black during the installatio...

Page 3: ...ktop b Click Screen Resolution To open the Windows Display Properties on Windows Vista a Right click on the Desktop b Click Personalize c Click Display Settings To open the Windows Display Properties on Windows XP a Right click on the Desktop b Select Properties c The Display Properties dialog opens select the Settings tab The Display Settings window will then open To set the display to Extend Mod...

Page 4: ...forderungen DisplayLink Software kann mit PCs Netbooks oder Notebooks mit einer Vielzahl von Prozessortypen verwendet werden einschließlich Atom N270 Einzelkernprozessoren und natürlich den neuesten Doppelkernpro zessoren i3 i5 i7 Für flüssige Videowiedergabe von bewegten Bildern besonders in HDTV wird dem Rechner sehr viel Rechenleistung abverlangt weniger leistungs fähige Prozessoren können nich...

Page 5: ...nt la vidéo sur un écran étendu Caractéristiques Français Connexion USB entre un PC notebook vers un écran additionnel via une prise HDMI écrans DVI supportés via un adaptateur HDMI DVI Supporte les modes miroir étendu et primaire SuperSpeed USB 3 0 délivre une video haute résolution et des per formances graphiques 3D Nouvelle génération de la technologie de compression DisplayLinkTM DL3 0 Transfè...

Page 6: ...logiciel l affichage de l écran DisplayLink peut clignoter ou devenir noir pendant l initialisation Note sur certaines machines vous devrez redémarrer avant d utiliser l adaptateur USB 3 0 HDMI c Une fois l installation terminée connectez l écran à l adaptateur USB 3 0 HDMI Contrôlez l affichage Français Il existe 2 manières de contrôler l écran 1 Utiliser le menu DisplayLink Manager 2 Utiliser le...

Page 7: ...ans le mode miroir a Décochez le mode étendu ou sélectionnez duppliquer les écrans b Clic Appliquer Pour paramétrer l adaptateur USB 3 0 HDMI en tant qu écran primaire a Activez l option C est mon écran principal b Cliquez Appliquer Note sur certains PCs il est nécessaire de désactiver l écran primaire désactivez l option Etendre le bureau sur ce moniteur pour l écran primaire La raison est que be...

Page 8: ...atatore 5 Una volta completata l installazione potete collegare e d utilizzare il monitor all adattatore Certifications FCC Certifications This device complies with Part 15 of the FCC Rules Operation is subject to the following two conditions 1 this device may not cause harmful interference and 2 this device must accept any interference received including interference that may cause undesired oper...

Reviews: