Lindy 42807 User Manual Download Page 9

User Manual 


English 

8


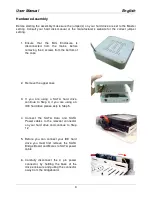
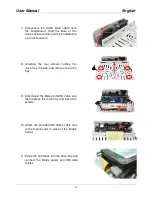
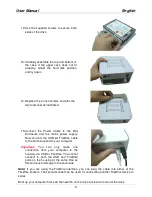
Using the enclosure with your PC   

 
If you want to use this enclosure with both PCs and Macs, then you should use a FAT32 
formatted hard drive. If you are using a brand new drive, or want to erase an older drive you will 
need to follow the instructions below:  


Windows 2000/XP/Vista users 

 
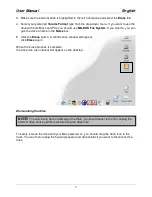
After first booting up your computer and connecting and powering up the enclosure, Windows 
will detect the drive and automatically install the relevant driver software. 

If it is a pre-formatted drive, no further action is required

; a new drive icon will show up in 

Windows Explorer. 
 
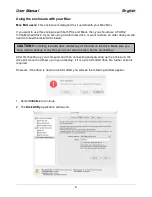
If you are using a brand new, unformatted drive, you will need to format the drive for use. 
 
1.  Right-click the 

My Computer

 icon on your desktop and from the drop-down menu, select 

Manage

 
2.  The Computer Management window will appear. Select 

Disk Management 

from the left 

hand pane. 

 
3.  In the right hand pane, the new drive will be identified as ‘Unallocated’. Right-click the drive 

and, from the drop-down menu, select 

New Partition


4.  The 

New Partition Wizard 

will appear. Follow the on-screen instructions to format and 

partition the drive. Once complete, the new drive icon will show up in Windows Explorer and 
the drive will be accessible.  

CAUTION!

 Formatting the hard drive will destroy all the data on the drive. Make sure you 

have made a backup of any files you do not want to erase before proceeding!  


Summary of Contents for 42807

Page 1: ...LINDY ELECTRONICS LIMITED LINDY ELEKTRONIK GMBH FIRST EDITION August 2008 Mini USB 2 0 FireWire Enclosure SATA IDE User Manual English LINDY No 42807 www lindy com...

Page 2: ......

Page 3: ...EE1394a combo interface USB 2 0 interface is backwards compatible with USB 1 1 equipped computers Connectors 1 x USB 2 0 Type B Female 2 x 6 Pin FireWire Female Aluminium cover for heat dispersal Low...

Page 4: ...bottom of the case 2 Remove the upper case 4 Connect the SATA Data and SATA Power cables to the relevant connector on your hard drive and continue to Step 12 3 If you are using a SATA hard drive conti...

Page 5: ...idgeboard Hold the base of the drive enclosure and pull the bridgeboard up to disconnect it 8 Unscrew the four screws holding the drive tray in place and remove the drive tray 9 Disconnect the Molex t...

Page 6: ...ow connect the USB or FireWire cable to the enclosure and to your computer Important You can only make one connection from your computer to the housing via USB or FireWire You cannot connect to both t...

Page 7: ...tructions below After first booting up your computer and then connecting and powering up the enclosure the drive will mount and show up on your desktop if it is a pre formatted drive No further action...

Page 8: ...ox 5 Click the Erase button A confirmation window will appear click Erase again When the erase process is complete the drive icon as outlined will appear on the desktop Dismounting the drive To safely...

Page 9: ...you are using a brand new unformatted drive you will need to format the drive for use 1 Right click the My Computer icon on your desktop and from the drop down menu select Manage 2 The Computer Manag...

Page 10: ...rs After first booting up your computer and connecting and powering up the enclosure Windows will detect the drive and automatically install the relevant driver software If it is a pre formatted drive...

Page 11: ...mful interference in a residential installation This equipment generates uses and can radiate radio frequency energy and if not installed and used in accordance with the instructions may cause harmful...

Page 12: ...n auch alten Elektro und Elektronikger ten ber die Hausm lltonne Diese Ger te m ssen den lokalen Sammelsystemen bzw rtlichen Sammelstellen zugef hrt werden Dort werden sie kostenlos entgegen genommen...

Reviews: