HDMI Scaler/Switch
User Manual
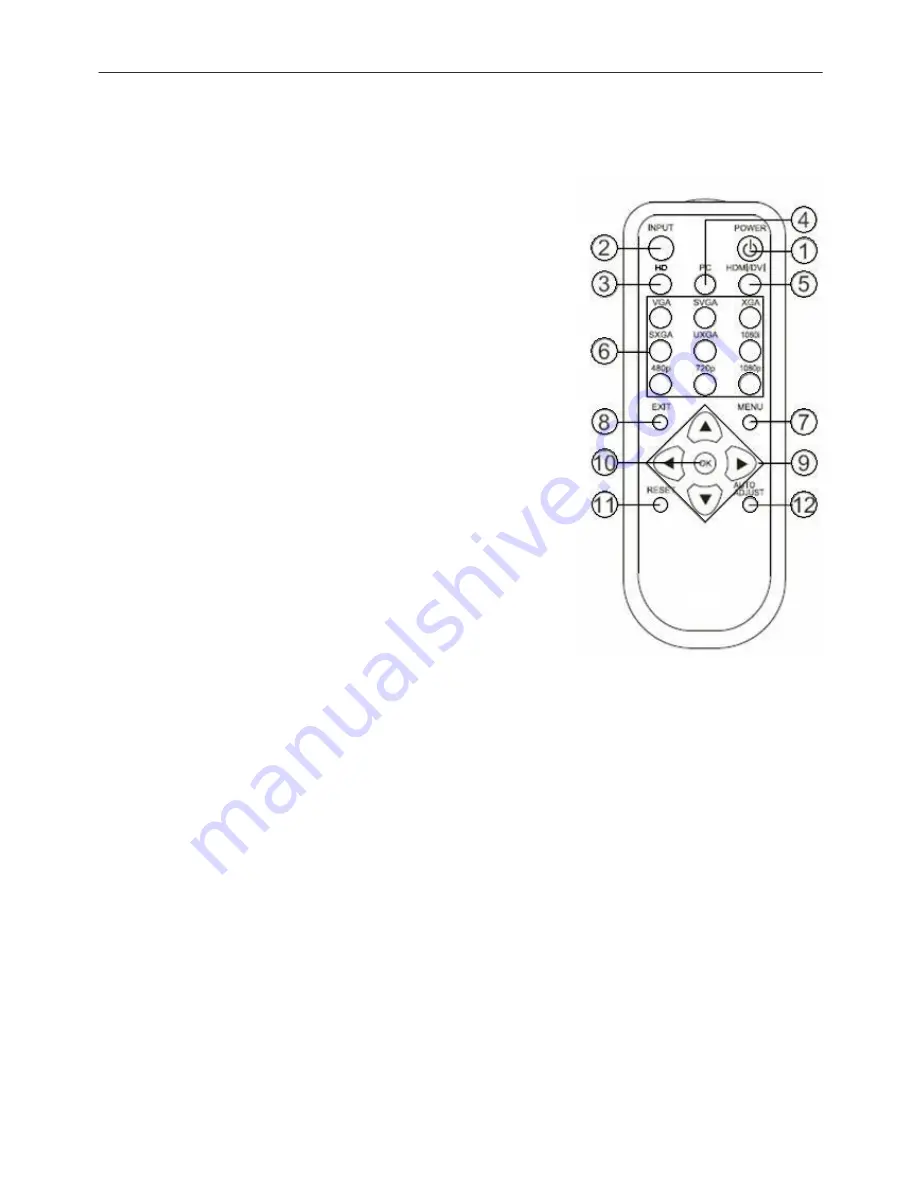
5. Remote Control
1. POWER:
Press the button once to power on the unit.
Press again to enter standby mode.
2. INPUT:
Press the button repeatedly to toggle
through the various input sources.
3. HD Input:
Press the button to directly select
component input.
4. PC Input:
Press the button to directly select PC input.
5.
HDMI/DVI Input:
Press the button to directly select HDMI (or
DVI) input.
6. Output Resolution:
Press any one of the buttons to directly select
output resolution. For other output resolutions
that are not covered by these buttons please
enter OSD Menu to select them.
7. MENU:
Press the button to bring up the OSD main
menu page.
8. Exit:
Press the button to exit from a sub menu or
main menu.
9. Up/Down/Left/Right:
Press the Up/Down button to move the
highlight bar to your desired parameter
during the OSD operation. Press the
Left/Right button to increase/decrease the
setting value of a selected parameter.
10. OK (Enter):
Press the button to confirm your selection.
11. Reset:
Press the button to reset the unit's firmware
setting to the factory default value.
12. Auto Adjust:
Press the button to optimize the position of
the picture (picture centering) on the
screen.
6. Specifications
•
Frequency bandwidth: 1.65Gbps (Single Link)
•
Input Ports:
Composite & L/R audio
S-Video & L/R audio
Component (3 RCA) & L/R audio
PC D-Sub (15-pin) & 3.5mm Jack
HDMI & 3.5mm Jack (for DVI)
Summary of Contents for 32596
Page 2: ......
Page 5: ...HDMI Scaler Switch User Manual 4 OSD Operation...


