background image

Manuale d’uso 


 Italiano 

- 21 - 


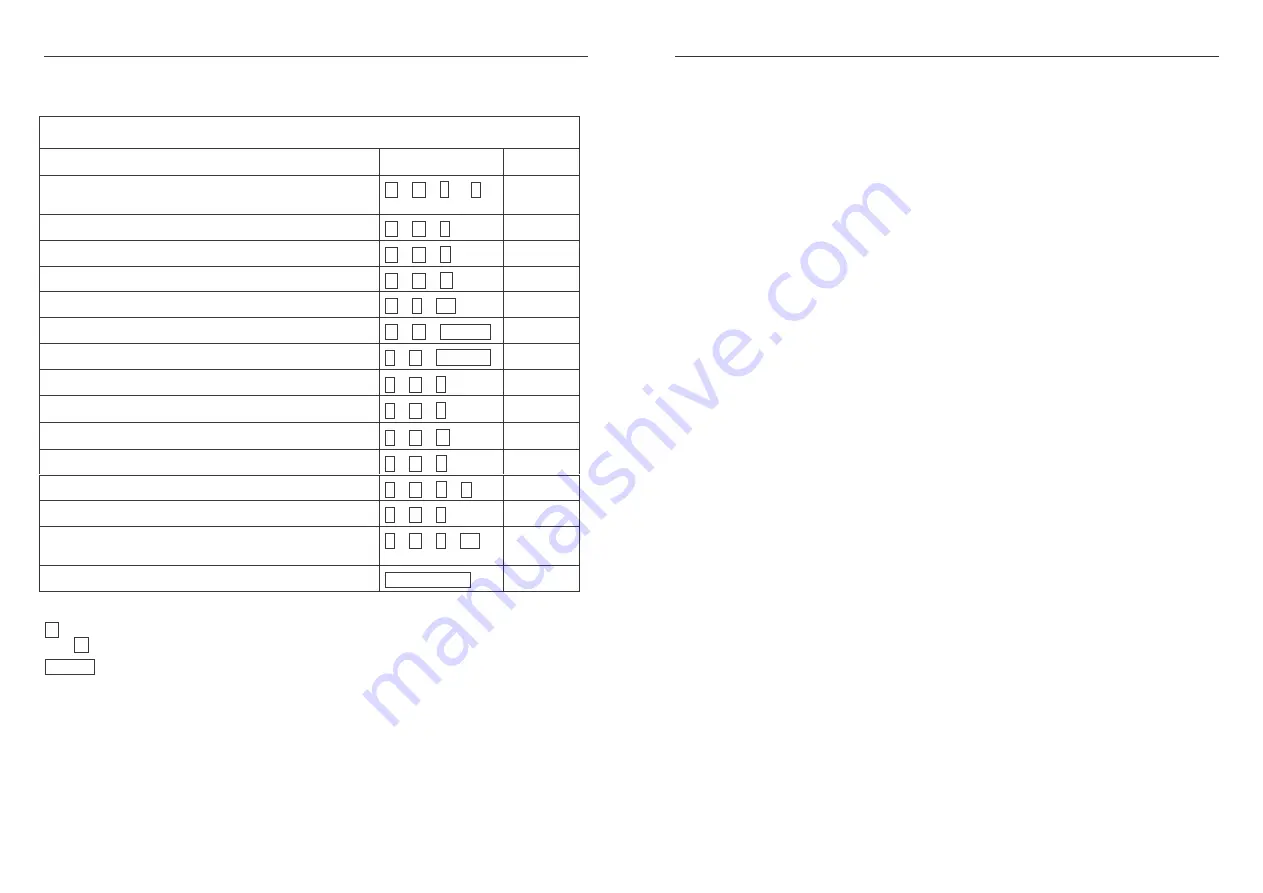
Comandi Hotkey e Opzioni di Configurazione 


 *     Rappresenta l’hotkey principale (di default è BLOC SCORR, configurabile con le hotkey   

**   NUM, CAPS, F12, o ESC) 

Fn1-Fn4 sono i tasti funzione F1, F2, F3 e F4 

(#)    Per modificare l’hotkey principale dai tasti sul pannello frontale dello switch, premere il 

tasto corrispondente all’ultima porta fino a quando non si sentono due brevi segnali 

acustici. Quindi premere la nuova hotkey (SCROLL, NUM, CAPS, F12, o ESC) sulla 

tastiera. Il KVM switch emetterà un segnale acustico a conferma della variazione della 

hotkey. 

(Si)  Quando è abilitata la commutazione congiunta tra KVM e hub USB 2.0 e/o l’Audio, 

premendo i tasti sullo switch verrà commutato tutto. Se la commutazione congiunta è 

disabilitata, l’Audio o l’hub USB sarà escluso dalla commutazione. 

KVM Switch Pro USB 2.0 Audio 

Comandi 

Hotkey Input 

Front 

Commutazione congiunta di KVM & Hub (Default Z per 

tastiere QWERTY

 *  +  *  + Z  (o Y) 


Sbloccare la commutazione congiunta di KVM & Hub  

 *  +  *  + X 


Commutazione congiunta di KVM & Audio    (Default) 

 *  +  *  + Q 


Sbloccare la commutazione congiunta di KVM & Audio  

 *  +  *  + W 


Commutazione diretta alla porta 1, 2, 3 o 4 

 *  + *  + 1-4 

SI 

Commutazione dell’Hub USB alla porta 1, 2, 3 o 4 

 *  +  *  + Fn1-Fn4 

(Si) 

Commutazione di dispositivi Audio alla porta 1, 2, 3 o 4 

*  +  *  +  Fn5-Fn8 

(Si) 

Commutazione alla porta precedente 

*  +  *  + 

↓↓↓↓


Commutazione alla porta successiva 

*  +  *  + 

↑↑↑↑


Commutazione alla porta precedente 

*  +  *  + 


Segnale acustico commutazione ON / OFF 

*  +  *  + B        


Modificare l’Hotkey pincipale  

*  +  *  + H + **        

Si (#) 

Commutazione tramite Autoscan 

*  +  *  + S        


Commutazione via Autoscan con intervallo di scan da 10s 

(1) a 100s (0) 

*  +  *  + S + 0-9       


Stop Autoscan 

Tasto qualsiasi         

Si 

Manuale d’uso 


 Italiano 

- 22 - 


Risoluzione dei Problemi 

Se si utilizzano vecchi computer USB: se si collegano vecchi computer con 

interfacce USB 1.1, assicurarsi che sia abilitato dal BIOS il supporto Legacy. 

Assicurarsi anche che il sistema operativo abbia i driver USB HID aggiornati.  
 
Alimentatore: è possibile anche utilizzare il KVM switch senza alimentatore 

esterno se utilizzato con dispositivi a basso consumo di energia. E’ comunque 

consigliato l’uso dell’alimentatore, soprattutto se si collegano dispositivi 

autoalimentati all’hub USB 2.0.  
 
Risoluzione problemi: controllare prima che tutti i cavi siano collegati 

correttamente al KVM switch ed ai dispositivi.  


1.  Se il KVM Switch emette un segnale acustico quando viene premuta la hotkey 

principale ma non compare nessuna immagine sul monitor, controllare che il  

computer selezionato non sia in standby oppure spento.  

2.  Se l’immagine visualizzata presenta difetti od ombre, assicurarsi che i cavi 

video utilizzati siano coassiali e di alta qualità.  

a.  Per segnali VGA analogici può risultare utile ridurre il frame rate video a 

72Hz. 

b.  Per segnali DVI-D digitali assicurarsi che il frame rate video sia di 60Hz. 
c.  Per segnali video misti analogici e digitali consultare le note nel capitolo 

Installazione. Il monitor dovrebbe selezionare in automatico tra il segnale 

analogico o digitale attivo. 

3.  Non premere nessun tasto sulla tastiera o sul mouse durante il processo di 

commutazione. Attendere che l’installazione dei driver sia completata. 

4.  A commutazione avvenuta tastiera o mouse non rispondono: 

a.  Utilizzare solo tastiere e mouse USB  
b.  Controllare se tastiera o mouse funzionano correttamente se connessi 

direttamente ad un computer  

c.  Riavviare il computer con tastiera e mouse collegati direttamente e 

controllare se i driver sono installati correttamente 


Se necessitate assistenza potete contattare direttamente lo staff LINDY, potete 

trovare i contatti sul sito www.lindy.com.

Summary of Contents for 32320

Page 1: ... English Benutzerhandbuch Deutsch Manuel Utilisateur Français Manuale d uso Italiano LINDY No 32320 2 Port VGA LINDY No 32321 4 Port VGA LINDY No 32322 2 Port DVI I LINDY No 32323 4 Port DVI I www LINDY com 2 User Manual English page 3 Benutzerhandbuch Deutsch Seite 8 Manuel d utilisateur Français page 13 Manuale d uso Italiano pagina 18 Certifications Statements page 24 ...

Page 2: ... that two devices to be connected to the KVM switch USB devices can either be switched together with the KVM function or configured to be excluded from switching Important Note If you share USB Pen Drives Card Readers or other memory devices and switch them between your computers you must make sure that any current data transfer is completed before you change channels If you do not do this the act...

Page 3: ...e KVM switch can be reconfigured to use a different hotkey from the following list NUM LOCK or CAPS LOCK or F12 or Escape ESC key Press the universal hotkey twice to invoke the switching function the KVM switch will confirm this with a short beep signal Depending on the next key you press you can select any of the available switching or configuration functions of the KVM switch Please refer to the...

Page 4: ...ers Should you require any help with this product then please contact LINDY Technical Support Team Contact information can easily be found on the LINDY website www lindy com Benutzerhandbuch Deutsch 8 Einführung Herzlichen Glückwunsch zum Erwerb des KVM Pro USB Audio Bitte lesen Sie dieses Handbuch sorgfältig um die ausgefeilten Möglichkeiten kennen zu lernen die Ihnen dieser technisch herausragen...

Page 5: ...igen Abschluss dieser Prozedur werden die an den KVM Switch angeschlossenen Maus und Tastatur möglicherweise nicht funktionieren Warten Sie bis Windows alle neu erkannten Komponenten komplett installiert User Manual English 10 hat und mehrmals gemeldet hat dass die neue Hardware nun verwendet werden kann Ein Mac wird möglicherweise eine PC Tastatur nicht auf Anhieb identifizieren folgen Sie den Bi...

Page 6: ...eine USB Devices angeschlossen werden kann der KVM Switch auch ohne Netzteil betrieben werden In diesem Falle erhält er seine Spannungsversorgung über die USB Kabel von den angeschlossenen Rechnern USB Geräte an den USB Hub Ports funktionieren dann NICHT Für einen problemlosen Betrieb empfehlen wir daher immer das Netzteil anzuschließen Sollten Sie Probleme mit diesem KVM Switch haben so wenden Si...

Page 7: ...TE quand vous utilisez en commun des clés USB lecteur de cartes etc la connexion à l ordinateur sera coupée lors de la commutation Les transferts de données en cours seront coupés les fichiers ouverts seront endommagés et peuvent être perdus Assurez vous bien préalablement que tous les transferts de données sont terminés ou utilisez la fonction Windows retirez mon périphérique USB en toute sécurit...

Page 8: ...iverselles hotkey pour activer la fonction de commutation Le switch KVM émet alors un bip sonore de confirmation Les options suivantes sont à disposition Manuel d utilisateur Français 16 Configuration des commandes de commutation correspond à la touche Arrêt Défil modifiables en par l utilisateur touche Num Maj F12 ou Echap Fn1 Fn4 correspond aux touches de fonctions F1 F2 F3 F4 Pour changer la to...

Page 9: ...nalogique ou numérique 2 Ne pressez aucunes touches sur la souris et sur le clavier pendant le démarrage des ordinateurs connectés Attendez jusqu à ce que Windows a installé tous les pilotes 3 Un ordinateur démarre mais le clavier ne fonctionne pas a N utilisez que des claviers USB b Vérifiez si le clavier fonctionne en le connectant directement sur l ordinateur Sinon utilisez un autre clavier 4 L...

Page 10: ...re che questa procedura sia terminata prima di utilizzare lo switch Su sistemi Mac è possibile che non venga riconosciuta la tastiera al primo avvio potrebbe apparire un menu di identificazione seguire le indicazioni per completare l installazione In alcuni casi potrebbe essere necessario scollegare e ricollegare mouse e tastiera per consentire il riconoscimento Potrebbe essere necessario anche ri...

Page 11: ... USB se si collegano vecchi computer con interfacce USB 1 1 assicurarsi che sia abilitato dal BIOS il supporto Legacy Assicurarsi anche che il sistema operativo abbia i driver USB HID aggiornati Alimentatore è possibile anche utilizzare il KVM switch senza alimentatore esterno se utilizzato con dispositivi a basso consumo di energia E comunque consigliato l uso dell alimentatore soprattutto se si ...

Page 12: ...pment The wheelie bin symbol shown indicates that this product must not be disposed of with household waste Instead the product must be recycled in a manner that is environmentally friendly For more information on how to dispose of this product please contact your local recycling centre or your household waste disposal service Each individual EU member state has implemented the WEEE regulations in...

Reviews: