background image

English 8 English 

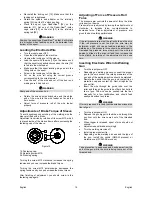
Wire Spool Loading 

Wire spool type S300 and BS300 can be installed on the 
wire spool support without adapter. 
Wire spool type S200, B300 or Readi-Reel

®

 can be 

installed, but the applicable adapter must be purchased. 
The applicable adapter can be purchased  
separately(see "Accessories" chapter). 
 

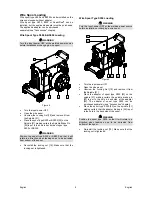
Wire Spool Type S300 & BS300 Loading 


 WARNING


Turn the input power OFF at the welding power source 
before installation or changing a wire spool. 
 

19

22

20

21


Figure 4 


Turn the input power OFF. 


Open the side panel. 


Unscrew the Locking Nut [19] and remove it from 
the Spindle [21]. 


Place the spool type S300 or BS300 [20] on the 
Spindle [21] making certain the Spindle Brake Pin 
[22] is put in the hole in back side of spool type 
S300 or SB300. 


 WARNING


Position the spool type S300 or SB300 so that it will 
rotate in a direction when feeding so as to be de-reeled 
from bottom of the spool. 
 

  Re-install the locking nut [19]. Make sure that the 

locking nut is tightened. 


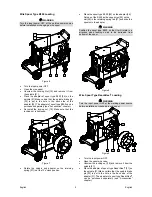
Wire Spool Type S200 Loading 


 WARNING


Turn the input power OFF at the welding power source 
before installation or changing a wire spool. 
 

19

25

22

21

24

23


Figure 5 


Turn the input power OFF. 


Open the side panel. 

  Unscrew the Locking Nut [19] and remove it from 

the Spindle [21]. 

  Place the adapter of spool type S200 [23] on the 

spindle [21] making certain the spindle brake pin 
[22] is put in the hole in back side of the adapter 
[23]. The adapter of spool type S200 can be 
purchased separately (see "Accessories" chapter). 


Place the spool type S200 [25] on the spindle [21] 
making certain that the adapter brake pin [24] is put 
in the hole in the back side of the spool. 


 WARNING


Position the spool type S200 so that it will rotate in a 
direction when feeding so as to be de-reeled from 
bottom of the spool. 
 

  Re-install the locking nut [19]. Make sure that the 

locking nut is tightened. 
 

Summary of Contents for WELD PAK 2000

Page 1: ...IM3051 11 2014 REV01 WELD PAK 2000 OPERATOR S MANUAL ENGLISH Lincoln Electric Bester Sp z o o ul Jana III Sobieskiego 19A 58 263 Bielawa Poland www lincolnelectric eu...

Page 2: ...WELD PAK 2000 conforms to the following directives 2006 95 CEE 2004 108 CEE and has been designed in compliance with the following standards EN 60974 1 EN 60974 5 EN 60974 10 2007 01 05 2014 Pawe Lipi...

Page 3: ...For future reference record in the table below your equipment identification information Model Name Code Serial Number can be found on the machine rating plate Model Name Code Serial number Date Wher...

Page 4: ...ge GMAW 49 Vdc 100 80 A 18 Vdc 20 180 A 23 Vdc FCAW SS 49 Vdc 100 80 A 18 Vdc 20 180 A 23 Vdc SMAW 49 Vdc 100 70 A 23 2 Vdc 20 160 A 26 4 Vdc WELDING CURRENT RANGE GMAW FCAW SS SMAW 20 A 200 A 20 A 20...

Page 5: ...y for equipment operating in or near the work area The operator must be sure that all equipment in the area is compatible This may require additional protection measures The dimensions of the work are...

Page 6: ...AGNETIC FIELDS MAY BE DANGEROUS Electric current flowing through any conductor creates electric and magnetic fields EMF EMF fields may interfere with some pacemakers and welders having a pacemaker sha...

Page 7: ...ng wire Wire diameter Recommended equipment which can be bought by user was mentioned in the chapter Accessories Installation and Operator Instructions Read this entire section before installation or...

Page 8: ...s below Controls and Operational Features 1 Power Switch ON OFF I O Controls the input power to the machine Be sure the power source is connected to the mains supply before turning power on I After in...

Page 9: ...Wire Drive for GMAW FCAW SS process 2 Roll wire drive 14 Welding Wire for GMAW FCAW SS 15 Spooled Wire for GMAW FCAW SS The machine does not include a spooled wire 16 Wire Spool Support Maximum 15kg...

Page 10: ...English English 7 Table 1 Positive polarity factory setting Table 2 Negative polarity...

Page 11: ...in a direction when feeding so as to be de reeled from bottom of the spool Re install the locking nut 19 Make sure that the locking nut is tightened Wire Spool Type S200 Loading WARNING Turn the input...

Page 12: ...t the 12 o clock position Place the spool type B300 29 on the adapter 26 Set one of the B300 inside cage wires 30 on the slot 28 in the retaining spring tab 27 and slide the spool onto the adapter WAR...

Page 13: ...er finishing of adjustment you should screw in the fastening cap again Adjusting of Force of Pressure Roll Force The pressure arm controls the amount of force the drive rolls exert on the wire Pressur...

Page 14: ...1 1m See the Figure 12 The gas cylinder which is fastened on the machine s shelf has to be secured by attaching it to the machine using the chain Figure 12 Welding GMAW FCAW SS Process WELD PAK 2000...

Page 15: ...est Technical Service Center or Lincoln Electric Repairs and modifications performed by unauthorized service or personnel will cause that the manufacturer s warranty will become null and void Any noti...

Page 16: ...ng number called for in the assembly page indicate a change in this printing First read the Part List reading instructions above then refer to the Spare Part manual supplied with the machine that cont...

Reviews: