


b-5
OPERATION
b-5
PULSE WELDING
Pulse welding procedures are set by controlling an
overall "arc length" variable. When pulse welding, the
arc voltage is highly dependent upon the waveform.
The peak current, back ground current, rise time, fall
time and pulse frequency all affect the voltage. The
exact voltage for a given wire feed speed can only be
predicted when all the pulsing waveform parameters
are known. Using a preset voltage becomes impracti-
cal, and instead the arc length is set by adjusting
"trim".
Trim adjusts the arc length and ranges from 0.50 to
1.50, with a nominal value of 1.00. Trim values greater
than 1.00 increase the arc length, while values less
than 1.00 decrease the arc length.
Most pulse welding programs are synergic. As the
wire feed speed is adjusted, the Power Wave will
automatically recalculate the waveform parameters to
maintain similar arc properties.
The Power Wave utilizes "adaptive control" to com-
pensate for changes in electrical stick-out while weld-
ing. (Electrical stick-out is the distance from the con-
tact tip to the work piece.) The Power Wave wave
forms are optimized for a 0.75" (19mm) stick-out. The
adaptive behavior supports a range of stickouts from
0.50" (13mm) to 1.25" (32mm). At very low or high
wire feed speeds, the adaptive range may be less due
to reaching physical limitations of the welding process.
Arc Control, often referred to as wave control, in pulse
programs usually adjusts the focus or shape of the
arc. Wave control values greater than 0.0 increase the
pulse frequency while decreasing the background cur-
rent, resulting in a tight, stiff arc best for high speed
sheet metal welding. Wave control values less than
0.0 decrease the pulse frequency while increasing the
background current, for a soft arc good for out-of-posi-
tion welding.
(See Figure B.3)
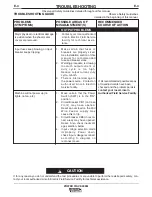
POWER WAVE 405M
FIGURE b.3
Current
Time
CURRENT WAVE FORM (PULSE)
PULSE-ON-PULSE™ (GMAW-PP)
Pulse on Pulse™ is a Lincoln process specifically
designed for use in welding relatively thin (less than
1/4"(6.4mm)0 thick) aluminum (See Table B.3). It
gives weld beads with very consistent uniform ripple.
In Pulse on Pulse modes, two distinct pulse types are
used, instead of the single pulse type normally used in
GMAW-P. A number of high energy pulses are used
to obtain spray transfer and transfer metal across the
arc. Such pulses are shown in Figure B.4. After a
number "N" of such pulses, depending on the wire
feed speed used, an identical number "N" of low ener-
gy pulses are performed. These low energy pulses,
shown in Figure B.4, do not transfer any filler metal
across the arc and help to cool the arc and keep the
heat input low.
The Peak Current, Background Current, and
Frequency are identical for the high energy and low
energy pulses. In addition to cooling the weld down,
the major effect of the low energy pulses is that they
form a weld ripple. Since they occur at very regular
time intervals, the weld bead obtained is very uniform
with a very consistent ripple pattern. In fact, the bead
has its best appearance if no oscillation of the welding
gun ("whipping") is used.(See Figure B.5)
When Arc Control is used in the Pulse on Pulse
modes, it does the same things it does in the other
pulsed modes: decreasing the Arc Control decreases
the droplet transfer and weld deposition rate.
Increasing the Arc Control increases the droplet trans-
fer and weld deposition rate. Since Arc Control varies
weld droplet transfer rate, the Arc Control can be used
to vary the ripple spacing in the weld bead.
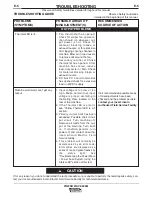
PEAK
AMPS
BACKGROUND
AMPS
TIME
HIGH HEAT
PULSES
LOW HEAT
PULSES
"N" PULSES
"N" PULSES
PEAK
AMPS
BACKGROUND
AMPS
TIME
HIGH HEAT
PULSES
LOW HEAT
PULSES
"N" PULSES
"N" PULSES
Summary of Contents for POWER WAVE 405M
Page 39: ...NOTES POWER WAVE 405M ...