Lincoln Electric CLASSIC 300 G Operator'S Manual Download Page 10

PRE-OPERATION SERVICE

READ

the engine operating and maintenance instruc-

tions supplied with this machine.

OIL

This unit is supplied from the factory with the engine
crankcase filled with a high quality SAE 10W/30 oil.
This oil should be acceptable for most typical ambient
temperatures.
Consult the engine operation manual for specific
engine manufacturer’s recommendations. Upon receipt
of the welder, check the engine dipstick to be sure the
oil is at the “full” mark. 

DO NOT overfill.

FUEL

Fill the fuel tank with the grade of fuel recommended in
the Engine Operator’s manual. Make sure the fuel
valves on the sediment bowl and the water separator
are in the open positions.

COOLING SYSTEM

The radiator has been filled at the factory with a 50-50
mixture of ethylene glycol antifreeze and water.  Check
the radiator level and add a 50-50 solution as needed
(see engine manual or antifreeze container for alter-
nate antifreeze recommendations)

CAUTION

When welding at a considerable distance from the
welder, be sure you use ample size welding cables. 

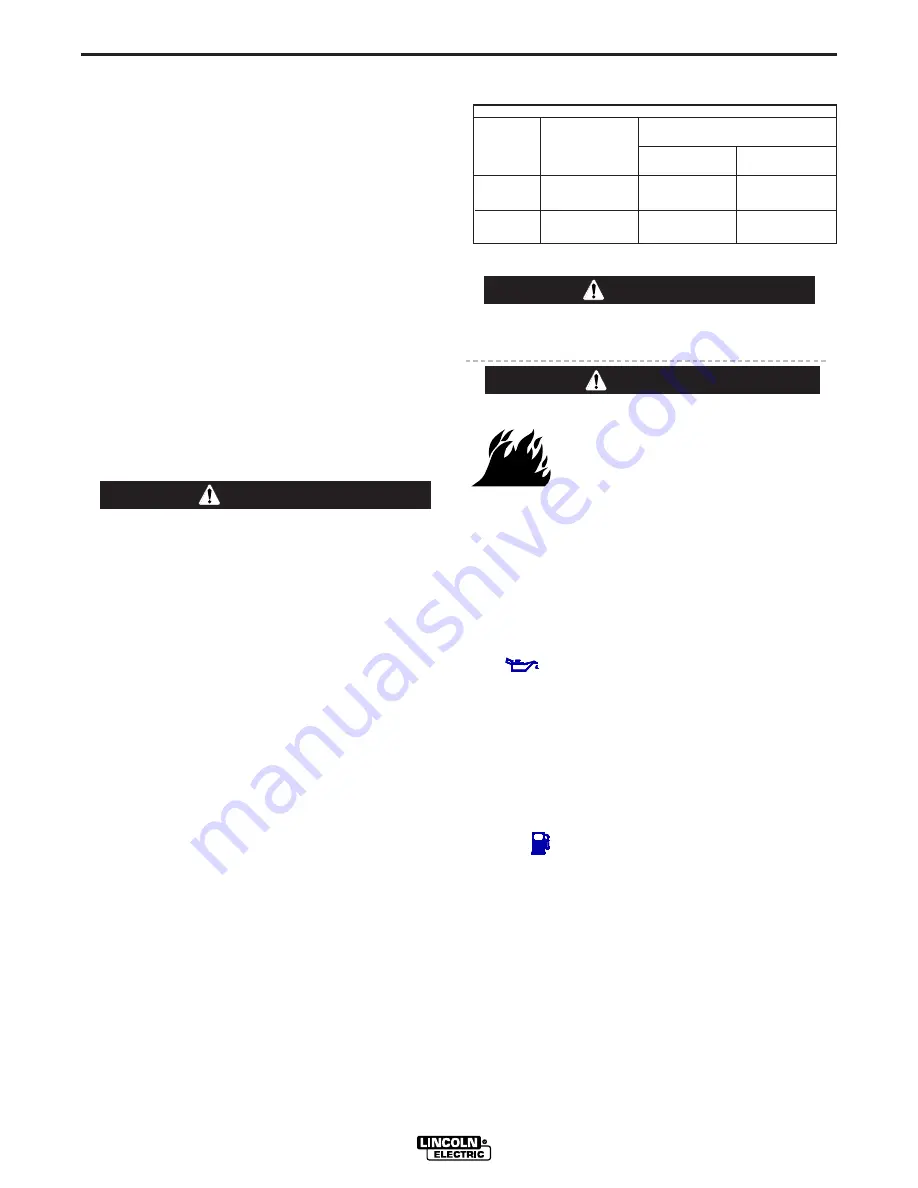
RECOMMENDED COPPER CABLE SIZES

Cables Sizes for Combined Length
of Electrode Plus Work Cable

Up to 200 ft.

200 to 250 ft.

Amps

Duty Cycle

60.96 m

200 to76.2 m

250

100%

1

1/0

300

60%

1/0

2/0

A-3

INSTALLATION   

CLASSIC 300G

A-3

TRAILER (See ACCESSORY Section) 

If the user adapts a non-Lincoln trailer, he must
assume responsibility that the method of attachment
and usage does not result in a safety hazard nor dam-
age the welding equipment. Some of the factors to be
considered are as follows:
1.  Design capacity of trailer vs. weight of Lincoln
equipment and likely additional attachments.
2.  Proper support of, and attachment to, the base of
the welding equipment so there will be no undue
stress to the framework.
3.  Proper placement of the equipment on the trailer to
ensure stability side to side and front to back when
being moved and when standing by itself while being
operated or serviced.
4.  Typical conditions of use, i.e., travel speed, rough-
ness of surface on which the trailer will be operated;
environmental conditions, likely maintenance.

5.  Conformance with federal, state and local laws. (1)

(1) Consult applicable federal, state and local laws regarding specific

requirements for use on public highways.

POLARITY CONTROL AND CABLE SIZES

With the engine off, route the electrode and work
cables through the strain relief bracket on the base
and connect to the studs located below the fuel tank
mounting rail. (See size recommendations below.)
For

Positive

polarity, connect the electrode cable to

the terminal marked 

“+”

. For 

Negative

polarity, con-

nect the electrode cable to the 

“-”

stud. These con-

nections should be checked periodically and tightened
if necessary.

• Stop engine while fueling.
• Do not smoke when fueling.
• Keep sparks and flame away

from tank.

• Do not leave unattended while

fueling.

• Wipe up spilled fuel and allow

fumes to clear before starting
engine.

• Do not overfill tank, fuel expan-

sion may cause overflow.

GASOLINE FUEL ONLY

------------------------------------------------------------------------

WARNING

GASOLINE

can cause fire
or explosion.

VEHICLE MOUNTING

Improperly mounted concentrated loads may
cause unstable vehicle handling and tires or other
components to fail.

• Only transport this Equipment on serviceable

vehicles which are rated and designed for such
loads.

• Distribute, balance and secure loads so vehicle

is stable under conditions of use.

• Do not exceed maximum rated loads for compo-

nents such as suspension, axles and tires.

• Mount equipment base to metal bed or frame of

vehicle.

• Follow vehicle manufacturer’s instructions.

------------------------------------------------------------------------

WARNING

Summary of Contents for CLASSIC 300 G

Page 1: ...houghtful operation on your part DO NOT INSTALL OPERATE OR REPAIR THIS EQUIPMENT WITHOUT READING THIS MANUAL AND THE SAFETY PRECAUTIONS CONTAINED THROUGHOUT And most importantly think before you act a...

Page 2: ...WEARERS SHOULD CONSULT WITH THEIR DOCTOR BEFORE OPERATING Read and understand the following safety highlights For additional safety information it is strongly recommended that you purchase a copy of...

Page 3: ...cal earth ground 3 f Maintain the electrode holder work clamp welding cable and welding machine in good safe operating condition Replace damaged insulation 3 g Never dip the electrode in water for coo...

Page 4: ...vent the welding sparks from starting a fire Remember that welding sparks and hot materials from welding can easily go through small cracks and openings to adjacent areas Avoid welding near hydraulic...

Page 5: ...appropri s et non inflammables 4 Des gouttes de laitier en fusion sont mises de l arc de soudage Se prot ger avec des v tements de protection libres de l huile tels que les gants en cuir chemise paiss...

Page 6: ...ion below for future reference This information can be found on your machine nameplate Product _________________________________________________________________________________ Model Number __________...

Page 7: ...eration B 2 Duty Cycle B 2 Control of Welding Current B 3 Idler Operation B 3 Auxiliary Power B 3 Throttle Body Deicing B 3 Accessories Section C Optional Equipment Field Installed C 1 Maintenance Sec...

Page 8: ...WIDTH DEPTH WEIGHT 40 94 in 24 00 in 66 91in 1039 9 mm 609 6 mm 1700 mm 1330 lbs 603kg Top of enclosure add 8 0 203 2mm for exhaust OUTPUT GENERATOR Auxiliary Power 1 3000 Watts 60 Hz AC 26 Amps 115V...

Page 9: ...per wire to a solid earth ground such as a metal water pipe going into the ground for at least ten feet and having no insulated joints or to the metal framework of a building which has been effectivel...

Page 10: ...chment to the base of the welding equipment so there will be no undue stress to the framework 3 Proper placement of the equipment on the trailer to ensure stability side to side and front to back when...

Page 11: ...ION when Installing a new battery disconnect the nega tive cable from the old battery first and connect the negative cable to the new battery last Connecting a battery charger remove the battery from...

Page 12: ...cing Keep away from moving parts See additional warning information at the front of this operator s manual WARNING DO NOT MOUNT OVER COMBUSTIBLE SURFACES Where there is a combustible surface directly...

Page 13: ...Protection The system shuts the engine down in the event of sudden low oil pressure or high coolant temperature A warning light on the control panel will indicate such a fault To reset the engine for...

Page 14: ...rcuit voltage is also controlled by the Fine Current Adjustment permitting control of the arc characteristics A high open circuit voltage setting provides the soft buttering arc with best resistance t...

Page 15: ...the OCV at the welding site Remote Control Kit K2464 1 Contains a remote control rheostat for adjusting the CC STICK OCV remote control potentiometer for adjusting the CV WIRE OCV and 100ft 30 5m cabl...

Page 16: ...and use clean equipment More bearing failures are caused by dirt introduced during greasing than from insufficient grease COMMUTATOR AND BRUSHES Uncovered rotating equipment can be dangerous Use care...

Page 17: ...gine alternator and the TBI controller can result from incorrect connection Proper operation of the idle control requires good grounding of the TBI controller and battery If desired the welder can be...

Page 18: ...ear 11AV0955 R Fan Belt Good Year 11AV1220 I Tighten cylinder head R Spark Plugs Gap 0 040 4 AC R46TS I Electrical systems I All nuts and bolts for tightness 4 C C Air filter earlier check may be req...

Page 19: ...lumn labeled PROBLEM SYMP TOMS This column describes possible symptoms that the machine may exhibit Find the listing that best describes the symptom that the machine is exhibiting Step 2 POSSIBLE CAUS...

Page 20: ...2 Brushes may be worn down to limit 3 Field circuit may have variable resistance connection or intermit tent open circuit due to loose or broken wire 4 Electrode lead or work lead con nection may be p...

Page 21: ...brushholder is the one nearest to the rotor lamination See the wiring diagram With the engine NOT running touch the positive battery terminal to the positive brushholder Remove the battery from the ci...

Page 22: ...e Idler from current sensing board Control Switch Operation Same Machine Idlers Check wiring between TBI controller and current sensing board 1 Check for current in wires looping through current senso...

Page 23: ...uck Check for loose or disconnected wire running between weld selector switch and output stud If for any reason you do not understand the test procedures or are unable to perform the tests repairs saf...

Page 24: ...fuel filter 4 Irregular and faulty fuel supply Injector pump trouble 5 Moisture or carbon on spark plugs 6 Improper viscosity of the lubri cating oil 7 Clogged air cleaner 8 No compression 9 Engine p...

Page 25: ...e or Blue Smoke Dark Smoke Faulty Charging Starter Motor does not run Engine Knocking Lack of Power 1 Lack of Coolant 2 Loose or slipping fan belt 3 Damaged fan belt 1 Excess engine oil 2 Too low visc...

Page 26: ...e you proceed CAUTION PROBLEMS SYMPTOMS POSSIBLE AREAS OF MISADJUSTMENTS S RECOMMENDED COURSE OF ACTION Surging Large Decrease in Speed Engine runs Irregularly Engine fails to pick up speed when Arc i...

Page 27: ...EAR CONNECT TO CASE G NEUTRAL BONDED TO FRAME NEUTRE RACCORDE AU BATI GROUND SCREW NEAR FUSE A 02 3 4 5 14 61 62 K924 4 REMOTE CONTROL OPTIONAL WITH MACHINE NOT RUNNING REMOVE PLUG P9 ON MACHINE FROM...

Page 28: ...LEAD 8 LEAD NEGATIVE CV OUTPUT TERMINAL PANEL MACHINE MUST NOT BE RUNNING ON MACHINE REMOVE PLUG P10 FROM CONNECTOR J5 CONNECT PLUG P5 ON W F M TO CONNECTOR J5 ON MACHINE PLUG P5 250 AMP THERMOSTAT AS...

Page 29: ...ORS Y X B G W F G ORANGE WHITE JUMPER WHITE JUMPER PIN CABLE CONNEC TION TABLE C D E LEAD COLOR RED BLUE CV WIRE CONTROL POT CCW BLUE RED ORANGE REMOTE CONTROL BOX CONNECT TO CASE K2464 1 REMOTE CONTR...

Page 30: ...8 4 1 6 6 8 2 6 3 2 5 1 1 5 6 4 5 5 A C O N T R O L P A N E L F G B H D E C O H O L E O M O U N T I N G H O L E N A N B N O T E S O I L A N D W A T E R I N E N G I N E B U T N O F U E L N A C E N T E...

Page 31: ...electrically live parts or electrode with skin or wet clothing Insulate yourself from work and ground No toque las partes o los electrodos bajo carga con la piel o ropa moja da Aislese del trabajo y...

Page 32: ...e Be und Entl ftung des Arbeitsplatzes Mantenha seu rosto da fuma a Use ventila o e exhaust o para remover fumo da zona respirat ria Turn power off before servicing Desconectar el cable de ali mentaci...

Page 33: ...and Service through Subsidiaries and Distributors Worldwide Cleveland Ohio 44117 1199 U S A TEL 216 481 8100 FAX 216 486 1751 WEB SITE www lincolnelectric com World s Leader in Welding and Cutting Pr...

Reviews: