Lincoln Electric AC-235 Manual Download Page 13

– 13 –

4. The Correct Welding Speed

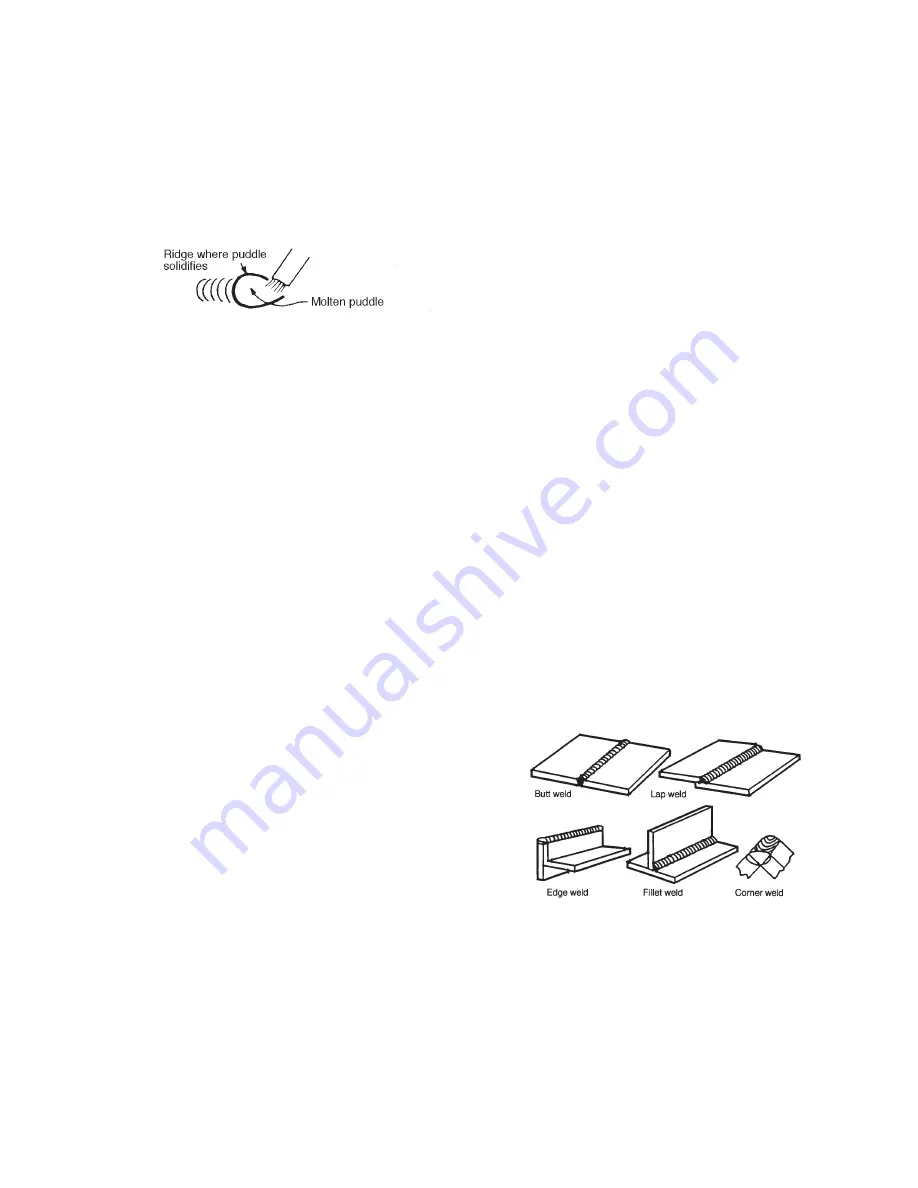
The important thing to watch while welding is the puddle
of molten metal right behind the arc. 

Do NOT watch the

arc itself.

It is the appearance of the puddle and the ridge

where the molten puddle solidifies that indicate correct
welding speed. The ridge should be approximately 3/8"
(9.5mm) behind the electrode.

Most beginners tend to weld too fast, resulting in a thin,
uneven, “wormy” looking bead. They are not watching the
molten metal.

IMPORTANT:

For general welding it is not necessary to

weave the arc; neither forwards and backwards nor side-
ways. Weld along at a steady pace. You will find it easier.

NOTE:

When welding on thin plate, you will find that you

will have to increase the welding speed, whereas when
welding on heavy plate, it is necessary to go more slowly
in order to get good penetration.

Practice

The best way of getting practice in the four skills that
enable you to maintain:

1 Correct Welding Position
2. Correct Way To Strike An Arc
3. Correct Arc Length
4. Correct Welding Speed

is to spend a little more time on the following exercise.

Use the following:

Mild Steel Plate ......................3/16" (4.8mm) or heavier
Electrode ............................1/8" (3.2mm) Fleetweld 180
Current Setting..........................................105 Amps AC

Do the following:

1. Learn to strike the arc by scratching the electrode over

the plate. Be sure the angle of the electrode is correct. If
you have a headshield use both hands.

2. When you can strike an arc without sticking, practice the

correct arc length. Learn to distinguish it by its sound.

3. When you are sure that you can hold a short, crackling

arc, start moving. Look at the molten puddle constantly,
and look for the ridge where the metal solidifies.

4. Run beads on a flat plate. Run them parallel to the top

edge (the edge farthest away from you). This gives you
practice in running straight welds, and also, it gives you
an easy way to check your progress. The 10th weld will
look considerably better than the first weld. By con-
stantly checking on your mistakes and your progress,
welding will soon be a matter of routine.

Common Metals

Most metals found around the farm or small shop are low
carbon steel, sometimes referred to as mild steel. Typical
items made with this type of steel include most sheet metal,
plate, pipe and rolled shapes such as channels, angle irons
and “I’’ beams. This type of steel can usually be easily
welded without special precautions. Some steel, however,
contains higher carbon. Typical applications include wear
plates, axles, connecting rods, shafts, plowshares and
scraper blades. These higher carbon steels can be welded
successfully in most cases; however, care must be taken to
follow proper procedures, including preheating the metal to
be welded and, in some cases, carefully controlling the
temperature during and after the welding process. For fur-
ther information on identifying various types of steels and
other metals, and for proper procedures for welding them,
we again suggest you purchase a copy of “New Lessons in
Arc Welding” (see page 25).

Regardless of the type of metal being welded, it is impor-
tant in order to get a quality weld that it be free of oil, paint,
rust or other contaminants.

Types of Welds

Five types of welding joints are: Butt Welds, Fillet Welds,
Lap Welds, Edge Welds and Corner Welds.

Of these, the Butt Weld and Fillet Weld are the two most
common welds.

Butt Weld

Butt Welds are the most widely used welds. Place two
plates side by side, leaving 1/16” (1.6mm) (for thin metal)
to 1/8” (3.2mm) (for heavy metal) space between them in
order to get deep penetration .

Summary of Contents for AC-235

Page 1: ...g Electrodes 23 Brief descriptions of the types and operating data for all Lincoln electrodes Welding Books and Teaching Aids 25 Sales and Service through Subsidiaries and Distributors Worldwide Cleve...

Page 2: ...ctrode electrode reel welding head nozzle or semiautomatic welding gun are also electrically hot 1 d Always be sure the work cable makes a good electrical connection with the metal being welded The co...

Page 3: ...welding sparks from starting a fire Remember that welding sparks and hot materials from welding can easily go through small cracks and openings to adjacent areas Avoid welding near hydraulic lines Hav...

Page 4: ...outdoors ____________________________________________________ 7 c Do not add the fuel near an open flame welding arc or when the engine is running Stop the engine and allow it to cool before refuelin...

Page 5: ...inflammables 4 Des gouttes de laitier en fusion sont mises de l arc de soudage Se prot ger avec des v tements de protection libres de l huile tels que les gants en cuir chemise paisse pantalons sans...

Page 6: ...on below for future reference This information can be found on your machine nameplate Product _________________________________________________________________________________ Model Number ___________...

Page 7: ...frame when the welder plug is inserted into the receptacle If a separate dis connect switch is used it should have two poles for the two hot lines and both should be fused for 50 amperes Attaching El...

Page 8: ...play after switching to a new position This wip ing action keeps the contacts free from dirt and oxides Duty Cycle The AC 235 is rated for 20 duty cycle on all switch posi tions except maximum 235 amp...

Page 9: ...9 NOTES...

Page 10: ...ription number required the welder name model number and code number 1 2 3 4 5 6 7 8 10 11 12 13 14 15 16 17 18 19 20 21 22 Item Description 1A Fan Motor 1B Fan Blade 2 Case 3 Nameplate 4 Warning Deca...

Page 11: ...g the tip of the electrode 1 16 1 8 away from the work or base metal being welded The electric arc is established in this gap and is held and moved along the joint to be welded melting the metal as it...

Page 12: ...Welding Position Beginners will find it easier to learn how to control the welding arc using the two handed technique shown below This requires the use of a headshield a Hold the electrode holder in...

Page 13: ...fies 4 Run beads on a flat plate Run them parallel to the top edge the edge farthest away from you This gives you practice in running straight welds and also it gives you an easy way to check your pro...

Page 14: ...iginal metal Fillet Welds When welding fillet welds it is very important to hold the electrode at a 45 angle between the two sides or the metal will not distribute itself evenly To make it easy to get...

Page 15: ...down welds are applied at a fast pace These welds are therefore shallow and narrow and as such are excellent for sheet metal Do not use the vertical down technique on heavy metal The welds will not be...

Page 16: ...about one inch 25mm from the sharp edge 4 The bead should be put on with a weaving motion and it should be 1 2 to 3 4 12 7 to 19mm wide Do not let the arc blow over the edge as that will dull the edg...

Page 17: ...l slowly 2 He can weld 1 2 12 7mm at a time and not weld at that spot again until the weld is completely cool to the touch In this way no large amount of heat is put into the mass Most inexperienced w...

Page 18: ...ORCH Welding Aluminum and Copper Alloys Brazing and Soldering Heating Bending and Straightening Required Equipment 1 A Lincoln Carbon Arc Torch L 2645 Its rating is 100 amperes 2 1 4 5 16 or 3 8 6 4 7...

Page 19: ...reversing the thumb control setting to spread the carbons 1 16 to 3 16 1 6 to 4 8mm apart As the carbons burn away use the thumb control to maintain the desired arc When the proper arc can no longer b...

Page 20: ...ns 5 Play the arc 3 to 4 75 to 100mm up and down the joint at the start This preheat helps to give a smoother bead and an easier start when the filler rod is applied 6 Move the torch to the beginning...

Page 21: ...y be classified into the following groups Out of Position Group E6011 This group includes electrodes which have a snappy deep penetrating arc and fast freezing deposits These electrodes are used for g...

Page 22: ...and V butts Also sometimes used with fill freeze and low hydrogen electrodes to make the first pass on these joints Motion D is a triangular weave used with fill freeze and low hydrogen electrodes to...

Page 23: ...225 Pink E7010 A1 Shield Arc 85P DC 140 225 Tan E7010 G Shield Arc HYP DC 75 130 90 185 140 225 160 250 Gray E8010 G Shield Arc 70 DC 75 130 90 185 140 225 Gray Brown E8018 C1 Jet LH 8018 C1 DC 90 150...

Page 24: ...24...

Page 25: ......

Page 26: ...electrically live parts or electrode with skin or wet clothing Insulate yourself from work and ground No toque las partes o los electrodos bajo carga con la piel o ropa moja da Aislese del trabajo y...

Page 27: ...e Be und Entl ftung des Arbeitsplatzes Mantenha seu rosto da fuma a Use ventila o e exhaust o para remover fumo da zona respirat ria Turn power off before servicing Desconectar el cable de ali mentaci...

Page 28: ...and Service through Subsidiaries and Distributors Worldwide Cleveland Ohio 44117 1199 U S A TEL 216 481 8100 FAX 216 486 1751 WEB SITE www lincolnelectric com World s Leader in Welding and Cutting Pr...

Reviews: