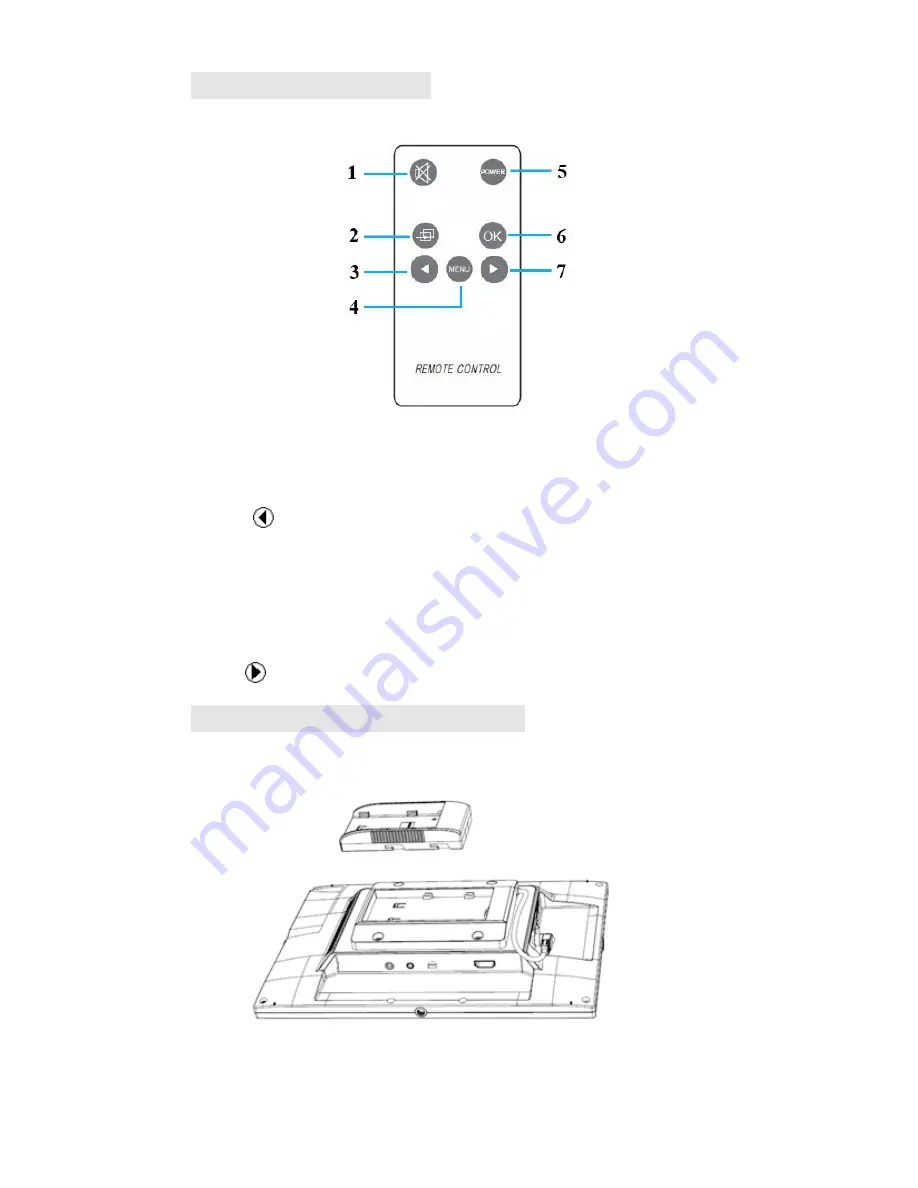
Lilliput FA1014 User Manual Download Page 6


  2. REMOTE CONTROL 


1. MUTE 

2. Circularly switch among of AV1, AV2, PC, HDMI, DVI or SDI. 

3. 

:  Left  move

Volume  down  or  to  adjust  the  value  of  setting 

function. 

4. MENU: To activate OSD (on-screen display) menu. 

5. POWER: ON/OFF. 

6. OK: Enter. 

7.

: Right move, Volume up or to adjust the value of setting function. 

  3. DV BATTERY MOUNT PLATE 

Standard mounts process 


Following  three  types  of  battery  plates  are  suitable  for  this  device,  model 

F970, QM91D, DU21 & LP-E6 (choose 2 out of 4). 

Summary of Contents for FA1014

Page 1: ...0 User Guide...

Page 2: ...onto the ground 3 Please do NOT use chemical solutions to clean this product Please wipe with a clean soft cloth to maintain the brightness of the surface 4 Please do not block any vent hole 5 Please...

Page 3: ...reen while working 4 Dial Turn the dial to adjust volume Turn the dial to select menu option and adjust the option value Press the dial to confirm 5 M EXIT To activate or exit OSD menu 6 FN Image auto...

Page 4: ...rface 2 DC 12V power input 3 HDMI DVI input interface 4 I O control interface 5 A V input interface 6 Earphone jack 7 Speaker 8 VESA Mounting interface 9 Slide to left to connect power cable Connectin...

Page 5: ...nput 4 DC TALLY connector 5 HDMI DVI input interfaces 6 HDMI output interface 7 Video output interface 8 A V input interface 9 Earphone jack 10 SDI output interface 11 SDI input interface 12 Speaker 1...

Page 6: ...lue of setting function 4 MENU To activate OSD on screen display menu 5 POWER ON OFF 6 OK Enter 7 Right move Volume up or to adjust the value of setting function 3 DV BATTERY MOUNT PLATE Standard moun...

Page 7: ...Model QM91D for battery of SONY DV DSCR1 F S MVCCD E HC15E HC1E AE1u DCRTRV828 E CCD TRV 116 DCR DVD PS105K 300K 10P 1E series Model F970 for battery of SONY DV DCR TRV series DCR TRV E series VX2100...

Page 8: ...ne 1 Blue Video trigger 1 2 Back GND 3 Green Video trigger 2 Composite cable White audio Yellow video 1 Yellow video 2 A V signal input HDMI to HDMI cable 1 HDMI signal input end 2 HDMI signal input c...

Page 9: ...rightness sharpness contrast saturation volume tint User can adjust the parameters of the selected item with Slide up and down to meet their needs 5 1 2 FN user definable function button Long press FN...

Page 10: ...he slider up to confirm after that press M EXIT to return to main menu 5 2 1 Picture ITEMS OPTIONS Brightness 0 100 Contrast 0 100 Saturation 0 100 Tint 0 100 Sharpness 0 100 Volume 0 100 Color Temp 6...

Page 11: ...FF Safety Marker OFF 95 93 90 88 85 80 5 2 3 Display ITEMS OPTIONS Aspect Ratio Full Screen 16 9 4 3 1 85 1 2 35 1 H V Delay OFF H V V H Check Field OFF Mono Red Green Blue Pixel to Pixel OFF ON Under...

Page 12: ...MS OPTIONS Auto ON H Position 0 100 V Position 0 100 Phase 0 63 Clock 0 100 5 2 5 System ITEMS OPTIONS Language English Chinese Reset OFF ON Backlight 0 100 Auto Light OFF ON Image Flip H V V H Upgrad...

Page 13: ...12 6 ACCESSORIES Standard Accessories Optional Accessories...

Page 14: ...problems Please press button and choose M EXIT SYSTEM Reset ON 6 According to the ISP the machine cannot function properly ISP for program upgrades non professionals do not use Please reboot your devi...

Page 15: ...14...

Reviews: