background image


5. Software Control - Lightware Device Controller


MMX4x2 series – User's Manual 

62

Applied firmware package: v1.6.0b19 | LDC software: v2.5.13b5

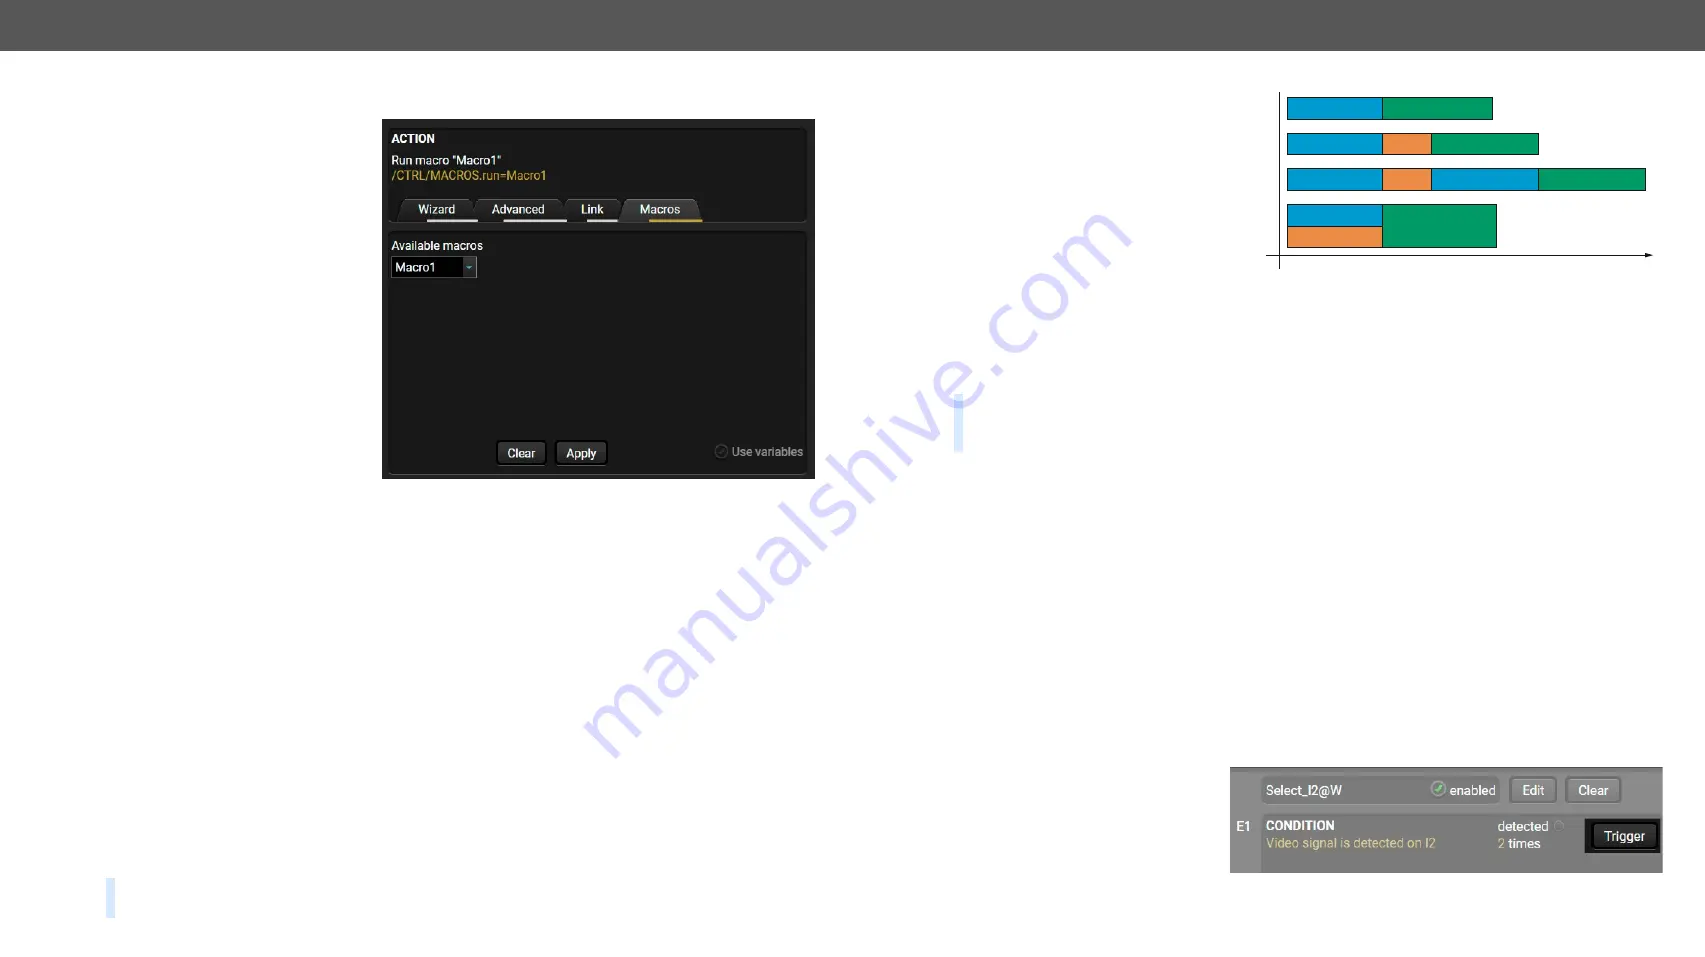
Linking a Macro (Action)

Macros stored in the device can be run 

as Actions. Thus a lot of commands 

can be run by using only one Event. The 

commands will be processed one-by-

one after each other.

 #macro

Step 1. 

Click on the 

Edit

 button of the 

desired Event; the 

Event editor

 is 

displayed.

Step 2. 

The wizard mode is the default, 

press the 

Macros

 button in the 

Action

 panel.

Step 3. 

Select the desired 

Macro 

from 

the list then press the 

Apply


button to store settings.

See more information about the Macro 

settings in the 

Macros

 section.


5.10.3. 

Special Tools and Accessories

The Name of the Event

The name of a port can be changed by typing the new name and clicking on the 

Set

 button. The following 

characters are allowed when naming: Letters (A-Z) and (a-z), numbers (0-9), special characters: hyphen ( - ), 

underscore ( _ ), and space ( ).

Enable or Disable an Event

The set Event can be enabled or disabled in the Event list, or directly in the Event editor window by setting or 

removing the 

tick mark

 beside the name.

Testing the Condition

When the desired Condition is arranged, the setting can be tested. The Event list and the Event editor contains 

a small panel that shows an indicator if the set condition is detected (or triggered). The 

detected

 mark turns 

green for two seconds and the 

Counter

 is increased. The 

Counter

 is reset at boot or can be reset manually by 

the button in Event editor.

Testing the Action

The method is the same as testing the Condition, but in this case, the Action can be triggered manually by 

pressing the 

Test

 button.

TIPS AND TRICKS: 

The Test button is also placed on the Action panel in the Event list. Thus you can check 

the Actions without opening the Event editor.

Delay the Action

In most cases the Action is 

performed immediately after 

the Condition is detected. But 

sometimes a delay is necessary 

between the Condition and the 

Action. Therefore, the new Event 

manager contains the Delay panel, 

which offers that feature with the 

settings below:


No delay

: when the Condition is detected, the Action is launched.


Simple delay

: when the Condition is detected, the Action is launched after the set time interval.


Still true after

: when the Condition is detected, the Action is launched after the set time interval only if 

the Condition still exists.


Continuously true

: when the Condition is detected, the Action is launched after the set time interval only 

if the Condition has been existing continuously.

TIPS AND TRICKS: 

Show advanced expressions

 option is a useful tool when you look for the path or value of 

a property but just the expression is displayed. The option is available in the Event list window and also 

in the Editor.

Variables

The variables and the tools (shown in the Control/Variables tab) can be used in the Event Manager.

Condition Wizard

 #variables 

The desired variable can be checked if its value is changed to a specific value.

Action Wizard

The value of a variable can be set/changed using the same methods as in the Control/Variables tab:


Setting the exact value


Increasing the value with/without limits


Converting the value (e.g. interval change)


Scanning and storing, or reformatting a property/parameter

If the 

Use variables 

option is enabled, you can link a variable by the 

$

 character. If you do so (e.g. $1), the 

device will handle it as the V1 variable. You can send the value of the variable e.g. as a TCP message.

Condition Triggering

This improvement works as if a 

condition is detected. When a complex 

control system is built, a Condition may 

trigger numerous Actions. A typical 

example is when a system is powered 

on and the ’ready-to-use’ state has to be 

loaded. In this case, there could be many actions that are based on the same condition. In order to reduce 

the number of the commands, you can trigger one ’key’ condition, which could start the whole process.

Delay

Condition = true

Condition = true

Condition = true

Condition = true

continously

true

still true after

simple delay

no delay

Perform the action

Perform the action

Delay

Delay

Perform the action

Condition = true Perform the action

Time

 

Summary of Contents for MMX4x2 Series

Page 1: ...MMX4x2 HDMI MMX4x2 HT200 MMX4x2 HDMI USB20 L User s Manual Standalone Multimedia Matrix Switcher v3 2 22 03 2022...

Page 2: ...floor wall or mounted in accordance with the installation instructions The apparatus shall not be exposed to dripping or splashing and no objects filled with liquids such as vases shall be placed on t...

Page 3: ...ware Device Updater V2 LDU2 software 2 13 1b2 Firmware package 1 6 0b19 Hardware MMX4x2 HDMI 1 1 Hardware MMX4x2 HT200 1 2 Hardware MMX4x2 HDMI USB20 L 1 1 Document revision v3 2 Release date 22 03 20...

Page 4: ...e 33 4 11 1 Technical Background 33 4 11 2 RS 232 Recognizer 34 4 12 Messaging Options 34 4 13 Batch Commands 34 4 14 IR Interface 35 4 15 GPIO Interface 36 4 16 Further Built in Features 36 4 16 1 Ma...

Page 5: ...tting 87 7 4 10 Setting the Delay of the Dark Mode Setting 87 7 4 11 Running a Macro 88 7 5 Cleartext Login Protection 88 7 5 1 Setting the Login Password 88 7 5 2 Logging Into the Device 88 7 5 3 Log...

Page 6: ...e Setting 120 7 17 3 Stopbits Setting 120 7 17 4 Parity Setting 120 7 17 5 Databit Setting 121 7 17 6 RS 232 Operation Mode 121 7 17 7 Enabling Disabling Command Injection 121 7 18 RS 232 Message Send...

Page 7: ...2 Advanced EDID Management 155 10 2 HDCP Management 156 10 2 1 Protected and Unprotected Content 156 10 2 2 Disable Unnecessary Encryption 156 10 3 Pixel Accurate Reclocking 157 11 APPENDIX 158 11 1 S...

Page 8: ...5 13b5 1 Introduction Thank you for choosing Lightware s MMX4x2 series device In the first chapter we would like to introduce the device highlighting the most important features in the coming sections...

Page 9: ...as an input automatically The Device5vEnable means turning the 5V supply for USB peripherals ON or OFF HDMI connectors are 4K capable HDCP compliant and additional control options are served by the U...

Page 10: ...used with the device please contact sales lightware com 1 Recommended for MMX4x2 HDMI and MMX4x2 HT200 models only The assembling of certain accessories can be found in the Mounting Options section Un...

Page 11: ...1 Introduction MMX4x2 series User s Manual 11 Applied firmware package v1 6 0b19 LDC software v2 5 13b5 Standalone Application MMX4x2 HDMI Standalone Application MMX4x2 HT200...

Page 12: ...ation by performing predefined actions in response to device status changes Event Manager Triggering a condition defining variables and checking two conditions for an action these features are availab...

Page 13: ...1 x 4K and 3D Support Audio Embedder and De embedder Function Autoselect Function for Video Inputs Deep Color Support and Conversion Ethernet Control Event Manager Forced Button Lock Frame Detector G...

Page 14: ...1 6 0b19 LDC software v2 5 13b5 2 Product Overview The following sections are about the physical structure of the device input output ports and connectors buttons and status LEDs MMX4x2 HT200 MMX4x2 H...

Page 15: ...int settings 9 Video select button for Output 2 Pushing the button selects the video source for Output 2 See the sequence in the OUT 1 and OUT 2 Video Select Buttons section q Reset button Pressing th...

Page 16: ...2 Video Select Buttons section 8 Input select LEDs The LEDs give feedback about the current crosspoint settings 9 Video select button for Output 2 Pushing the button selects the video source for Outp...

Page 17: ...9 Input select LEDs The LEDs give feedback about the current crosspoint settings q Video select button for Output 2 Pushing the button selects the video source for Output 2 See the sequence in the OUT...

Page 18: ...ut Autoselect feature in The Autoselect Feature section Crosspoint Status LEDs IN1 IN4 LEDs green blinking Input is selected signal is not present amber blinking Pre programmed audio configuration 1 4...

Page 19: ...A2 HDMI OUT 2 Stream 2 A3 Analog In O1 HDMI OUT 1 O2 HDMI OUT 2 O3 ANALOG OUT AUDIOOUT LIVE OUT1AUTO IN2 IN1 IN3 IN4 OUT OUT OUT2AUTO OUT1 VIDEO SELECT OUT2 RESET VIDEO SELECT SET AUDIO CONFIG HDMI I...

Page 20: ...ce follow the steps reboot restart Step 1 Push the button with a thin object for a second Step 2 Wait until the device reboots You can use the matrix when the LIVE LED is blinking slowly again ATTENTI...

Page 21: ...package v1 6 0b19 LDC software v2 5 13b5 3 Installation The chapter is about the installation of the device and connecting to other appliances presenting also the mounting options and further assembly...

Page 22: ...1 1 1U High Rack Shelf This accessory allows rack mounting for half rack quarter rack and pocket sized units 1U high rack shelf 1U high rack shelf provides mounting holes for fastening two half rack...

Page 23: ...g Type Phoenix Combicon series 3 5mm pitch 5 pole type MC 1 5 5 ST 3 5 You can find more information about analog audio function in the Audio Interface section Audio cable wiring guide is in the Cable...

Page 24: ...tion 3 2 7 RS 232 Connector The matrix contains a 3 pole Phoenix connector which is used for RS 232 serial connection Pin nr Signal 1 Ground 2 TX data 3 RX data RS 232 connector pin assignments Compat...

Page 25: ...r adaptor to the DC input on the matrix first then to the AC power socket MMX4x2 HDMI USB20 L HDMI Connect the source devices e g PC Laptop Blu ray player to the HDMI input ports of the matrix by HDMI...

Page 26: ...the device with a few real life examples Compact Size Matrix Concept Video Interface Consumer Electronics Control CEC Interface Audio Interface The Autoselect Feature USB Interface Ethernet Interface...

Page 27: ...log audio outputs Summary of the interfaces MMX4x2 HDMI USB20 L 4 2 Video Interface The following figure describes the port diagram of the MMX4x2 HT200 matrix Port diagram of MMX4x2 HT200 matrix switc...

Page 28: ...in audio embedder function which means the audio signal that is received on the analog audio input port is able to be embedded into the HDMI outputs 4 4 2 Audio Output Modes The MMX4x2 series matrix c...

Page 29: ...ected Port with priority 1 is selected Port with priority 2 is selected Port with priority 30 is selected Y Y Y Automatic Input Selection Example The Concept If there is no other source connecting to...

Page 30: ...crophone keyboard and mouse are connected to the USB A type ports The user can select to switch the USB peripherals to the PC or to the laptop Settings The PC is connected to the PC 1 USB B type port...

Page 31: ...d it is powered but switched off 4 8 The Event Manager Feature The Event Manager feature means that the device can sense changes on its ports and is able to react according to the pre defined settings...

Page 32: ...IP Port Function MAC Filter Cleartext Login IP Port Block 80 HTTP Post Get 81 LW3 control miniweb 6107 LW3 protocol 800x Command injection RS 232 900x Command injection IR 10001 LW2 protocol 4 10 TPS...

Page 33: ...s are accepted depending on the current port setting Command Injection Mode In this mode the matrix works as a TCP IP RS 232 bidirectional converter The TCP IP data signal is converted to RS 232 data...

Page 34: ...here Login name is the recognized RS 232 message Action is sending serial message Admin on the P1 port to the VC codec E3 Set a condition where Password is the recognized RS 232 message Action is send...

Page 35: ...the Matrix and IR signals are sent by the Remote controller A pair of active speakers are also connected to the analog audio output port of the Matrix The volume can be controlled via the Matrix by u...

Page 36: ...uilt in Features 4 16 1 Matrix Cloning Configuration Backup and Restore The device configuration cloning of MMX4x2 series matrix is a simple method that eliminates the need to repeatedly configure mul...

Page 37: ...RS 232 interfaces by the Lightware Device Controller LDC The software can be installed on a Windows PC or macOS The application and the User s Manual can be downloaded from www lightware com Install...

Page 38: ...tes on Lightware s website and opens the update window if the LDC found updates The current and the update version number can be seen at the top of the window and they are shown in this window even wi...

Page 39: ...usly Add New Favorite Device Press the Add button in the appearing window you can enter the IP address The hostname of the desired device can be used instead if it is supported That allows setting a u...

Page 40: ...the device or select it and click on the green Connect button ATTENTION Before the device is connected via the local RS 232 port make sure that Control mode and LW3 protocol are set on the serial port...

Page 41: ...itched to the output the color of the tile is white otherwise grey 5 Audio input ports Each tile represents an audio input port The A1 and A2 are logical audio ports they mean the audio channel of the...

Page 42: ...ghted in green the mode is active In this case confirmation is not required the selected preset is loaded immediately when the button is pressed Auto Load 5 4 3 Port Tiles The colors of the port tiles...

Page 43: ...ings and tools signaltype Mute unmute the port Lock unlock the port HDCP setting enable disable TPS mode see the details in the TCP Recognizer section tpsmode Send and receive Consumer Electronics Con...

Page 44: ...nected independently from the transmitted signal No sync screen configuration settings of the test pattern See more details in the No Sync Screen Test Pattern section Frame detector diagnostic tool se...

Page 45: ...ties window of the A1 digital audio input ATTENTION If the TPS HDMI video input port is muted locked the digital audio input port belonging to it will also be muted locked 5 5 5 Analog Audio Input Por...

Page 46: ...he available settings can be found in the HDMI Video Output section 5 5 7 Analog Audio Output Port properties window of the analog audio output Available settings analogaudio volume balance Mute unmut...

Page 47: ...gend of the received message 10 33 17 ACK Answer for the acknowledged command 10 35 01 NACK Answer for the not acknowledged command 10 33 17 IN PROGRESS The command is being processed 10 33 17 FAILED...

Page 48: ...ilt in oscilloscope but it is much more easy to use Actual display area shows the active video size light gray Dark gray area of the full frame is the blanking interval which can contain the info fram...

Page 49: ...tial line in the CATx cable The inappropriate termination of the cable usually causes high error rates Check the cable terminations or change the cable Reference Values Value Explanation 1 10 1 9 Exce...

Page 50: ...ulated EDID the only difference is the Destination panel press the User button Thus one or more EDIDs can be copied into the user memory either from the factory memory or from a connected sink Dynamic...

Page 51: ...D file can be loaded into the editor The software resolves the raw EDID and displays it as readable information to the user All descriptors can be edited saved in an EDID file or uploaded to the User...

Page 52: ...a the current RS 232 port Response cannot be seen in the surface ATTENTION The escaping is done automatically when sending a message via this surface When the message is an LW3 command it has to be cl...

Page 53: ...Ethernet port CPU Ethernet port cannot be disabled Ports tab in the Control Ethernet menu HTTP Clients HTTP Post and Put Message Sending ATTENTION This feature means posting or putting HTTP messages...

Page 54: ...aved from the first bit until the delimiter or the data between the two delimiters Timeout If there is no response within the set time interval milliseconds the data that is received from the last del...

Page 55: ...utput level setting and the Toggle button is not available For more details about GPIO interface see the GPIO Interface section 1 GPIO pin name 2 GPIO port icon 3 Low level indicator 4 High level indi...

Page 56: ...crolling on or off by putting removing the tick by Autoscroll 20 fingerprints can be stored in the device at the same time Each of them can be ordered to an action in Event Manager For more details ab...

Page 57: ...le and press Open ATTENTION The preset and the macros of the selected slot will be erased If there is a macro with the same name already in the device it will be removed and the new one will be availa...

Page 58: ...lower than the min setting the min will be valid Cycle button the operand will be added to the current value If the result would be beyond the limit min max the value will be stepped to the other end...

Page 59: ...0 8N1 s 8N1 MEDIA AUDIO XP SourcePortStatus T000A T000B T000F 6c 5c T000B MANAGEMENT UID PackageVersion 1 6 0b12 r64 b 1 6 0 MANAGEMENT NETWORK HostName lightware 00005031 lightware 00005031 1 defined...

Page 60: ...vent There is a grey bar on the left of the Event panel in each line If a condition and an action are set and the Event is enabled the bar is displayed in green eventmanager Event Manager menu list of...

Page 61: ...ssary property and to set the value Step 4 Set the desired value and operator then press the Apply button to store settings INFO This mode is also available for setting the Action The Link Tool The ne...

Page 62: ...Action Therefore the new Event manager contains the Delay panel which offers that feature with the settings below No delay when the Condition is detected the Action is launched Simple delay when the...

Page 63: ...ine The task is to turn on the projector when signal is detected on the HDMI out 1 port RS 232 Settings Make sure that the serial line is established between the matrix and the projector Check that th...

Page 64: ...lps to identify the device itself in the rack shelf devicelabel label producttype firmwareversion identifyme status serialnumber 5 11 2 Network Network tab in Settings menu General IP address and DHCP...

Page 65: ...bled all LEDs on the unit are switched off after 1 minute by default if no buttons are pressed Pressing any button brings back the status info on the LEDs without performing the function of the button...

Page 66: ...allows the following builtinweb miniweb web Source selection This block can be used to select an input or enable disable the Autoselect remotely e g from a mobile device Action triggers The action tri...

Page 67: ...gger button The displayed trigger buttons will get a text label with the event name minus the suffix To add the desired Action as a button append the name of the desired Event with the W characters se...

Page 68: ...ed Step 4 Connect to the other device that needs to be configured and upload restore your configuration file Step 5 Done You can have as many totally identical customized devices as you like ATTENTION...

Page 69: ...NG Loading factory default settings will erase all presets in the device memory Loading the selected configuration Deleting the selected configuration Saving the current configuration to the selected...

Page 70: ...hrough a reduced command set of LW2 protocol commands to ensure the compatibility with other Lightware products The supported LW2 commands are described in this chapter Protocol Description Instructio...

Page 71: ...digit ASCII format loc Location number in 1 2 or 3 digit ASCII format id id number in 1 or 2 digit ASCII format id2 id number in 2 digit ASCII format CrLf Carriage return Line feed 0x0D 0x0A Space ch...

Page 72: ...be changed by an LW3 command see the Setting the Device Label section Command and Response LABEL LABEL DEVICE_LABEL CrLf Example label LABEL MMX_OFFICE 6 3 4 Querying the Control Protocol The device...

Page 73: ...le Time Returns the date when the CPU firmware was compiled Command and Response CT Complied DATE TIME CrLf Example ct Compiled Sep 30 2016 14 07 56 6 3 11 Querying the Health Status Internal voltages...

Page 74: ...out only the Video layer Please use the AV option when available Example 1 2 1 AV O01 I02 AV I2 audio and I2 video input ports are switched to O1 output port Example 2 0 1 O01 I00 ATTENTION The respon...

Page 75: ...ut port is connected to the O2 video output port I2 audio input port is connected to all the audio output ports O1 O2 O3 6 4 7 Viewing the Crosspoint Size Shows the physical crosspoint size Command an...

Page 76: ...3 0 highest priority 3 lowest priority See more details about port numbering in the Input Output Port Numbering section Example prio_v1 1 0 2 3 PRIO_V1 1 0 2 3 ATTENTION Always set the priority for a...

Page 77: ...by typing the ip_address command The response contains the fix IP address that is stored in the device even if DHCP is enabled in this case this IP address is not valid 6 5 3 Setting the Subnet Mask S...

Page 78: ...mand and Response RS232_LOCAL_FORMAT baud_rate data_bit parity stop_bit RS232_LOCAL_FORMAT baud_rate data_bit parity stop_bit CrLf Parameters Parameter Parameter description Value Value description ba...

Page 79: ...Response RS232_LINK_PROT protocol RS232_LINK_PROT protocol CrLf Parameters See the previous section Example RS232_LINK_PROT LW2 RS232_LINK_PROT LW2 6 7 GPIO Port Configuration DIFFERENCE This section...

Page 80: ...ng an Input to the Outputs in out layer Muting an Output out layer Unmuting an Output out layer Locking an Output out layer Unlocking an Output out layer Viewing the Connection State on the Output VC...

Page 81: ...ing the Control Protocol RS232 mode Serial Port Format Setting Local port RS232_LOCAL_FORMAT baud_rate data_bit parity stop_bit Serial Port Format Setting Link port RS232_LINK_FORMAT baud_rate data_bi...

Page 82: ...Usage Protocol Rules System Commands Cleartext Login Protection Video Port Settings Audio Port Settings from Firmware v1 2 0 Audio Port Settings for Firmware v1 1 0 Event Manager Basics Event Manager...

Page 83: ...and the port number 6107 Step 4 Select the Raw connection type and open the connection Once the terminal window is opened you can enter the LW3 protocol commands which are listed in the following sec...

Page 84: ...pr MEDIA UART P2 TPS out RS 232 SET command The SET command can be used to modify the value of a property Use the dot character when addressing the property SET MEDIA VIDEO I1 ColorSpaceMode 0 pw MEDI...

Page 85: ...hanges A user can subscribe to any node These notifications are asynchronous messages and are useful to keep the client application up to date without having to periodically poll the node to detect a...

Page 86: ...the Device The receiver can be restarted the current connections LAN RS 232 USB will be terminated Command and Response reboot restart CALL SYS reset mO SYS reset Example CALL SYS reset mO SYS reset 7...

Page 87: ...0b19 The LEDs of the device can be switched off in case their light could be annoying In Dark mode all LEDs are switched off except the LEDs of the RJ45 connectors Ethernet and TPS in darkmode Comman...

Page 88: ...t values The following can be queried without login ProductName PartNumber SerialNumber FirmwareVersion PackageVersion MacAddress 7 5 1 Setting the Login Password Command and Response CALL LOGIN setPa...

Page 89: ...encrypted No signal Not connected 1 1 Embedded audio presents Encrypted Signal presents Connected T 0 0 A F Mute Lock status Reserved character always 0 Reserved character always 0 Embedded audio HDC...

Page 90: ...utput port I3 input port is connected to the O2 output port 7 6 5 Switching Video Input Command and Response CALL MEDIA VIDEO XP switch in out mO MEDIA VIDEO XP switch Example 1 CALL MEDIA VIDEO XP sw...

Page 91: ...n3_prio in4_prio in1_prio in2_prio in3_prio in4_prio 0 1 2 3 1 0 2 3 In the example above the input 1 has the highest priority on output 1 and input 4 has the lowest priority On output 2 the highest p...

Page 92: ...VIDEO XP unmuteDestination Example CALL MEDIA VIDEO XP unmuteDestination O1 mO MEDIA VIDEO XP unmuteDestination 7 6 16 Locking an Output Port Command and Response CALL MEDIA VIDEO XP lockDestination o...

Page 93: ...ical and HDMI output ports O1 and O2 7 6 20 1 Test Pattern Generator Mode Setting Command and Response SET MEDIA VIDEO out TpgMode tpg_mode pw MEDIA VIDEO out TpgMode tpg_mode Parameters Parameter Par...

Page 94: ...ue description tps_port Port number S1 TPS input port number tps_mode TPS transmission mode A Auto The TPS mode is determined automatically H HDBaseT Ideal for high resolution signals up to 4K L Long...

Page 95: ...resent Connection status Letter Byte 1 Byte 2 Byte 1 Byte 2 Character 2 Character 3 Character 4 Character 5 BIT 7 6 BIT 5 4 BIT 3 2 BIT 1 0 BIT 7 6 BIT 5 4 BIT 3 2 BIT 1 0 Reserved Reserved Reserved R...

Page 96: ...utput3 ports 7 7 4 Switching Audio Input Command and Response CALL MEDIA AUDIO XP switch audio_in audio_out mO MEDIA AUDIO XP switch Parameters Parameter Parameter description Values Parameter values...

Page 97: ...AUDIO XP muteSource audio_in mO MEDIA AUDIO XP muteSource Parameters The audio_in parameter is the Audio input port number and can be A1 A2 or A3 Example CALL MEDIA AUDIO XP muteSource A1 mO MEDIA AUD...

Page 98: ...ng an Input Port Command and Response CALL MEDIA AUDIO XP unlockSource audio_in mO MEDIA AUDIO XP unlockSource Parameters The audio_in parameter is the Audio input port number and can be A1 A2 or A3 E...

Page 99: ...p value Example SET MEDIA AUDIO A3 Gain 3 pw MEDIA AUDIO A3 Gain 3 00 7 7 18 Analog Audio Output Level Settings by Exact Values 7 7 18 1 Setting the Volume dB Command and Response analogaudio volume S...

Page 100: ...depend on the installed firmware version of the device If your device is installed with firmware v1 2 0 see the Audio Port Settings from Firmware v1 2 0 section The following LW3 commands are related...

Page 101: ...us pw SYS MB LEGACYAUDIOXP EnableAnalogPassthrough passthrough_status Parameters Parameter Parameter description Value Value description passthrough_status Audio source of Analog audio out O3 true Ana...

Page 102: ...percent The input volume attenuation in percent Number between 0 and 100 in step of 1 The value is rounded up if necessary to match with the step value Example SET MEDIA AUDIO I5 VolumePercent 50 pw...

Page 103: ...DIA AUDIO I5 stepVolumePercent 5 m0 MEDIA AUDIO I5 stepVolumePercent The volume is increased with 5 the current volume is 0 83 dB which means 95 in percent 7 8 7 3 Setting the Balance Command and Resp...

Page 104: ...MEDIA AUDIO O3 Balance 0 pw MEDIA AUDIO O3 Balance 0 7 8 9 Analog Audio Output Level Settings by Steps 7 8 9 1 Setting the Volume dB Command and Response analogaudio volume CALL MEDIA AUDIO audio_out...

Page 105: ...al with I1 in other words if other input port is connected to O1 than I1 Example 3 Sometimes it is enough if the value of a property changes to anything In this case just put a to the end of the prope...

Page 106: ...Macro1 pw EVENTS E1 Action Macro1 7 10 Event Manager Tool Kit 7 10 1 Setting the Delay In most cases the Action is performed immediately after the Condition is detected But sometimes a delay is neces...

Page 107: ...Name string pw EVENTS E loc Name string Parameters The string may contain letters A Z and a z numbers 0 9 special characters hyphen underscore _ and space up to 20 characters Longer string results an...

Page 108: ...ber of real detections The counter is reset at boot Command and Response GET EVENTS E loc ExternalConditionTriggerCount pw EVENTS E loc ExternalConditionTriggerCount num_value Example GET EVENTS E1 Ex...

Page 109: ...e Integer Negative value is also accepted min The lowest allowed value optional Integer Negative value is also accepted max The highest allowed value optional Integer Negative value is also accepted I...

Page 110: ...RS V1 Value 10 CALL CTRL VARS V1 cycle 1 10 20 mO CTRL VARS V1 cycle CHG CTRL VARS V1 Value 11 Example 2 subtraction GET CTRL VARS V1 Value pw CTRL VARS V1 Value 13 CALL CTRL VARS V1 cycle 2 10 20 mO...

Page 111: ...scanf MEDIA AUDIO XP SourcePortStatus 5c mO CTRL VARS V1 scanf GET CTRL VARS V1 Value pw CTRL VARS V1 Value T00AA A simple pattern has been applied we need the first five characters from the property...

Page 112: ...ApplySettings mO MANAGEMENT NETWORK ApplySettings INFO The ApplySettings method will save and apply the new value and will reboot the device INFO The current setting can be queried by the GET command...

Page 113: ...e is not allowed to change parameters in the LW device true or 1 The device is allowed to change parameters in the LW device name Unique name for the better identification optional Any string Up to 5...

Page 114: ...ot is also accepted except as last character Example SET MANAGEMENT NETWORK HostName mtg room1 pw MANAGEMENT NETWORK HostName mtg room1 7 14 Ethernet Message Sending The device can be used for sending...

Page 115: ...the indicated IP port address Example with HEX codes CALL MEDIA ETHERNET udpMessage 192 168 0 20 9988 C00 x0a x0d mO MEDIA ETHERNET udpMessage The C00 message with CrLf Carriage return and Line feed...

Page 116: ...RL HTTP C1 ServerIP 80 7 15 3 Setting the Target Path This property sets the path in the target device where the post put message is to be sent Command and Response SET CTRL HTTP C1 File path pw CTRL...

Page 117: ...hen a message is recognized but you can also use it in Event manager tcprecognizer message Preparation Step 1 Set a TCP client in the Lightware device three TCP clients can be run at the same time set...

Page 118: ...pr CTRL TCP C1 Rx PWR_off 7 16 8 Querying the Last Recognized Message Hex The recognized message is stored as a hex message in the property below till the next recognized message or until the clear m...

Page 119: ...is 50ms Command and Response SET CTRL TCP C loc ActivePropertyTimeout a_timeout pw CTRL TCP C loc ActivePropertyTimeout a_timeout Parameters The a_timeout parameter is the active timeout value ms betw...

Page 120: ...udrate baudrate pw MEDIA UART serial_port Baudrate baudrate Parameters Parameter Parameter description Values Value description serial_port Serial port number P1 P2 baudrate Baud rate value 0 4800 1 7...

Page 121: ...Parameters Parameter Parameter description Values Value description serial_port Serial port number P1 P2 ci_enable Command injection setting true Command Injection is enabled false Command Injection...

Page 122: ...ndition in Event manager and an Action can be defined for it Working Method A message got recognized from the incoming data if one of the following occurs The set DelimiterHex is detected in the messa...

Page 123: ...t 20 Password Login name Delimiter hex format 3A Stored string 7 19 4 Querying the Last Recognized Message String The recognized message is stored as a string in the property below until the next reco...

Page 124: ...ctiveRxHex recognized_hex Parameters The recognized_hex parameter is the recognized data in hex format Example GET MEDIA UART RECOGNIZER ActiveRxHex pr MEDIA UART RECOGNIZER ActiveRxHex 4C6F67696E3A 7...

Page 125: ...p_forward power_on left number_6 page_down skip_backward power_off right number_7 volume_up 3d_mode stop_function root_menu number_8 volume_down stop_record f1 setup_menu number_9 mute_toggle pause_re...

Page 126: ...l format Example CALL MEDIA CEC I2 sendHex 8700E091 mO MEDIA CEC I2 sendHex 7 20 5 Querying the Last Received CEC Message GET MEDIA CEC port LastReceivedMessage pr MEDIA CEC port LastReceivedMessage C...

Page 127: ...able true 7 21 2 Changing Command Injection Port Number Command and Response SET MEDIA IR ir_port CommandInjectionPort port_no pw MEDIA IR ir_port CommandInjectionPort port_no Parameters Parameter Par...

Page 128: ...tabase from the Internet The downloaded codes are mostly in little endian format 7 22 2 Sending Pronto Hex Codes in Big endian Format via IR Port Command and Response CALL MEDIA IR D1 sendProntoHexBig...

Page 129: ...tion Example SET MEDIA GPIO P1 Direction I pw MEDIA GPIO P1 Direction I 7 23 3 Querying the Output Level of a GPIO Pin Command and Response GET MEDIA GPIO port Output pw MEDIA GPIO port Output value P...

Page 130: ...e 2 sec power cut towards the devices if host is changed true power cut off is active false power cut off is inactive Example SET MEDIA USB USBSWITCH DelayedSwitch 2 pw MEDIA USB USBSWITCH DelayedSwit...

Page 131: ...Management 7 25 1 Querying the Emulated EDIDs Command and Response edid GET EDID EdidStatus pr EDID EdidStatus source E1 source E2 source E3 source E4 Parameters Parameter Parameter description Values...

Page 132: ...EDID to User Memory Command and Response CALL EDID copy source destination mO EDID copy Parameters Parameter Parameter description Values Value description source Source EDID memory place F1 F120 Fac...

Page 133: ...gin Function SET LOGIN LoginEnable login_state Video Port Settings Querying the Status of the Input Ports GET MEDIA VIDEO XP SourcePortStatus Querying the Connected Input Port Number GET MEDIA VIDEO o...

Page 134: ...gs GET MEDIA AUDIO XP DestinationPortAutoselect Changing the Autoselect Mode CALL MEDIA AUDIO XP setDestinationPortAutoselect out state mode Querying the Input Port Priority GET MEDIA AUDIO XP PortPri...

Page 135: ...tep Analog Audio Output Level Settings Setting the Volume dB SET MEDIA AUDIO audio_out VolumedB level Setting the Volume Percent SET MEDIA AUDIO audio_out VolumePercent percent Setting the Balance SET...

Page 136: ...TER MACaddress loc MAC_address receive send name LW2 Control Port Blocking SET MANAGEMENT SERVICEFILTER Lw2Enabled port_mode HTTP Port Blocking SET MANAGEMENT SERVICEFILTER HttpEnabled port_mode HTTP...

Page 137: ...UART serial_port Baudrate baudrate Stopbits Setting SET MEDIA UART serial_port StopBits stopbit Parity Setting SET MEDIA UART serial_port Parity parity Databit Setting SET MEDIA UART serial_port Data...

Page 138: ...hex_code GPIO Port Configuration Querying the Direction of a GPIO Pin GET MEDIA GPIO port Direction Setting the Direction of a GPIO Pin SET MEDIA GPIO port Direction dir Querying the Output Level of...

Page 139: ...form firmware updates on our products by giving a few tips on how to start and by explaining the features of the Lightware Device Updater v2 LDU2 software The latest software and firmware pack can be...

Page 140: ...in the window where you select the firmware package file in LDU2 8 2 2 LDU2 Installation ATTENTION Minimum system requirement 2 GB RAM The minimum screen resolution is 1600x900 INFO The Windows and th...

Page 141: ...whether a newer version is available on the web Main Screen When the software is started by the shortcut the device discovery screen appears Press the Search for devices button to start finding the Li...

Page 142: ...firmware update If any problem occurs reboot the unit and restart the process Keeping the Configuration Settings By default device configuration settings are restored when the firmware update is fini...

Page 143: ...ure which device to select press the Identify me button It makes the front panel LEDs blink for 10 seconds The feature helps to find the device physically Step 3 Check the update parameters DIFFERENCE...

Page 144: ...did not enter the password in the Parameters window or it is incorrect a window will appear to get the password for each device INFO The device might reboot during the firmware update procedure When t...

Page 145: ...examples with LightwareDeviceUpdaterV2_CLI cmd 8 5 2 How to Use Command Structure The commands can be run over CLI in the following way LightwareDeviceUpdaterV2_CLI cmd command options Command a cert...

Page 146: ...es x86 Lightware Lightware Device Updater V2 lib jre bin java exe jar lib ldu2 jar checkForUpdates Current LDU2 version 2 9 1b1 New version is available online v2 13 1b2 Download URL http update light...

Page 147: ...22 03 08 12 50 27 761 INFO 192 168 0 115 Creating backup of device settings 2022 03 08 12 50 30 646 INFO 192 168 0 115 Backup HTTP enable properties 2022 03 08 12 50 31 860 INFO ProgressReporter Progr...

Page 148: ...V2_CLI cmd update ip 192 168 0 115 factoryDefault package d Firmware 4x2 Released MMX4x2_v1 6 4b2 lfp2 c Program Files x86 Lightware Lightware Device Updater V2 lib jre bin java exe jar lib ldu2 jar u...

Page 149: ...the device 2022 03 08 13 48 22 466 INFO 192 168 0 115 HTTP and HTTP post properties have got restored on port 80 2022 03 08 13 48 24 596 INFO 192 168 0 115 HTTP and HTTP post have got enabled on port...

Page 150: ...in this case If the backup cannot be created for some reason you will get a message to continue the process without backup or stop the update A root cause can be that the desired device is already in...

Page 151: ...13b5 9 Troubleshooting Usually if the system seems not to transport the signal as expected the best strategy for troubleshooting is to check signal integrity through the whole signal chain starting fr...

Page 152: ...utput is muted Check the mute state of output port 5 4 3 LW2 6 4 2 LW3 7 6 3 Display is not able to receive the video format Check the emulated EDID select another e g emulate the EDID of the display...

Page 153: ...Our team s response time is one of the best in the industry and in the toughest of cases we can directly consult with the hardware or software engineer who designed the product to get the information...

Page 154: ...gies The following sections contain descriptions and useful technical information on how the devices work in the background The content is based on experiences and cases we met in the practice These s...

Page 155: ...d later they do not sense that the EDID has been changed You need to restart your source to make it read out the EDID again 10 1 2 Advanced EDID Management Each DVI sink e g monitors projectors plasma...

Page 156: ...re introduced the HDCP enabling disabling function the HDCP capability can be disabled in the Lightware device If HDCP is disabled the connected source will detect that the sink is not HDCP capable an...

Page 157: ...cuit eliminates the following errors Intra pair skew Skew between the and wires within a differential wire pair e g Data2 and Data2 It s caused by different wire lengths or slightly different wire con...

Page 158: ...technical details as follows Specifications Maximum Extension Distances Input Output Port Numbering Content of Backup File Factory Default Settings Applied Ports Network Settings Mechanical Drawings...

Page 159: ...l 1 mm steel MMX4x2 HDMI and MMX4x2 HT200 Dimensions in mm 221 W x 100 4 D x 26 H Dimensions in inch 8 7 W x 3 95 D x 1 02 H Weight MMX4x2 HDMI and HT200 625 g MMX4x2 HDMI USB20 L Dimensions in mm 221...

Page 160: ...B 2 0 Output power over USB A ports max 500 mA USB port 1 can supply up to 1000 mA ATTENTION The sum of the current that the GPIO and the USB A ports can supply together is max 2A Control Ports RS 232...

Page 161: ...BaseT compatible device 11 3 Input Output Port Numbering MMX4x2 HDMI and MMX4x2 HDMI USB20 L Audio Video Ports Port name Video port nr LW2 Video port nr LW3 Audio port nr LW2 Audio port nr LW3 Till fw...

Page 162: ...way address MAC filter allowlist Port blocking settings TCP client settings CTRL TCP Further settings RS 232 recognizer settings Control lock status Device label Dark mode state User EDID data U1 U14...

Page 163: ...e label Cleared User EDIDs Not cleared Events Cleared IR codes Cleared Presets Cleared Unprotected backups Cleared Protected backups Not cleared USB 2 0 switch state USB A ports switched to PC1 port V...

Page 164: ...IO PC 1 PC 3 PC 4 USB HOSTS HDCP HDCP SIGNAL SIGNAL SIGNAL SIGNAL SIGNAL SIGNAL SIGNAL HDMI HDMI HDMI HDMI HDMI HDMI HDMI PC 2 4x USB DEVICE 2 3 4 L R AUDIO OUT PIN 2 1mm 12V DC 2A ETHERNET 3 ETHERNET...

Page 165: ...re that a connector or cable fits your system before use ATTENTION Never join the phase inverted negative cold or poles either right and left to the ground or to each other on the output side as this...

Page 166: ...576p 50 00 Hz H 2chLPCM Mem Resolution Type EDID features F35 1280 x 720p 50 00 Hz H 2chLPCM F36 1280 x 720p 60 00 Hz H 2chLPCM F37 1920 x 1080i 50 04 Hz H 2chLPCM F38 1920 x 1080i 50 00 Hz H 2chLPCM...

Page 167: ...F120 3840 x 2160p 60 00 Hz H 2chLPCM Legend D DVI EDID H HDMI EDID U Universal EDID supporting many standard resolutions F29 Universal EDID for DVI signals no audio support F47 HDMI EDID supporting PC...

Page 168: ...ded method to send Wake On LAN packet Advanced Control pack v3 Added properties in root node FirmwareVersion PackageVersion MacAddress Added new ConnectedSource property for media output nodes Added N...

Page 169: ...nalog audio input to O1 SET SYS MB LEGACYAUDIOXP EmbedAudioInputToHdmiOut1 true CALL MEDIA AUDIO XP switch A3 O1 Transmit original HDMI audio on O1 SET SYS MB LEGACYAUDIOXP EmbedAudioInputToHdmiOut1 f...

Page 170: ...settings configurationcloning Configuration cloning backup crosspoint Crosspoint switch setting darkmode Dark mode setting devicelabel Device label dhcp Dynamic IP address DHCP setting diagnostic Fail...

Page 171: ...query switch Crosspoint switch setting systemlog System log tcprecognizer TCP message recognizer related settings terminal Advanced view Terminal window testpattern Test pattern no sync screen setting...

Page 172: ...ny application other than that for which it was intended 2 3 Subjected to any mechanical or electrical abuse or accidental damage 2 4 Any costs incurred for repair replacement of goods that fall into...

Reviews: