24
1. Overview
2. Setup & Use
3. Optional
Accessories
4. T
roubleshooting
5. W
arranty
, Safety
& Specifications
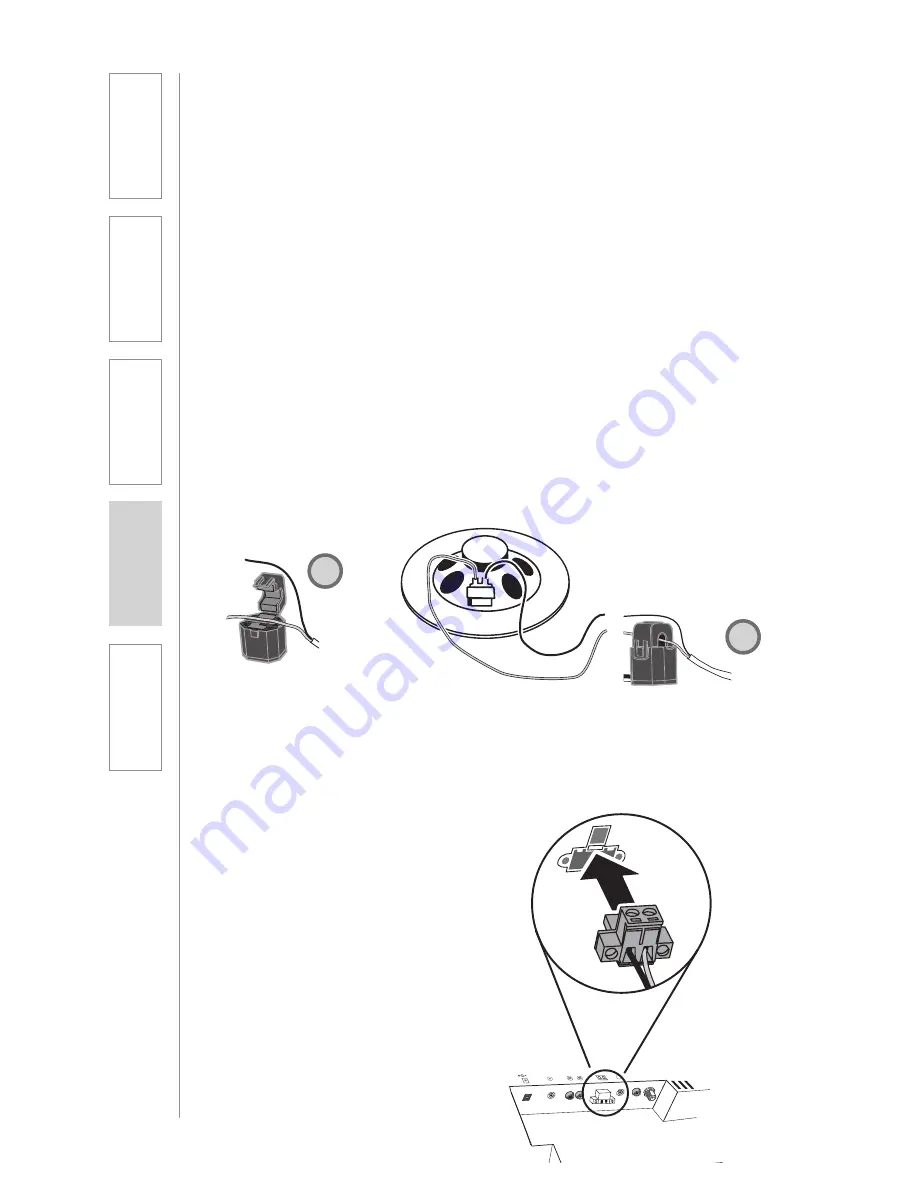
Step 2: Connecting the sensor to the
speaker wire
a. Gain access to the back of the
speaker either up in the ceiling
or on the wall. NOTE: there is no
need to disconnect any wires.
b. Unclip and open the top loop
of the PageFirst sensor. Hang
it around one of the lead wires
connected to the paging
speaker and clip it back together
(Figure 1).
PAGEFIRST INSTALLATION
The following components are included when the PageFirst option is purchased
as an add-on: Please note that PageFirst is not compatible with telephone or
IP-based paging systems.
• PageFirst sensor clip with wire pigtail (PFSC)
• 50’ length of wire with connector
• 2 wire nuts
Step 1: Locate paging speaker and sensor clip
If possible, the paging sensor should be hung around the 8-ohm lead wires
that are connected directly to the speaker. If it is a sealed ceiling speaker
where only the 70-volt wire is accessible, connect to the exposed 70-volt wires.
a. Locate the paging speaker in the classroom. NOTE: PageFirst does not
work with telephone or IP-based intercom systems.
b. Locate the PageFirst sensor clip. This clip is designed to hang around the
wire connected to the paging speaker. Through induction, it detects the
audio signal as it comes through the wire.
Figure 2:
Connecting Pagefirst to REDCAT Media
Jacks For
Testing Purposes Only
250 400 700 1K 1K4 2K5 4K 6K3
— AUDIO INPUTS —
COMPUTER DVD/VCR
DC POWER INPUT
24VDC @ 2.5 A
PageFirst
INPUT
ADJ
Figure 1: Hanging the Sensor Clip
2
1


