POWER
IR
AF
A VOLUME
B VOLUME
AUX 1 VOLUME
AUX 2 VOLUME
LES - 750IR
IR
AF
POWER
IR
AF
A VOLUME
B VOLUME
AUX 1 VOLUME
AUX 2 VOLUME
LES - 750IR
IR
AF
SPEAKER OUTPUT
DC POWER
CHARGE
MIXED AUDIO
OUT
OUT
ADJ
ADJ
AUX
AUX
IN 1
IN 2
OFF
ON
OFF
ON
OFF
ON
OFF
ON
1
2
3
4
EQUALIZER
SENSOR
SHORT
SENSOR INPUTS
250
400
600
1K
1K6
2K5
6K3
4K
+10
0
-10
Green
LED
However, do not leave the LightMic plugged
into the charger for more than 10 days, as it
will significantly shorten battery life.
6. Once the batteries are charged,
remove the charging cable from
the LightMic.
7. NiMH batteries will maintain their
charge for a full day of normal
classroom use.
8. With proper care, NiMH batteries
will provide service for at least one
year. If battery or charging problems
occur, contact LightSPEED Service
at 800.732.8999.
[ caution! ]
Do not attempt to charge alkaline
batteries—they can overheat and
expand, creating a significant
hazard and damaging the LightMic.
(This is not covered by the warranty.)
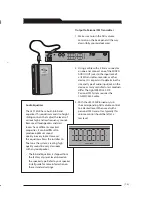
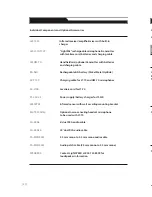
1. Ensure the LightMic is turned OFF.
The LES 750iR must be connected
to AC power in order to charge
the LightMic.
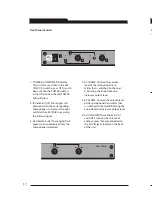
2. The LightMic’s rechargeable batteries
are factory installed. Plug one end of
the charging cable firmly into the
jack labeled CHARGER on the side of
the LightMic. Connect the other end
of the charging cable to one of the
MIC CHARGE jacks on the back of
the LES 750iR.
3. The triangle-shaped light on the
front of the LightMic transmitter
glows green when the cable is
connected and charging correctly.
The light goes out when fully charged.
4. The batteries will fully charge
in 8 to 12 hours.
5. It is best to leave the LightMic
charging until used, since the
batteries slowly lose their charge
when not in use.
The rechargeable NiMH
batteries must be fully
charged before regular
classroom operations.
Charging the LightMic
Step 2 :
SPEAKER OUTPUT
DC POWER
CHARGE
MIXED AUDIO
OUT
OUT
ADJ
ADJ
AUX
AUX
IN 1
IN 2
OFF
ON
OFF
ON
OFF
ON
OFF
ON
1
2
3
4
EQUALIZER
SENSOR
SHORT
SENSOR INPUTS
250
400
600
1K
1K6
2K5
6K3
4K
+10
0
-10
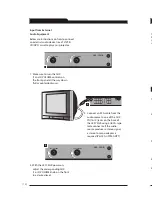
Input from External
Audio Equipment
Below are instructions on how to connect
an external audio device like a TV/VCR,
CD/DVD, cassette player, or projector.
1
1. Make sure to turn the AUX
(1 and 2) VOLUME controls on
the front panel all the way down
(fully counterclockwise).
2. Connect an RCA cable from the
audio source to one of the AUX
IN (1 or 2) jacks on the back of
the LES 750iR using an RCA-type
male connector. If the audio
source produces a stereo signal,
a stereo to mono adapter is
required (Part # AC-STM-ADPT).
3
2
3. With the LES 750iR power on,
adjust the corresponding AUX
(1 or 2) VOLUME knob on the front
to a desired level.
[15]
[8]


