Lightspeed flexcat Registration Manual Download Page 6

REMOTE REGISTRATION 

ADDING OR REPLACING A FLEXCAT REMOTE CONTROL
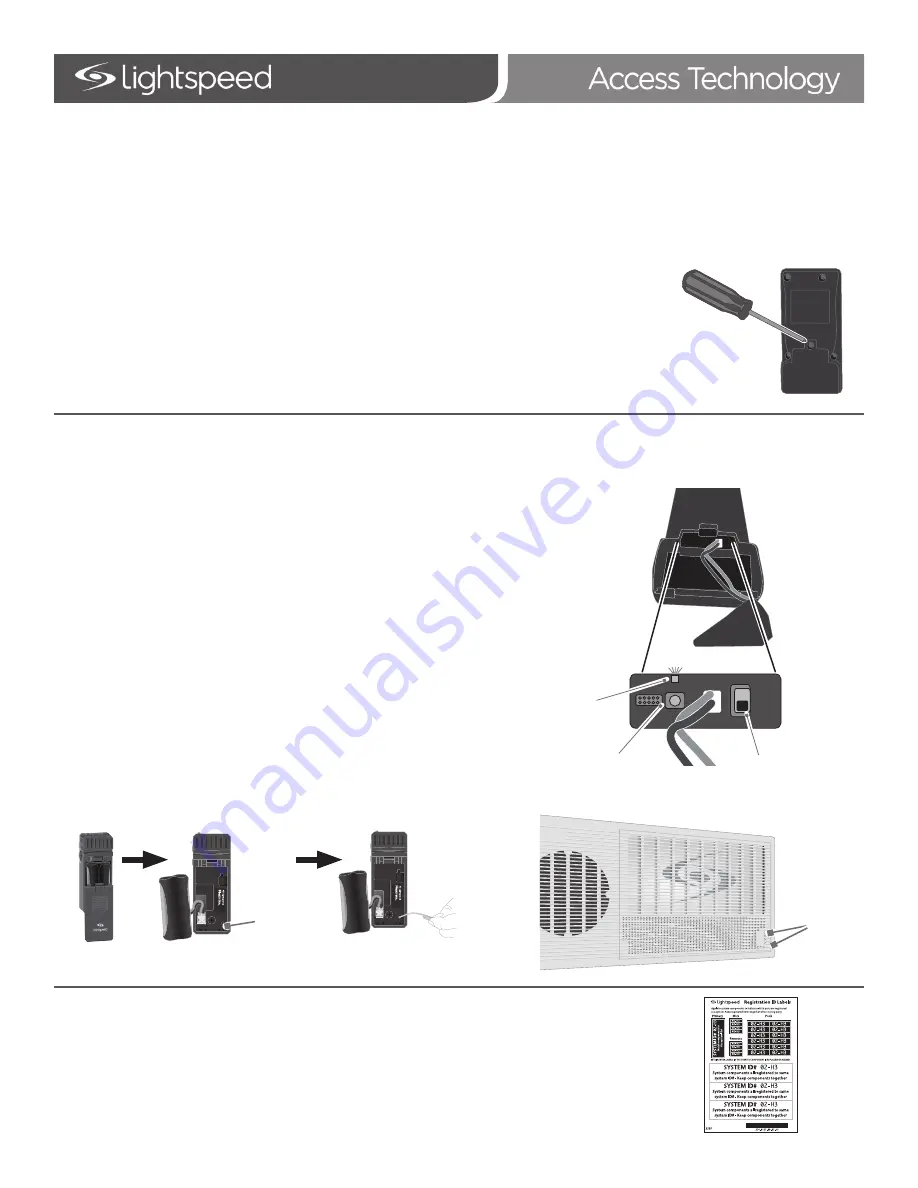
1. 

Using a small philips screw driver, unscrew and remove the remote control battery cover to reveal the 
registration button.

2. 

Make sure the teacher select toggle switch is in the appropriate position to match the Microphone #1 or #2.

3. 

Use the existing Flexmike to register the Remote Control. Open 
the Flexmike battery compartment and pull the battery out 
(leaving it plugged in) to reveal the registration button.

4. 

Using a paperclip, 

press and hold the registration button for 3 

seconds 

inside the Flexmike. The 1 and 2 lights will begin blinking 

on the Topcat.

5. 

Briefly press the registration button on the remote. 

6. 

The registration light on the remote will turn on for about 1 second, then 
turn off. The #2 light on the Topcat will also turn off.

7. 

The registration is complete.

8. 

If there is a second remote, repeat steps 2-5, paying attention to the teacher 
select switch 

NOTE: If there are two microphones, one remote should be set to Teacher 1, the 2nd to Teacher 2, 

ensuring  the remote label matches the Teacher 1 or Teacher 2 designation.

Follow the procedures below if adding or replacing a remote. 

(NOTE: once a remote is registered, it can be used to initiate registration of new/replacement pods and 
microphones)

(INSIDE REMOTE)

TEACH2

TEACH1

Registration 

Button

Teacher 

Select

Registration 

Light

9. 

Once the remote is registered, you may now use it to initiate registration of addiitonal or 
replacement pods and microphones.

10.  Place system ID number (located in back of Topcat User Manual) on the new Remote Control.

 Registration 

Button

Blinking lights

Summary of Contents for flexcat

Page 1: ...unted in the ceiling or on the wall Through key presses on the remote you can specify which device you want to register Microphone 2 or Pod 3 for example Once registration is initiated and the device...

Page 2: ...at any point the Topcat or Flexmike lights begin blinking rapidly that indicates registration error Turn the new Flexmike off and repeat steps 4 9 Power On Solid light Existing Flexmike 4 Open the new...

Page 3: ...ere is audio Power On Blinking lights NEW Flexmike 4 Open the speaker panel of the Topcat see Topcat Install Guide for instructions on how to open the panel The Topcat can remain installed for this pr...

Page 4: ...You can begin speaking into the new Sharemike to verify there is audio 11 Place system ID number located in back of Topcat User Manual on the new Sharemike Power On Solid light Existing Flexmike 5 Us...

Page 5: ...Use another registered functional component existing Flexmike or Sharemike to trigger the registration function in Topcat 5 Using a paperclip press and hold the registration button for 3 seconds insid...

Page 6: ...the remote will turn on for about 1 second then turn off The 2 light on the Topcat will also turn off 7 The registration is complete 8 If there is a second remote repeat steps 2 5 paying attention to...

Page 7: ...button on the remote will begin blinking and the 1 light on the Topcat will begin blinking 7 Using a paperclip briefly press the registration button on the Flexmike The 1 and 2 lights will be blinkin...

Page 8: ...on on the remote will begin blinking and the 1 light on the Topcat will begin blinking 7 Using a paperclip briefly press the registration button on the Sharemike The 1 and 2 lights will be blinking al...

Page 9: ...iefly press the registration button on the bottom of the pod The registration light will turn on 7 After several seconds a number will light in the group display the green ready light will turn on and...

Reviews: