background image


3.0 RIDING


Find a straight, level road without much car traffic for learning 

how to ride. 

DO NOT 

attempt any U-turns or other sharp turns 

until you have mastered slow speed turning, explained in Step 3.3. 
Keep your speed at 10-15 mph, as this will prevent your feet from 
hitting the front wheel and is more stable than slower speeds. 
Finally, look into the distance, not at the front wheel. 
 

3.1 PEDAL TYPE:


The Phantom comes with platform pedals which make learning 

to ride easy.  

If 

you install clipless pedals, follow these tips:  


A)

  Don't engage when first learning how to ride. 


B)

  Practice unclipping a few times before riding with clipless 


pedals. It is best if you practice this while leaning against a 


wall, or while someone is holding you up. 


3.2 STARTING: 
 
A)  

If this is your first experience with a recumbent bicycle, it is 


suggested that a friend helps you balance by holding onto the 


seat when starting.  

      Or start on a downhill, coasting at first and then bring your feet 


up to the pedals.  
  

B)  

For starting by yourself, the trick is to have one pedal in the 


straight up (power) position, with one foot on this pedal, and 


the other foot on the ground. Push hard against the upright 


pedal to get moving, then bring your other foot up and catch 


the other pedal.  

Summary of Contents for Phantom

Page 1: ......

Page 2: ...ate adjustment methods The unconventional design and closeness of the front wheel to your feet require that new riding skills must be acquired Carefully follow the instructions and after a short period of time you will have the new habits needed to ride your Lightning successfully CONTENTS 1 0 THE PHANTOM ASSEMBLY 2 0 ADJUSTMENTS BEFORE RIDING 3 0 LEARNING TO RIDE 3 9 SAFE RIDING 4 0 ACCESSORIES ...

Page 3: ...FIG 1 0 ...

Page 4: ...re fully tightening the securing bolt Failure to follow this step could cause clamp failure while riding resulting in loss of control D Install the wheels in the dropouts and check the tire pressure E Install the rear derailleur F Connect the seat to the frame using the plastic quick release clamps See Fig 1 1 G Install the seat foam into the seat bottom pocket with the thick foam portion in front...

Page 5: ...FIG 1 1 ...

Page 6: ...1 2 shows the cable installation for the front derailleur J Install the pedals Note The left side pedal has reverse left hand threading K Unroll and install chain see Figure 1 3 for proper chain routing Connect chain using Superlink L Re check the headset brakes and derailleurs for proper adjustment and operation FIG 1 2 ...

Page 7: ...FIG 1 3 ...

Page 8: ...FIG 1 4 ...

Page 9: ...t rotate under pedaling pressure A Loosen the two Allen head bolts under the crank tube with a 5 mm Allen wrench B Slide the cranks in or out until your legs are slightly bent at their furthest extension See Fig 2 1 It s better to have the cranks too close when making the initial adjustment than too far away C Verify the crankarms chainrings are vertical using the alignment lines then tighten the ...

Page 10: ...dlebars see Fig 2 1 C Verify the handlebars are at right angles to the front wheel then tighten the Quill bolt to 13 22 foot pounds D Slide the cable housing on the stem up or down to prevent any tight cables during turning E At this point you can adjust the handlebars forward or rearward using the tilt mechanism then repeat steps A thru D above as needed see Fig 2 2 FIG 2 2 Torque securing bolt 1...

Page 11: ...rge front chain wheel large rear sprocket combination and at the same time not so long that it goes slack when shifted onto small chain wheel middle rear sprocket combinations This can be accomplished by adjusting the chain length so that the rear derailleur is in the position shown in Fig 2 3 with the chain on the large chain ring large rear sprocket combination CAUTION If the chain is not long e...

Page 12: ...ps A Don t engage when first learning how to ride B Practice unclipping a few times before riding with clipless pedals It is best if you practice this while leaning against a wall or while someone is holding you up 3 2 STARTING A If this is your first experience with a recumbent bicycle it is suggested that a friend helps you balance by holding onto the seat when starting Or start on a downhill co...

Page 13: ...up See Fig 3 1 This method requires you to have sufficient speed to coast through the turn B To make turns and apply power have your feet as in A and make short 1 3 rotation back and forth pedal strokes This method must be used when you are starting out and turning at the same time such as a sharp right turn after stopping at a stop sign Both methods take some practice to master but it will eventu...

Page 14: ...on the handlebars 3 5 BUMPS For going over bumps or railroad tracks follow these hints Lean forward in the seat slightly so your back is not touching This prevents the rear wheel impact from being transmitted to your back A relaxed grip on the handlebars will allow the bike to move under you thus transmitting less force from the bump For some wheel eating potholes the only solution is to slow down...

Page 15: ...stroke muscles help significantly NOTE The derailleur does not normally have sufficient take up capacity to allow use of the small chainring small rear sprockets 3 8 MUSCLE CONDITIONING A DO NOT immediately ride your bike for long distances as it takes some time for your muscles to become accustomed to the recumbent position Ride 5 10 miles on the first day then increase by 5 10 miles per day ther...

Page 16: ...out Because of the low Lightning seat position it is possible to lean over more in a corner than a standard bike without realizing it E PLEASE OBSERVE ALL TRAFFIC LAWS Cars like it when you are predictable so don t make any sudden moves and always signal your intentions F WHEN RIDING IN HEAVY TRAFFIC bright colored clothes are a big help A warning flag may also be a good idea G FOR NIGHT RIDING bu...

Page 17: ...d using a heavy duty 6mm aluminum cage or rib type cages 4 2 REAR RACK The custom Lightning specific rack works best other similar racks also work with some bending of the attaching arms Use the aft set of threaded holes in the rear dropouts for attaching racks and fenders Attach the upper rack struts to the seat stay pinch bolts see Fig 4 1 FIG 4 1 ...

Page 18: ...asily mount on most rear racks However any pannier that fits your rack will work 4 4 SEAT BAG The best option is the Lightning seat bag It has a large capacity and is easily slipped on It also has pockets for 1 or 2 hydration bladders 4 5 MIRROR For safe riding we highly recommend using either a helmet mounted mirror or the Lightning handlebar mounted mirror ...

Page 19: ...ur riding style We recommend the seat be kept more upright when you are first learning how to ride as it is easier to balance Later on the seat can be reclined backward for less wind resistance or perhaps improved comfort However be aware that visibility and controllability are reduced somewhat with the seat reclined To adjust the seat back angle ref Fig 1 1 A Slightly loosen the four plastic seat...

Page 20: ...est ring 5 6 PAINT The paint on the frame is a very tough urethane powder coating which is highly resistant to scratching It also maintains its luster for a long time but can be waxed with ordinary auto type waxes if desired 5 7 BIKE PARTS All of the other parts are standard bicycle components and can be easily serviced by your local bicycle shop The chain should be periodically lubricated The bra...

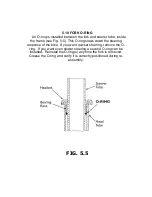
Page 21: ...This O ring slows down the steering response of the bike If you want quicker steering remove the O ring If you want even slower steering a second O ring can be installed Reinstall the O ring s any time the fork is removed Grease the O ring and verify it is correctly positioned during re assembly FIG 5 5 ...

Page 22: ...FOR YOUR RECORDS FRAME S N BOUGHT FROM DATE OF PURCHASE SERVICING DATE ITEM ...

Page 23: ...de through a Lightning dealer or Lightning Cycle Dynamics during the warranty period 4 THIS LIMITED WARRANTY ONLY APPLIES upon the bicycle being operated under normal conditions of use and properly maintained This limited warranty DOES NOT APPLY to normal wear and tear and also DOES NOT COVER failure due to abuse neglect improper assembly improper maintenance alteration collision crash misuse or i...

Reviews: