Lightmaxx VEGA ARC Pro II Instruction Manual Download Page 9


ENGLISH 

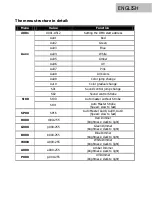
The menu structure in detail: 


Menu 

Value 

Function 

d001 

d001-d512 

Setting the DMX start address 


Au01 

Red 


Au02 

Green 


Au03 

Blue 

Auxx 

Au04 

White 


Au05 

Amber 


Au06 

UV 


Au07 

Pink 


Au08 

All Colors 


Au09 

Color jump change 


Au10 

Color gradual change 


S01 

Sound control jump change 


S02 

Sound control Strobe 

St00 

St00 

Auto master without Strobe 


St01 

Auto Master Strobe 

(Speed: slow to fast) 

SP00 

SP16 

Auto Master Au08, Au09, Au10 

(Speed: slow to fast) 

R000 

r000-255 

Red Dimmer 

(brightness: dark to light) 

G000 

g000-255 

Green Dimmer 

(brightness: dark to light) 

B000 

b000-255 

Blue Dimmer 

(brightness: dark to light) 

W000 

w000-255 

White Dimmer 

(brightness: dark to light) 

A000 

a000-255 

Amber Dimmer 

(brightness: dark to light) 

P000 

p-000-255 

UV Dimmer 

(brightness: dark to light) 

Summary of Contents for VEGA ARC Pro II

Page 1: ...rcuit Modifications to the power cord or plug are prohibited If the power cord is damaged it must be replaced immediately with an original spare part from the manufacturer Failure to do so may result in fire or death due to electric shock DANGER For babies and children Dispose of or store any packaging material properly Packaging material must be kept out of the reach of babies and children due to...

Page 2: ...vices with protection class IP65 are dustproof and completely protected against contact 2nd code number of the IP code In addition the devices are protected against water jets from any angle so that these devices can also be used outdoors However event technology devices are only suitable for temporary use Continuous outdoor operation is not recommended Hint Power supply It is essential that you c...

Page 3: ...void condensation in the unit the unit should adapt to the ambient temperature before commissioning Hint Unwanted odours A new product can sometimes lead to unwanted odours This reaction is normal and disappears after a few minutes ...

Page 4: ...nstalled either upright or suspended The device must always be attached to a solid approved carrier or a suitable surface Note the load limit of the selected installation position e g for tripods The opening of the bracket must be used to fasten the device Always provide a second independent safety backup for the device e g with a safety cable Work on the device e g assembly should always be carri...

Page 5: ...No DE 41617453 Tel 49 221 8884 0 Fax 49 221 8884 2500 info musicstore de Intended use The lightmaXX VEGA ARC Pro II was designed for use as an electronic LED lighting effect The device may only be used for this purpose and in accordance with the operating instructions Other purposes as well as operation under other operating conditions are expressly not intended and can lead to damage to property ...

Page 6: ...or the DMX output of a device already in your DMX line Always use a DMX cable with a 110 Ohm resistor for this connection Address the device according to your DMX configuration The following table shows the respective DMX modes of the individual devices with the corresponding values and functions Channel Value Function 1 000 255 Master Dimmer 2 000 255 Red Dimmer 3 000 255 Green Dimmer 4 000 255 B...

Page 7: ...evice If you connect several devices of the same type via DMX they can be controlled simultaneously via the master device To do this set the desired function Master on the first device of the line the other devices of the series must now be set as Slave Now the first device of the line gives the function to all other devices and all devices run simultaneously Operation Start Connect the device to ...

Page 8: ... to activate the menu navigate via the Up and Down buttons A corresponding selection is confirmed with the Enter key No Designation No Designation 1 Locking Screw 6 Operating keys 2 Mounting Bracket 7 DMX Input 3 pole 3 LED Lense 8 DMX Output 3 pole 4 Cooling fin 9 Power Supply Power Twist 5 Display 10 Power Output Power Twist ...

Page 9: ...ge S02 Sound control Strobe St00 St00 Auto master without Strobe St01 Auto Master Strobe Speed slow to fast SP00 SP16 Auto Master Au08 Au09 Au10 Speed slow to fast R000 r000 255 Red Dimmer brightness dark to light G000 g000 255 Green Dimmer brightness dark to light B000 b000 255 Blue Dimmer brightness dark to light W000 w000 255 White Dimmer brightness dark to light A000 a000 255 Amber Dimmer brig...

Page 10: ...r Ultraviolet Beam angle 45 Protection class IP65 Operating modes Master Slave DMX Stand Alone Sound Mode Features Static Colors Color Change Color Fade Dimmer and Strobe Effect DMX Channels 10 Connections DMX In Output 3 pole Power Twist In Output Dimensions without Bracket L x W x H 240 x 240 x 255 mm Dimensions with Bracket L x W x H 260 x 260 x 275 mm Weight 5 5 kg ...

Page 11: ...the device from the power supply before cleaning it Never clean the appliance wet Optical lenses should be cleaned with a dry microfiber cloth to optimize light output Ventilation grilles and openings should always be cleaned of dust and dirt Suitable compressed air sprays are recommended for this application Symptom Troubleshooting No function Check the mains connection and the fuse No reaction i...

Page 12: ... on the packaging Disposal of batteries Batteries do not belong in the garbage Please keep batteries in accordance with the official collection points or disposal stations in accordance with the specifications Disposal of your old device Do not dispose of the device with household waste This device is subject to the WEEE Directive Waste Electrical and Electronic Equipment in its currently valid ve...

Page 13: ...ENGLISH MS ID LIG0017261 000 08 2021 Notes ...

Reviews: