LIFESTYLER 831.285250 User Manual Download Page 14

14

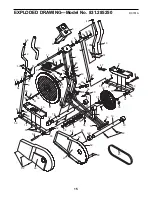
PART LIST—Model No. 831.285250

R0701A

Note: “#” indicates a non-illustrated part. Specifications are subject to change without notice. See the back cover
of this manual for information about ordering replacement parts.

Key

No.

Qty.

Description

Key

No.

Qty.

Description

1

1

Frame

2

1

Upright

3

2

Frame Bushing

4

2

Upright Endcap

5

1

Console

6

1

Left Pivot Arm 

7

1

Right Pivot Arm 

8

2

Upright Bushing 

9

4

Pivot Bushing

10

2

M8 x 19mm Button Screw

11

1

Pivot Axle

12

2

Handlebar

13

2

Foam Grip

14

1

Left Pedal Arm

15

1

Right Pedal Arm

16

1

Left Pedal

17

1

Right Pedal

18

1

Front Stabilizer

19

1

Rear Stabilizer

20

4

Stabilizer Endcap

21

1

Flywheel

22

1

Resistance Belt

23

1

Resistance Spring

24

1

Hook

25

1

Cable Clamp

26

1

Left Side Shield

27

1

Right Side Shield

28

1

Resistance Knob

29

1

Resistance Cable

30

1

Crank/Pulley

31

1

Magnet

32

2

Pedal Washer

33

4

Pedal Arm Bushing

34

2

Pedal Axle

35

2

1/2” Nylon Locknut

36

1

Flywheel Axle

37

1

Bearing Set

38

1

Crank Nut

39

1

Belt Clamp

40

1

Reed Switch Clamp

41

1

Reed Switch Wire

42

4

Small Pivot Bushing

43

2

Flywheel Washer

44

2

Eyebolt

45

1

Belt

46

2

Eyebolt Nut

47

1

Extension Wire

48

2

Handlebar Endcap

49

4

M8 x 63mm Carriage Bolt

50

10

M8 Nylon Locknut

51

4

M5 x 30mm Button Bolt

52

4

M5 Nylon Locknut

53

2

M8 x 38mm Button Bolt

54

2

Pivot Washer

55

6

M4 x 19mm Flange Screw

56

2

M8 x 60mm Bolt

57

4

M4 x 12mm Button Screw

58

3

M4 x 16mm Flat Screw

59

7

M4 x 16mm Button Screw

60

4

M4 x 25mm Round Screw

#

1

User’s Manual

#

1

Allen Wrench

#

1

Grease Packet

Summary of Contents for 831.285250

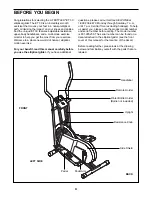
Page 1: ...s in this manual before using this equipment Keep this manual for future reference Model No 831 285250 Serial No Serial Number Decal Patent Pending Write the serial number in the space above for futur...

Page 2: ...BEFORE YOU BEGIN 4 PART IDENTIFICATION CHART 5 ASSEMBLY 6 HOW TO USE THE ELLIPTICAL GLIDER 9 MAINTENANCE 11 CONDITIONING GUIDELINES 12 PART LIST 14 EXPLODED DRAWING 15 HOW TO ORDER REPLACEMENT PARTS...

Page 3: ...lider always hold the handlebars and step onto and off the pedal that is in the lowest position 10 Each time you stop exercising on the elliptical glider allow the pedals to come to a complete stop be...

Page 4: ...u use the elliptical glider If you have additional questions please call our toll free HELPLINE at 1 800 736 6879 Monday through Saturday 7 a m until 7 p m Central Time excluding holidays To help us a...

Page 5: ...assembly Note Some parts may have been pre attached for shipping If a part is not in the parts bag check to see if it has been pre attached M8 x 19mm Button Screw 10 2 M8 x 63mm Carriage Bolt 49 4 M5...

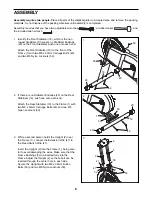
Page 6: ...lts 49 and two M8 Nylon Locknuts 50 2 If there are no Stabilizer Endcaps 20 on the Rear Stabilizer 19 push one onto each end Attach the Rear Stabilizer 19 to the Frame 1 with two M8 x 63mm Carriage Bo...

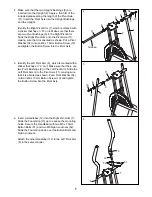
Page 7: ...Grip down over the Button Bolts and Nylon Locknuts Attach the other Handlebar 12 to the Left Pivot Arm 6 in the same manner 5 9 10 54 9 6 13 51 52 6 7 6 11 12 4 Make sure that the two Upright Bushings...

Page 8: ...at there are two Pedal Arm Bushings 33 in the Left Pedal Arm Apply a thin film of the included grease to a Pedal Axle 34 Insert the Pedal Axle into the Left Pedal Arm and slide a Pedal Washer 32 onto...

Page 9: ...ariety to your exercise you may choose to turn the pedals in the opposite direction To dismount the elliptical glider allow the pedals to come to a complete stop CAUTION The elliptical glider does not...

Page 10: ...r simply begin pedaling When the power is turned on the entire display will appear for two seconds The console will then be ready for operation 2 Select one of the five modes Scan mode When the power...

Page 11: ...uids away from the console Use only a sealable water bottle in the console CONSOLE TROUBLE SHOOTING If the console does not function properly the batteries should be replaced To replace the batteries...

Page 12: ...ounts of oxygen for prolonged periods of time This increases the demand on the heart to pump blood to the muscles and on the lungs to oxygenate the blood For aerobic exercise adjust the intensity of y...

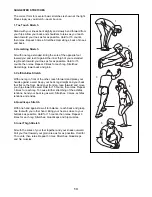
Page 13: ...lles Stretch With one leg in front of the other reach forward and place your hands against a wall Keep your back leg straight and your back foot flat on the floor Bend your front leg lean forward and...

Page 14: ...nce Belt 23 1 Resistance Spring 24 1 Hook 25 1 Cable Clamp 26 1 Left Side Shield 27 1 Right Side Shield 28 1 Resistance Knob 29 1 Resistance Cable 30 1 Crank Pulley 31 1 Magnet 32 2 Pedal Washer 33 4...

Page 15: ...20 20 21 22 23 24 25 26 28 29 30 31 33 33 33 34 34 35 35 36 37 38 39 40 41 42 42 42 42 43 43 44 44 46 46 50 49 49 50 50 50 50 20 51 51 52 52 53 53 50 50 55 55 56 50 56 50 59 59 59 59 60 60 57 48 48 58...

Page 16: ...50 QUESTIONS If you find that you need help assembling or operating the LIFESTYLER ET 30 a part is missing or you need to schedule repair service call our toll free HELPLINE 1 800 736 6879 Monday Satu...

Reviews: