background image


27 


TRACTION


II


13

. TROUBLE SHOOTING GUIDE 

72 

Bolt 

ST4.2*15 

34 


73 

Bolt 

M5*10 


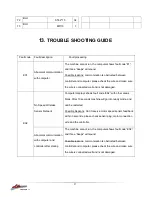
Fault code 

Fault description 

      Fault processing 

E01 

Abnormal communication 

with computer 

The machine cannot run

, the computer shows fault code“E1”, 

and 

three “beeps” will sound. 

Possible reasons: communication is obstructed between 

controller and computer, please check the wire and make sure 

the wire is connected well and is not damaged. 

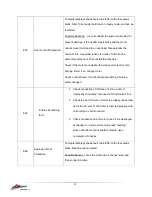
E02 

No Speed Wireless 

Sensor Network 

Computer displays shows fault code 

“E02” with other areas 

blank. After 10 seconds machine will go into ready mode, and 

can be restarted. 

Possible Reasons: 

Can’t receive motor speed sensor feedback 

within 3 seconds, please check sensor plug, motor connection 

wire and the controller. 

Abnormal communication 

with computer and 

controller after startup


The machine cannot run, the computer shows fault code 

“E02”, 

and 

three “beeps” will sound. 

Possible reasons: communication is obstructed between 

controller and computer, please check the wire and make sure 

the wire is connected well and is not damaged.
 

Summary of Contents for Traction II

Page 1: ...roduct may vary slightly from the item pictured due to model upgrades Read all instructions carefully before using this product Retain this owner s manual for future reference TRACTION II OWNER S MANUAL ...

Page 2: ...RMATION 4 3 IMPORTANT OPERATING INSTRUCTIONS 5 4 ASSEMBLY INSTRUCTIONS 6 5 FOLDING INSTRUCTIONS 9 6 INCLINE INSTRUCTIONS 10 7 GROUNDING METHODS 11 8 OPERATION GUIDE 12 9 EXERCISE GUIDE 18 10 MAINTENANCE GUIDE 20 11 EXPLODED DIAGRAM 24 12 PARTS LIST 25 13 TROUBLE SHOOTING GUIDE 27 14 WARRANTY 29 ...

Page 3: ...sh or shag carpet Damage to both carpet and treadmill may result Do not block the rear of the treadmill Provide a minimum of 1 metre clearance between the rear of the treadmill and any fixed object Place your unit on a solid level surface when in use Never allow children on or near the treadmill When running make sure the plastic clip is fastened on your clothing It is for your safety should you f...

Page 4: ...feet are not suitable for use on your treadmill Quality athletic shoes are recommended to avoid leg fatigue Allowed temperature 5 to 40 degrees Remove the safety key after use to prevent unauthorized treadmill operation 2 IMPORTANT ELECTRICAL INFORMATION WARNING NEVER use a ground fault circuit interrupt GFCI wall outlet with this treadmill Route the power cord away from any moving part of the tre...

Page 5: ...entre of the belt which may result in serious injury In order to prevent losing balance and suffering unexpected injury NEVER mount or dismount the treadmill while the belt is moving This unit starts with at a very low speed Simply standing on the belt during slow acceleration is proper after you have learned to operate this machine Always hold on to handrail while making control changes A safety ...

Page 6: ...SCRIPTION REMARK Q Y NO DESCRIPTION REMARK QTY 1 MAIN FRAME 1 62 BOLT M8 15 8 19 SAFETY KEY 1 63 BOLT M6 25 6 22L R FRONT COVER 2 84 INNER WASHER 8 4 14 5 t0 8 8 23 FOOT PLATE 2 86 MP3 OUTPUT WIRE 1 33 FOOT PLATE PLUG 6 91 BOLT M4 15 6 51 ALLEN WRENCH S5 1 92 ALLEN WRENCH S6 1 52 SCREW DRIVER 1 ...

Page 7: ...ing the computer 18 rotate the uprights 4L 4R so it is aligned with the arch pocket on mainframe 2 as shown by the arrow 3 Use the M8 15 bolt 62 and washer 84 to secure the uprights 4L R to the mainframe 2 4 Use the M4 15 bolt 91 to secure the cover 22 to the mainframe 2 5 Pull up 4L 4R as shown by the arrow and rotate until it is aligned with the arch pockets on uprights 4L 4R ...

Page 8: ...ave performed a complete assembly as outlined above and secured all nuts bolts before proceeding with the following 1 Put on the safety key and MP3 output wire 1 Use the M6 25 bolt 63 to lock the foot plate 23 to the running board 13 tightly 2 Attach the foot plate plug 33 ...

Page 9: ...olding Erect the base frame using position A until you hear the click sound emitted by the lock pin Whilst supporting position A with your hand use your hand to pull the spring pin B lightly and allow the machine to descend but itself smoothly A A B ...

Page 10: ...btract buttons When adjusting the incline whilst the treadmill is running the increase is 1 level per press Holding the incline for button more than 2 seconds will quickly increase or decrease the incline There are also shortcut keys 3 6 9 12 on the computer Picture 1 shows incline 0 Picture 2 shows incline 20 ...

Page 11: ...ction of the equipment grounding conductor can result in risk of electric shock Check with a qualified electrician or serviceman if you are in doubt as to whether the product is properly grounded Do not modify the plug provided with the product if it will not fit the outlet have a proper outlet installed by a qualified electrician This product is for use on a nominal 240 volt circuit and has a gro...

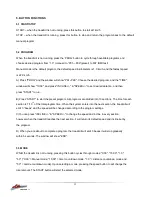
Page 12: ...after a 3 second countdown 3 PROGRAM Cycles through available programs 3 manual 99 preset 4 SAFETY LOCK Display window will show if safety key is removed and the treadmill will stop immediately after emitting 2 beeps Replace the safety key to resume normal operation ...

Page 13: ...to start the preset program All programs are divided into 10 sections The time for each section is 1 10th of the total program time When the system enters into the next section the treadmill will emit 3 beeps and the speed will be changed according to the program settings C You can press INCLINE SPEED to change the speed and incline in every section however when the treadmill reaches the next sect...

Page 14: ...ng DISTANCE running distance distance remaining CALORIE calories burnt calories remaining PULSE current pulse beats per minute 7 PULSE FUNCTION Hold hand pulse sensors for 5 seconds Heart shaped graphics will appear when the machine is testing pulse Heart rate data is for reference ONLY ...

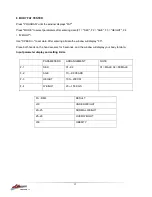
Page 15: ...r entering all data the window will display F5 Place both hands on the hand sensors for 5 seconds and the window will display your body fat data Input parameter display and setting limits PARAMETERS ARRANGEMENT NOTE F 1 SEX 01 02 01 MALE 02 FEMALE F 2 AGE 10 99 YEARS F 3 HEIGHT 100 200 CM F 4 WEIGHT 20 150 KGS FA BMI RESULT 19 UNDER WEIGHT 20 25 NORMAL WEIGHT 25 29 OVER WEIGHT 30 OBESITY ...

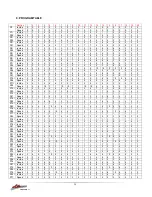
Page 16: ...4 5 6 5 4 3 2 1 2 3 4 5 6 5 4 3 2 1 P14 P62 Incline 1 1 1 1 1 1 1 1 1 1 1 1 1 1 1 1 1 1 1 1 Speed 2 4 6 8 6 6 4 4 2 2 2 4 6 8 6 6 4 4 2 2 P15 P63 Incline 1 1 1 1 1 1 1 1 1 1 1 1 1 1 1 1 1 1 1 1 Speed 2 4 6 8 10 8 6 4 2 2 2 4 6 8 10 8 6 4 2 2 P16 P64 Incline 1 1 1 1 1 1 1 1 1 1 1 1 1 1 1 1 1 1 1 1 Speed 2 2 6 6 8 10 6 6 2 2 2 2 6 6 8 10 6 6 2 2 P17 P65 Incline 1 1 1 1 1 1 1 1 1 1 1 1 1 1 1 1 1 1 1 ...

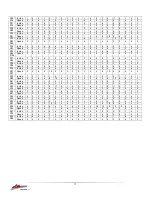
Page 17: ...3 4 5 4 3 Speed 2 4 6 8 6 6 4 4 2 2 2 4 6 8 6 6 4 4 2 2 P39 P87 P97 Incline 2 4 6 2 4 6 2 4 6 2 2 4 6 2 4 6 2 4 6 2 Speed 2 4 6 8 10 8 6 4 2 2 2 4 6 8 10 8 6 4 2 2 P40 P88 Incline 1 3 1 2 1 2 1 1 2 0 1 3 1 2 1 2 1 1 2 1 Speed 2 2 6 6 8 10 6 6 2 2 2 2 6 6 8 10 6 6 2 2 P41 P89 Incline 1 2 2 3 4 4 3 2 1 0 1 2 2 3 4 4 3 2 1 1 Speed 2 3 4 5 2 3 4 5 3 2 2 3 4 5 2 3 4 5 3 2 P42 P90 Incline 1 4 5 7 9 11 9...

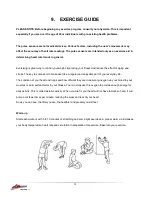
Page 18: ...success is to make exercise a regular and enjoyable part of your everyday life The condition of your heart and lungs and how efficient they are in delivering oxygen via your blood to your muscles is an important factor to your fitness Your muscles use this oxygen to provide enough energy for daily activity This is called aerobic activity When you are fit your heart will not have to work so hard It...

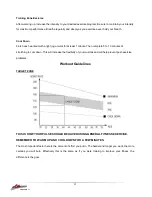
Page 19: ...ete 5 to 10 minutes of stretching to cool down This will increase the flexibility of your muscles and will help prevent post exercise problems Workout Guidelines TARGET ZONE THIS IS HOW YOUR PULSE SHOULD BEHAVE DURING GENERAL FITNESS EXERCISE REMEMBER TO WARM UP AND COOL DOWN FOR A FEW MINUTES The most important factor here is the amount of effort you put in The harder and longer you work the more...

Page 20: ...EFORE MAINTENANCE WARNING STOP TREADMILL BEFORE FOLDING 1 General Cleaning Use a soft damp cloth to wipe the edge of the belt and the area between the belt edge and frame A mild soap and water solution along with a nylon scrub brush will clean the top of the textured belt This task should be done once a month Allow to dry before using On a monthly basis vacuum underneath your treadmill to prevent ...

Page 21: ...e more than 5 hours per week every 6 8 weeks See below procedures for lubricating 1 Use a soft dry cloth to wipe the area between the belt and deck 2 Spread lubricant onto the inside surface of belt and deck evenly make sure the machine is turned off and power is disconnected 3 Periodically lubricate the front and rear rollers to keep them at their peak performance If the treadmill belt deck rolle...

Page 22: ...d of end cap Tighten the rear roller only enough to prevent slippage at the front roller Turn both the right and left bolt clockwise one full turn and inspect for proper tension When an adjustment is made to the belt tension you must also make a tracking adjustment to compensate for the change in belt tension DO NOT OVER TIGHTEN Over tightening will cause belt damage and premature bearing failure ...

Page 23: ...ary The procedures are below 1 Set speed at approximately 3 5km h 2 Check the side the belt shifts to If the belt shifts to right tighten the right bolt and loosen the left bolt by using 6mm Allen Key until the belt is centred itself If belt shifts to left tighten the left bolt and loosen the right bolt by using a 6mm Allen Key until the belt is centred When adjusting the belt using the 6 mm Allen...

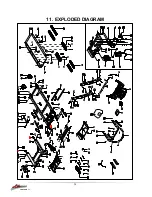
Page 24: ...24 TRACTION II 11 EXPLODED DIAGRAM ...

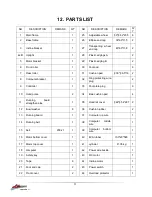
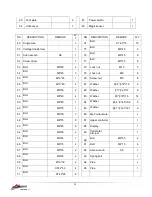
Page 25: ...et 1 32 Ring protecting wire plug 2 9 Controller 1 33 Foot plate plug 6 10 Hand pulse 2 34 Blue cushion pad 4 11 Running board strengthen pipe 1 35 Handrail cover 48 54 287 2 12 Bowl washer 8 36 Cushion rubber 2 13 Running board 1 37 Computer up wire 1 14 Running belt 1 38 Computer middle wire 1 15 belt 200 J7 1 39 Computer bottom wire 1 16 Motor bottom cover 1 40 EVA rubber t3 0 20 565 1 17 Motor...

Page 26: ...80 Screw nut M5 8 56 Bolt M10 40 4 81 Washer 6 6 12 t1 6 2 57 Bolt M8 50 2 82 Washer 11 20 t2 6 58 Bolt M8 40 4 83 Washer 9 16 t1 6 18 59 Bolt M8 80 1 84 Washer 8 4 14 5 t0 8 8 60 Bolt M8 75 1 85 Washer 8 1 12 3 t2 1 6 61 Bolt M8 30 3 86 Mp3 output wire 1 62 Bolt M8 15 8 87 Upper controller 1 63 Bolt M6 25 6 88 Display 1 64 Bolt M6 60 2 89 Horizontal armrest 1 65 Bolt M6 45 1 90 Bolt M8 55 2 66 Bo...

Page 27: ... Speed Wireless Sensor Network Computer displays shows fault code E02 with other areas blank After 10 seconds machine will go into ready mode and can be restarted Possible Reasons Can t receive motor speed sensor feedback within 3 seconds please check sensor plug motor connection wire and the controller Abnormal communication with computer and controller after startup The machine cannot run the co...

Page 28: ...change motor Check control board If control board is emitting a burning smell change it E04 Incline self learning fault 1 Check connection of VR wire of incline motor If improperly connected reconnect VR and make it firm 2 Check to see if AC wire of motor is properly connected and if the AC wire of the motor is inserted properly with correct sign on control board 3 Check connection line of motor t...

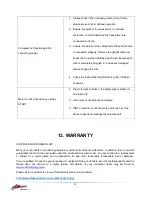
Page 29: ...ions http www lifespanonline com au Warranty Policy Computer not functioning after connecting power 1 Please check if the overload protect jump if it has please press it let it continue operation 2 Ensure the wires of the power switch overload protection control board and the transformer are connected correctly 3 Ensure the wire from the computer to the control board is connected properly Remove t...

Reviews: