background image


22

X. FAQ

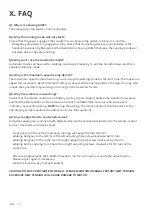
Q1: Why is it showing SAFE?

The emergency stop switch is not connected.

Q2: Why the running mode will not start?

Check that the power supply of the treadmill is connected, the switch is turned on, and the
    emergency stop siwtch is plugged in. Also, check that the locking devices on both sides of the
    handrail have been tightened and the treadmill is showing RUN. Otherwise, the running mode will
    not work due to the safety setting.

Q3: Why can't I use the Automatic mode?

Automatic mode can be used for Walking mode only. Please try to put the handrail down and then
enable automatic mode.

Q4:


Why is the maximum speed is only 3km/h?

The maximum speed is 3km/h when you are using the walking mode for the first time. The maximum
speed will increase to 6km/h (3,7mi/h) after you accessed the novice guide on the App. You may also
unlock the speed limit by walking or running on the treadmill for 1km.

Q5: Why the remote is not working?

Check that the remote control has a battery and try to pair it again. Restart the treadmill and press
and hold the Mode button in the remote control AT THE SAME TIME for 5 seconds. A beep will
indicate a successful pairing. 

NOTE:

 During the pairing, the remote control should be close to the

LED display on the treadmill. (See 04. Learn to Use the Treadmill).

Q6: How to adjust belt to center before use?

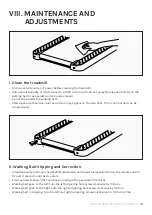
Simultaneously press and hold both Mode Button and Speed Increase Button on the remote control
for over 3 seconds until device start.

     Front panel will show "CALI" and keep running with speed 3km/h (2mi/h).
     Walking belt goes to the left: Turn the left adjusting hole screw clockwise by 1/4 turn.
     Walking belt goes to the right: turn the right adjusting hole screw clockwise by 1/4 turn.
     Walking belt is slipping: Turn the left and right adjusting screws clockwise for 1/2 turn at the
     same time.

     After each adjustment, the treadmill needs to run for 1-2 minutes to verify the adjustments.
     Please adjust again if necessary.
     Press the function key to stop treadmill.

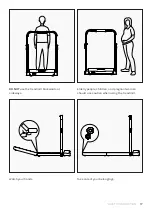
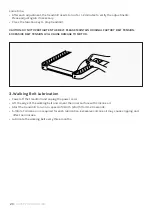
CAUTION: DO NOT OVERTIGHTEN THE BELT. PLEASE MAINTAIN ORIGINAL FACTORY BELT TENSION. 
EXCESSIVE BELT TENSION WILL CAUSE DAMAGE TO MOTOR.

|  FAQ

Summary of Contents for LFTM-VFOLD

Page 1: ...future reference NOTE This manual should not be used to guide your purchasing decision Your product and the contents inside its carton may vary from what is listed in this manual This manual may also...

Page 2: ...ies 06 IV Function Diagram 07 V Set Up Guide 10 VI Learn to Use the Treadmill 12 VII Safety Instruction 15 VIII Maintenance and Adjustments 19 IX Replacement Disposal and Battery Button Warning 21 X F...

Page 3: ...ly for its intended use as described in this manual Do not use attachments not recommended by the manufacturer 4 Never operate this appliance if it has a damaged cord or plug if it is not working prop...

Page 4: ...physical sensory or mental capabilities or lack of experience and knowledge unless they have been given supervision or instruction concerning use of the appliance by a person responsible for their saf...

Page 5: ...Please do not use it for any commercial leasing or public group purpose Reference Index Parameter Applicable Age 14 60 years old Speed Range Walking Mode 0 5km 6km h 0 5 3 7mi h Running Mode 0 5 10km...

Page 6: ...ase check if the items inside the packaging are complete and intact In case of any item missing or broken please contact the seller Treadmill ACCESSORIES Power Cord Remote Control Remote Control Lanya...

Page 7: ...limit of 3km h when the treadmill is used for the first time Unlocking the speed limit of 6km h can be done in three ways Finishing beginner guidance on the KS Fit App walking on the treadmill for 1km...

Page 8: ...is mode manual M mode can be used For safety reasons running mode does not support automatic A mode Ensure the handlebars are tightened on the side when placed vertically 2 RUNNING MODE Safety Lock So...

Page 9: ...Calorie data can be displayed on the panel after being set in the APP Touch Key press Standby Mode Manual Mode Automatic Mode Indicator Light Fault Caution Light Connection Caution Light 4 Remote Cont...

Page 10: ...l locking device lift the handrail to a vertical position tighten the locking devices on both sides of the handrail 3 Unfold the treadmill adjust the walking belt to the center position slowly unfold...

Page 11: ...ch Connect the power supply and turn on the power switch 6 Download KS Fit APP from the Apple Store or Google Play Store and complete installation 7 Open APP follow the instructions to add and connect...

Page 12: ...cally via an intelligent algorithm 2 STANDBY MODE CONTROL DESCRIPTION Standby Mode Under standby mode users can press the mode button on the remote control briefly to wake up the treadmill and switch...

Page 13: ...ton Short press Starts or stops the treadmill Speed Decrease Button Short press Speed decrease by 0 5km h 0 5mi h 5 AUTOMATIC CONTROL MODE DESCRIPTION Automatic This mode is difficult to control and c...

Page 14: ...L PAIRING INSTRUCTIONS Not connected to APP Will flicker Connected to APP Off 7 CONNECTION CAUTION LIGHT E01 Software overcurrent E02 Hardware overcurrent E03 IPM Module Overheating E04 Low voltage Pr...

Page 15: ...ase wear sports shoes and clothes and exercise moderately when using the treadmill If you feel uncomfortable during running please stop immediately and consult a doctor Otherwise you may risk injuries...

Page 16: ...CTION DO NOT operate the treadmill in damp or wet locations DO NOT use on uneven floor Please unplug the power cord when not in use DO NOT step on the head of the treadmill DO NOT bring pets when usin...

Page 17: ...7 SAFETY INSTRUCTION DO NOT use the treadmill backwards or sideways Elderly people children and pregnant women should use caution when using the treadmill Watch your hands Take care of your belongings...

Page 18: ...TY INSTRUCTION DO NOT fold before power off Keep treadmill upright and put it in a space with supporting points on both sides Please keep away from children DO NOT get on and off when the treadmill op...

Page 19: ...loor This is normal and can be simply wiped 1 Clean the treadmill Simultaneously press and hold both Mode Button and Speed Increase Button on the remote control for over 3 seconds until device start F...

Page 20: ...XCESSIVE BELT TENSION WILL CAUSE DAMAGE TO MOTOR Power off the treadmill and unplug the power cord Lift the edge of the walking belt and smear the inner surface with silicone oil Start the treadmill t...

Page 21: ...ctive appliances Devices marked with this symbol must be disposed of separately from your household waste as they contain valuable materials that can be recycled Proper disposal protects the environme...

Page 22: ...l has a battery and try to pair it again Restart the treadmill and press and hold the Mode button in the remote control AT THE SAME TIME for 5 seconds A beep will indicate a successful pairing NOTE Du...

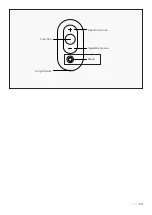
Page 23: ...23 Speed increase Speed decrease Mode Lanyard Hole Function FAQ...

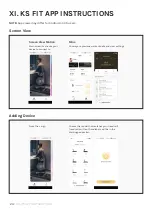
Page 24: ...PP INSTRUCTIONS Screen View Screen View Motion Main screen to choose your device to connect to Mine Shows your previous workout data and user settings Adding Device Press the sign Choose the model tha...

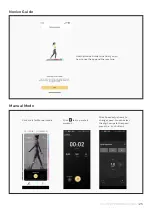
Page 25: ...he Novice Guide to instruct you on how to use the app and the machine Manual Mode Click start for Manual mode Click to stop or start workout Click Speed adjustment to change speed You can select the d...

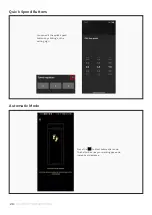
Page 26: ...Buttons KS FIT APP INSTRUCTIONS Automatic Mode You can edit the quick speed buttons by clicking on the setting sign Press the to start Automatic mode The belt will sense your walking pace and increas...

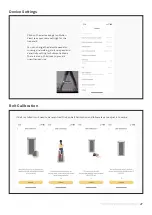
Page 27: ...e settings for the treadmill You can change the default speeds for running and walking start up speed and sensitivity setting for Automatic Mode There is also a Child Lock to prevent unauthorised use...

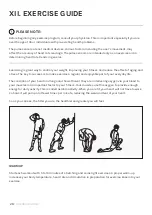
Page 28: ...make exercise a regular and enjoyable part of your everyday life The condition of your heart and lungs and how efficient they are in delivering oxygen via your blood to your muscles is an important fa...

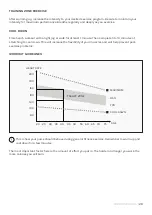
Page 29: ...rcise Remember to warm up and cool down for a few minutes TARGET ZONE MAXIMUM 85 70 COOL DOWN AGE HEART RATE 200 180 160 140 120 100 80 20 25 30 35 40 45 50 55 60 65 70 75 The most important factor he...

Page 30: ...erlaw gov au Please visit our website to view our full warranty terms and conditions http www lifespanfitness com au warranty repairs WARRANTY AND SUPPORT Any claim against this warranty must be made...

Page 31: ......

Page 32: ...WWW LIFESPANFITNESS COM AU...

Reviews: