background image


16 


EXER-58


Hand Pulse Technology 

This product comes equipped with hand pulse sensors which are used to pick up tiny EKG/ECG signals that run 
through the body when your heart beats. These electrical EKG/ECG signals are very small and that they must be 
amplified 1000 times to make the signal useful for the computer to display your pulse. 

To ensure proper operation: 

-


The user must maintain good, consistent contact on all four sensors 

-


The users skin cannot be too dry or too wet 

Other factors that could affect the reading: 

-


Change of grip on the sensors (during slow pace walking and up to running) 

-


Tightening of hand muscles will produce small electrical signals 

-


Static electricity charges from the air or from walking on the treadmill 

EKG/ECG Sensors may filter through actual EKG/ECG signals and “Noise” factors that may affect the reading. This will 
cause the pulse reading to be delayed and will take longer to update the display as the heart rate changes. Too much 
noise will create an incorrect reading. Medical conditions or having no electrical signal in the hands are other factors 
that may affect pulse readings as well. 

These are limitations of hand pulse technology and even the most expensive systems (which can cost upwards of 
$3,000) used in hospitals have the same problems. The difference is that a patient in a hospital is not running on a 
treadmill. Hand pulse technology works well on stationary exercise machines like bikes and even elliptical cross 
trainers but are not perfect on a treadmill. We offer treadmills with a wireless heart rate receiver which may be a 
more accurate option.  

To test if your hand pulse sensors are working up to specification, hold them while standing on the side step rails, 
not walking, and see if the reading is more in line with what you would expect. This will eliminate the movement and 
static electricity factors. If your hands are dry, then wet them slightly (saliva works as a great conductor if this 
doesn’t bother you).  

For more information, please contact our Lifespan Fitness Technical Support Department 

www.lifespanfitness.com.au


[email protected]


Summary of Contents for EXER-58

Page 1: ...uals are available through our website at www lifespanfitness com au Product may vary slightly from the item pictured due to model upgrades Read all instructions carefully before using this product Re...

Page 2: ...EXER 58 TABLE OF CONTENTS 1 IMPORTANT SAFETY INSTRUCTIONS 3 2 CARE INSTRUCTIONS 4 3 EXPLODED DIAGRAM 5 4 PARTS LIST 6 5 ASSEMBLY INSTRUCTIONS 7 6 COMPUTER OPERATION 12 7 EXERCISE GUIDE 13 8 WARRANTY 1...

Page 3: ...ion that affects your heart rate blood pressure or cholesterol level c Be aware of your body s signals Incorrect or excessive exercise can damage your health Stop exercising if you experience any of t...

Page 4: ...chine with heavy or sharp objects The machine can be kept clean by wiping it down using dry cloth All nuts and bolts are to be checked and tightened on a regular basis This includes pedals and other m...

Page 5: ...5 EXER 58 3 EXPLODED DIAGRAM...

Page 6: ...33 5 10 24 Spring washer d8x1 5 2 7 Acorn nut M8 4 25 Handlebar 1 8L R Crank 1 pr 26 Computer 1 9L R Pedals 1 pr 27 Square cap 2 10 Front end cap 2 28 Seat post 1 11 Sensor Wire 1 29 Spring knob 1 12...

Page 7: ...en the front and rear stabilizers 2 3 to the main frame 1 with cap nuts 7 arc washers 6 and carriage bolts 5 STEP 2 1 Tighten left and right pedals 9L R to the cranks 8 2 Tighten the left pedal anti c...

Page 8: ...ith spring knob 29 2 Tighten seat horizontal tube 34 to the seat post 28 using a flat washer 31 and plum nut 32 Then tighten seat 33 to seat horizontal tube 34 with flat washer 36 and nylon nut 35 Ple...

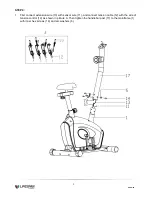
Page 9: ...nnect extension wire 13 with sensor wire 11 and connect tension cable 12 with the wire of tension control 19 as shown in picture A Then tighten the handlebar post 17 to the mainframe 1 with inner hex...

Page 10: ...hread the pulse wire 20 through hole of handlebar post 17 then pull out from the hole of console bracket Then tighten the handlebar 25 to the handlebar post 17 with inner hex screws 14 spring washers...

Page 11: ...11 EXER 58 STEP 6 1 Connect extension wire 13 and pulse wire 20 with the wire of computer 26 and then tighten the computer 26 to the console bracket of handlebar post 17 with cross pan head screws 23...

Page 12: ...the scan mode press the MODE key when the pointer on the function you want which begins blinking FUNCTIONS 1 TIME Press the MODE key until pointer lock on to TIME The total working time will be shown...

Page 13: ...ake exercise a regular and enjoyable part of your everyday life The condition of your heart and lungs and how efficient they are in delivering oxygen via your blood to your muscles is an important fac...

Page 14: ...se Cool Down Finish each workout with a light jog or walk for at least 1 minute Then complete 5 to 10 minutes of stretching to cool down This will increase the flexibility of your muscles and will hel...

Page 15: ...e entitled to have the goods repaired or replaced if the goods fail to be of acceptable quality and the failure does not amount to a major failure Full details of your consumer rights may be found at...

Page 16: ...es Too much noise will create an incorrect reading Medical conditions or having no electrical signal in the hands are other factors that may affect pulse readings as well These are limitations of hand...

Reviews: