background image

26

7.

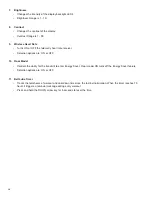
Brightness

Changes the intensity of the display backlight LED’s.

Brightness Range is 1 - 10. 

8.

Contrast

Changes the contrast of the display.

Contrast Range is 1 - 99.

9.

Wireless Heart Rate

Turns ON or OFF the telemetry heart rate receiver.

Selection options are: ON or OFF.

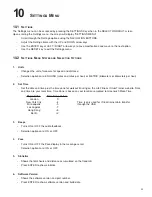
10. Floor Model

Controls the ability for the treadmill to enter Energy Saver; Floor model ON turns off the Energy Saver feature.

Selection options are: ON or OFF.

11. Belt Lube Timer

Tracks the total hours of workout and cool down time since the last belt lubrication. When the timer reaches 75 
hours it triggers a reminder message during every workout.

Press and hold the DOWN arrow key for 5 seconds to reset the time.

Summary of Contents for FTR

Page 1: ...LIFE FITNESS TREADMILL Owner s Manual 01 17 12 8860701 REV A 3 ...

Page 2: ...ing Sales Email kundenberatung lifefitness com Operating Hours 08 30 16 30 h MEZ Spain Life Fitness IBERIA C Frederic Mompou 5 1º1ª 08960 Sant Just Desvern Barcelona SPAIN Telephone 34 93 672 4660 Fax 34 93 672 4670 Service Email servicio tecnico lifefitness com Sales Marketing Email info iberia lifefitness com Operating Hours 9 00h 18 00h Monday Thursday 8 30h 15 00h Friday Belgium Life Fitness B...

Page 3: ...e harmful interference to radio or television reception which can be determined by turning the equipment off and on the user is encouraged to try to correct the interference by one or more of the following measures Re orient or relocate the receiving antenna Increase the separation between the equipment and the receiver Connect the equipment into an outlet on a circuit different from that to which...

Page 4: ...Overviews 19 8 Virtual Trainer 23 9 Heart Rate Zone Training Exercise 24 9 1 Why Heart Rate Zone Training Exercise 24 9 2 Heart Rate Monitoring 24 10 Settings Menu 25 10 1 Settings 25 10 2 Settings Menu States and Selection Options 25 11 Service and Technical Data 27 11 1 Troubleshooting 27 11 2 How to Adjust and Tension the Striding Belt 29 11 3 Preventive Maintenance Tips 30 11 4 Using and Testi...

Page 5: ...ifications in this manual for product specific features Statement of Purpose The Treadmill is an exercise machine that enables users to walk or run in place on a moving surface CAUTION Health related injuries may result from incorrect or excessive use of exercise equipment The manufacturer STRONGLY recommends seeing a physician for a complete medical exam before undertaking an exercise program par...

Page 6: ...r cord away from heated surfaces Do not pull the equipment by the power cord or use the cord as a handle Do not run the power cord on the floor under or along the side of the treadmill If the electrical supply cord is damaged it must be replaced by the manufacturer an authorized service agent or a similarly qualified person to avoid a hazard Do not use this product in areas where aerosol spray pro...

Page 7: ...not in use To do this press and hold both the SPEED DOWN ARROW and the STOP key on the console Use caution when folding and unfolding the treadmill Do not let the treadmill lower to the floor unassisted Guide the deck to the floor by hand Use this unit only for its intended use as described in this manual Do not use attachments not recommended by the manufacturer In conformity with the European Un...

Page 8: ...2 LIFE FITNESS TREADMILL OVERVIEW 7 ...

Page 9: ... walking surface Follow assembly instructions starting on page 9 WARNING Fold the treadmill into the upright and locked position before rolling it over on its side or picking it up from the floor The base or folding frame can swing around unexpectedly if this procedure is not followed 3 2 COMPONENT LIST HARDWARE Identify the following components after unpacking your treadmill 1 Left Upright Qty 1 ...

Page 10: ...upright by installing one M8 X 15MM SILVER BOLT 9 and one STAR WASHER 3 CAUTION Do not pinch the wire when attaching the left upright to the left upright bracket Carefully feed any excess wire into the upright tube Connectors must be inside the upright tube after installation Locate the RIGHT UPRIGHT 4 The upright is marked R Position the RIGHT UPRIGHT near the inside of the right bracket Install ...

Page 11: ...the treadmill running surface back down a Set the console assembly into the slot on the right upright lower right image b Connect the two electrical connectors between the LEFT UPRIGHT and the CONSOLE ASSEMBLY Push any excess wire into either the upright or the console assembly c Set the console on top of the uprights while pushing the connectors in to the upright The tabs on the console set into ...

Page 12: ...tighten the screws c Install the M8 X 60MM BLACK SCREWS 6 and STAR WASHER 3 at the bottom of the handrail Finger tighten the screws Repeat the above procedure for the LEFT HANDRAIL 7 3 6 TIGHTENING THE SCREWS Use the supplied 6MM HEX WRENCH to tighten all 18 screws on the user assembly points 3 7 ATTACHING THE POWER CORD Insert the female plug of your treadmill s power cord into the male outlet ne...

Page 13: ...duct If it will not fit an electrical outlet have a proper outlet installed by a qualified electrician TURNING THE UNIT ON To turn the treadmill on locate the ON OFF power switch at the front of the treadmill near the power cord and turn it ON HOW TO STABILIZE THE LIFE FITNESS TREADMILL After placing the unit where it will be used check its stability If there is even a slight rocking motion or the...

Page 14: ...ch has two positions I one for ON and 0 zero for OFF MOVING THE TREADMILL Turn the treadmill off and disconnect its power cord then raise its deck Note If adjustments were made to the front levelers during setup make sure to tighten the levelers snug against the base frame before moving The treadmill may now be moved on its front platform wheels by pushing and pulling on its handrails Do not attem...

Page 15: ...button for forward back up and down navigation during workout or console set up as well as incline time and speed workout adjustments While setting up a workout use the LEFT RIGHT arrows to scroll through workout setup options and then use the UP DOWN arrows to adjust the values During a workout use the LEFT RIGHT arrows to adjust the workout difficulty level or HR Target in HR Programs Use the UP...

Page 16: ...increments of 0 5 with each press of the arrows O Speed Up Down Use the SPEED UP DOWN arrow keys to change the speed of the belt by increments of 0 1 mph with each press of the arrows P Pause Resume Press this key once during a workout to pause the workout Press the key again to resume the workout After a Pause the treadmill speed shall be 0 5mph 0 8kph The pause time is set for 5 minutes The disp...

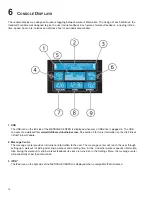
Page 17: ...cute a workout from www Lifefitnessvirtualtrainer com See section 8 for more information on the Life Fitness Virtual Trainer Website 2 Message Center The message center provides instructional information to the user The message center will coach the user through setting up a workout including selecting a workout and entering time incline and other workout specific information Also during the worko...

Page 18: ...l illuminate to show when the user s actual heart rate is above or below the target heart rate Example User s Age is 45 220 45 175 175 is the Maximum Heart Rate for a 45 year old 175 x 65 114 114 is the optimal target heart rate for weight loss and fat burning 5 Workout Profile Display The workout profile graphically displays the intensity of a workout with columns of various heights During the wo...

Page 19: ...e of level is an incline level or percentage The incline level is manually adjusted by the user in a MANUAL work out The range of possible incline percentages is 0 12 and can be adjusted in 0 5 increments 8 Time Display The time window displays the total workout time set by the user during workout setup which is a range from 99 to 1 minute depending on the program During the workout time will coun...

Page 20: ...ides details on the steps themselves WORKOUT PROFILE To start a workout select one of the six pre programmed workout buttons on the right side of the console or plug in your USB and select the USB workout button When a workout is selected the MESSAGE CENTER will display the first workout set up step and show the current value for the set up parameters Throughout the workout setup process use the U...

Page 21: ...HILL workout has two main phases in between the warm up and cool down Plateau Increases the incline slightly and keeps it steady to bring the heart rate to the low end of the target zone Interval Training Is a series of increasingly steeper hills alternating with valleys or periods of recovery The heart rate should rise to the high end of the target zone during this segment Goal The computerized i...

Page 22: ...p as the test score calculation is based on a heart rate reading The workout duration will be five minutes at a 5 incline Immediately afterward the console will take the user s heart rate reading calculate a fitness score and display the score in the MESSAGE CENTER The Fit Test is considered to be a submax VO2 volume of oxygen test It gauges how well the heart supplies oxygenated blood to the exer...

Page 23: ...iption as equal to 220 minus an individual s age The tables below list fit test results RELATIVE FITNESS CLASSIFICATION FOR MEN Men Estimated VO2 Max ml kg min Per Age Category RELATIVE FITNESS CLASSIFICATION FOR WOMEN Women Estimated VO2 Max ml kg min Per Age Category Life Fitness developed this rating scale based on VO2 max percentile distributions referenced in American College of Sports Medici...

Page 24: ...click on the UPLOAD RESULTS button to view a list of most recent workout results on your USB and choose the once you wish to upload 4 Track Your Progress If you have uploaded workout results clicking on TRACK PROGRESS button will display a graph showing your progress during the past month You can easily adjust the start and end dates to check progress during periods of your choice How to begin a w...

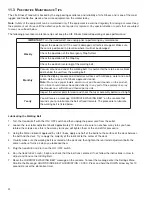
Page 25: ... pressed against the skin trans fer heart rate signals from the user to the console The electrodes are inside the chest strap A that the user wears during the workout The transmitter strap delivers an optimal heart rate reading when the electrodes are in direct contact with the skin or a thin layer of wet clothing The electrodes are two grooved surfaces on the underside of the strap and must remai...

Page 26: ...ETRIC kilometers or kilometers per hour 2 Set Time Set the date and time plus the time zone for workout tracking on the Life Fitness Virtual Trainer web site Date and time are your local time Time Zone is based on your location compared to Greenwich Mean Time Major Cities Time Zone Values London 0 New York City 4 Time is only used for Virtual trainer data transfer Minneapolis 5 through the USB Los...

Page 27: ...ection options are ON or OFF 10 Floor Model Controls the ability for the treadmill to enter Energy Saver Floor model ON turns off the Energy Saver feature Selection options are ON or OFF 11 Belt Lube Timer Tracks the total hours of workout and cool down time since the last belt lubrication When the timer reaches 75 hours it triggers a reminder message during every workout Press and hold the DOWN a...

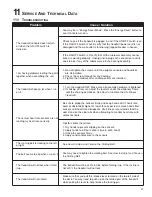
Page 28: ...s under the stationary frame until the shaking decreases See How to Stabilize the Life Fitness Treadmill The contact heart rate sensors are not reading my heart rate correctly Be sure to grasp the sensors firmly and keep hands still If heart rate seems substantially higher or lower than expected remove hands from sensors until heart rate disappears Life Fitness recommends that the user stand on th...

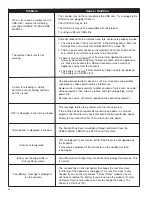
Page 29: ...s causes external noise interference Equipment is in close proximity to other sources of noise such as audio video equipment fans two way radios and high voltage high current power line Remove the source of noise or reposition the exercise equipment OFF is displayed in the incline window This message relates to a problem with the Incline system If the incline has been repeatedly moved up and down ...

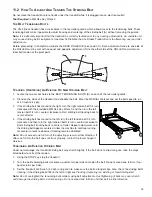
Page 30: ...e with the provided 6MM Hex Key Wrench and then turn the left tension bolt 1 4 turn counter clockwise to start striding belt tracking back to center of roller 4 If the striding belt has moved to the left turn the left tension bolt 1 4 turn clockwise and then turn the right tension bolt 1 4 turn counter clockwise to start striding belt tracking back to center of roller Repeat adjustments until the ...

Page 31: ...d turn on the ON OFF switch 6 Run the treadmill at 3 mph 5 kph and check that the belt runs centered If not follow the instructions in How to Adjust and Tension the Striding Belt 7 Reset the LUBRICATE WALKING BELT message on the console To reset the message enter the Settings Menu Scroll to the Message HOURS SINCE BELT LUBRICATION XXXX Press and hold the DOWN arrow key for 10 seconds to reset the ...

Page 32: ...lso be used to clean the display and all exterior sur faces Use a soft cotton cloth only Apply the cleaner to the cotton cloth before cleaning DO NOT use ammonia or acid based cleaners DO NOT use abrasive cleaners DO NOT use paper towels DO NOT apply cleaners directly to the equipment surfaces 11 4 USING AND TESTING THE SAFETY STOP PULL CORD During operation of the treadmill the lanyard on the Saf...

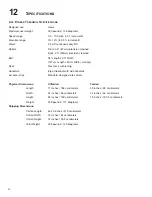
Page 33: ...m Width multi ply Deck Flex Deck cushioning Handrails Ergo Crossbar with side handrails Accessory tray Standard designed into system Physical Dimensions Unfolded Folded Length 77 inches 196 centimeters 35 inches 89 centimeters Width 34 inches 86 centimeters 34 inches 86 centimeters Height 59 inches 150 centimeters 75 inches 190 5 centimeters Weight 259 pounds 117 kilograms Shipping Dimensions Cart...

Page 34: ...t in your User Manual Manual All terms of this warranty are void if this Product is moved beyond the continental borders of the United States of America excluding Alaska Hawaii and Canada and are then subject to the terms provided by that country s local authorized Life Fitness Representative WHAT YOU MUST DO Retain proof of purchase our receipt of the attached registration card assures registrati...

Page 35: ...y person to assure for us any other obligation or liability concerning the sale of this Product Under no circumstances shall we be liable under this warranty or otherwise of any damage to any person or property including any lost profits or lost savings for any special indirect secondary incidental or consequential damages of any nature arising out of the use of or inability to use this Product So...

Reviews: