background image

3

QUICK GUIDE / DL-USB-PTZ10-B

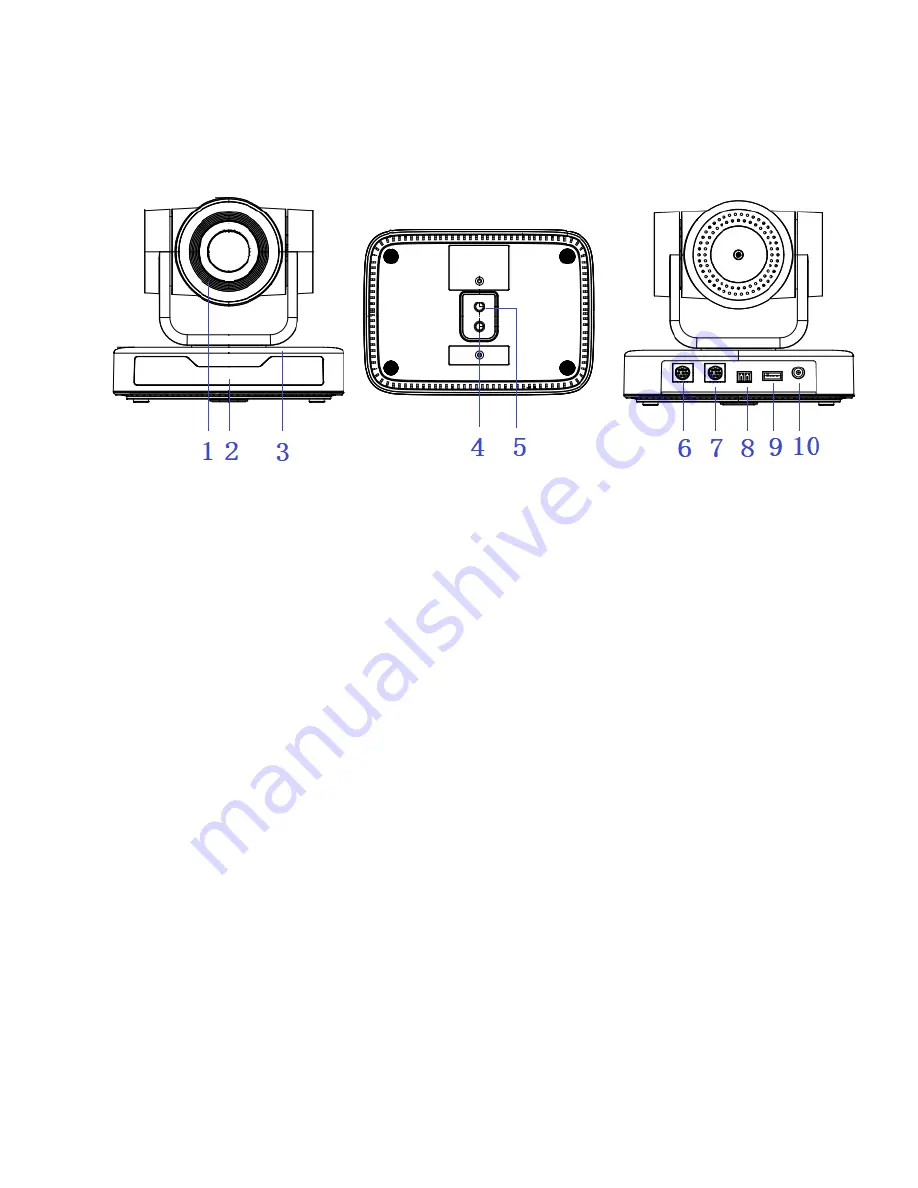
PRODUCT BREAKDOWN

FRONT

REAR

BOTTOM

6. RS232 Control Interface (Input)
7. RS232 Control Interface (Output)
8. RS485 Input (left +, right-)
9. USB 2.0 Interface 
10. DC12V Input Power Supply Socket

1. Camera Lens

2. Remote Control Receiving Indicator

3. Camera Base

4. Tripod Screw Hole
5. Screw Hole for Tripod 

Summary of Contents for DL-USB-PTZ10-B

Page 1: ...www libav com 800 530 8998 QUICK GUIDE FULL HD PTZ CAMERA V 2 0 DL USB PTZ10 B ...

Page 2: ...ogy Fast accurate and stable auto focusing technology Low Noise and High SNR Super high SNR image is achieved with low noise CMOS Advanced 2D 3D noise reduction technology further reduces the noise while ensuring high image clarity Control Interface RS485 RS232 cascade connection Multiple Control Protocol Support VISCA PELCO D PELCO P protocols support automatic identification protocols Quiet Pan ...

Page 3: ...BOTTOM 6 RS232 Control Interface Input 7 RS232 Control Interface Output 8 RS485 Input left right 9 USB 2 0 Interface 10 DC12V Input Power Supply Socket 1 Camera Lens 2 Remote Control Receiving Indicator 3 Camera Base 4 Tripod Screw Hole 5 Screw Hole for Tripod ...

Page 4: ...4 QUICK GUIDE DL USB PTZ10 B MOUNTING OPTIONS Wall mounting the camera using the provided wall mount or third party mount Included Items STEP 1 STEP 3 STEP 4 FINISHED STEP 2 ...

Page 5: ...5 QUICK GUIDE DL USB PTZ10 B Optional Ceiling Mount Included Items STEP 1 STEP 3 STEP 2 STEP 4 FINISH ...

Page 6: ...abling the USB power feature Initial Configuration The remote control receiving indicator will start to flash after the camera has been powered on The camera will pan tilt and then move to the HOME position both the horizontal and vertical positions are in the middle When the remote control s receiving indicator stops flashing the self checking is completed After powering on and self checking the ...

Page 7: ...n rotation range of the holder Do not power on before completing the installation Troubleshooting No video output a Check whether the camera power supply is connected and receiving power c Check whether the bottom of the DIP switch is switched to normal operating mode d Check whether the video output cable has been disconnected e Check whether the camera is selected within the software Remote cont...

Page 8: ...ND 5 RXD 6 GND 7 IR OUT 8 NC WindowsDB 9 1 DCD 2 RXD 3 TXD 4 DTR 5 GND 6 DSR 7 RTS 8 CTS 9 RI Connection to PC or Camera Controller No Port Definition 1 DTR Data Terminal Ready 2 DTR Data Set Ready 3 TXD Transmit Data 4 GND Signal Ground 5 RXD Receive Data 6 GND Signal Ground 7 IR OUT IR Commander Signal 8 NC No Connection ...

Page 9: ...er Detect 2 RXD Receive Data 3 TXD Transmit Data 4 DTR Data Terminal Ready 5 GND System Ground 6 DSR Data Set Ready 7 RTS Request to Send 8 CTS Clear to Send 9 RI Ring Indicator Camera 1 1 DTR 2 DSR 3 TXD 4 GND 5 RXD 6 GND 7 IR OUT 8 NC Camera 2 1 DTR 2 DSR 3 TXD 4 GND 5 RXD 6 GND 7 OPEN 8 OPEN Cascading Cameras ...

Page 10: ...of 3 seconds on standby key Do a long press for 3 seconds again on the standby key The camera will self check again and return to HOME position If the preset 0 position is set the camera will return to the preset 0 position Select the camera address you want to control Auto auto focus mode Manual manual focus mode Focus near Press FOCUS key Valid only in manual focus mode Focus far Press FOCUS key...

Page 11: ...eset Press a number key 0 9 directly to call a preset position Clear Preset Press CLEAR PRESET button and then press the number key 0 9 to clear preset positions Note Press the key three times continually to clear all presets Up Press Down Press Left Press Right Press Back to middle position Press HOME Press and hold the up down left right key the pan tilt movements will keep running from slow to ...

Page 12: ...o sub menu Version Enter into sub menu Restore Default Enter into reset setting select YES or NO to confirm Select For selecting menu Change Value For modifying parameters MENU Back Press Menu to return Home OK Press Home to confirm In normal working mode press MENU key to display the menu using scroll arrows to point at or highlight the selected items MENU Open close the OSD menu HOME Camera lens...

Page 13: ...D 1 255 Baudrate 2400 4800 9600 115200 Visca Address Fix On Off Auto Filp On Off Exposure Enter into Exposure setting Color Enter into color setting Image Enter into image setting Focus Enter into focus setting Noise Reduction Enter into noise reduction System Setting Camera Setting SETUP Protocol Auto Visca Address 1 Visca Address Fix OFF PELCO P Address 1 PELCO D Address 1 Baudrate 9600 Auto Fil...

Page 14: ...On Off only available in auto mode Compensation Level 7 7 only available in auto mode when EV is ON BLC ON OFF for options only available in auto mode Dynamic Range 1 8 close Anti Flicker OFF 50Hz 60Hz for options only available in Auto Iris priority Brightness priority modes Gain limit 0 15 only available in Auto Iris priority Brightness priority mode WDR Off 1 8 WB Mode Auto Manual One Push 3000...

Page 15: ...rightness 0 14 Contrast 0 14 Sharpness 0 15 Flip H On Off Flip V On Off B W Mode color black white Gamma Default 0 45 0 50 0 5 0 63 DCI Dynamic Contrast Off 1 8 Minimum Illumination On Off IMAGE Brightness 7 Contrast 8 Sharpness 3 Flip H OFF Flip V OFF B W Mode Color Gamma Default DCI Close Low Light Mode OFF Select Change Value Menu Back ...

Page 16: ...middle low FOCUS Focus Mode Auto AF Zone All AF Sensitivity Low Select Change Value Menu Back Noise Reduction Move the pointer to the NOISE REDUCTION in the Menu click the HOME and enter the NOISE REDUCTION as follows 2D Noise Reduction Auto close 1 7 3D Noise Reduction Close 1 8 Dynamic Hot Pixel Close 1 5 NOISE REDUCTION NR 2D 4 NR 3D 2 Dynamic Hot Pixel OFF Select Change Value Menu Back ...

Page 17: ...n Camera Version Display camera version information AF Version Display the focus version information VERSION MCU Version 3 1 0 2019 09 26 Camera Version 1 0 5 2019 09 27 AF Version 1 0 0 2019 09 07 Select Change Value Menu Back Home OK Restore Default Move the pointer to the RESTORE DEFAULT in the Main Menu click the HOME and enter the RESTORE DEFAULT as follows Restore default YES NO Color style ...

Page 18: ...tion At this point the camera can be controled using the serial commands SERIAL PORT COMMUNICATION AND CONTROL VISCA Protocol Return Command z camera address 8 Ack Completion Message Command packet Note ACK z0 41 FF Returned when the command is accepted Completion z0 51 FF Returned when the command has been executed Error Messages Command packet Note Syntax Error z0 60 02 FF Returned when the comm...

Page 19: ...ocus Stop 8x 01 04 08 00 FF Far Standard 8x 01 04 08 02 FF Near Standard 8x 01 04 08 03 FF Far Variable 8x 01 04 08 2p FF p 0 low F high Near Variable 8x 01 04 08 3p FF Direct 8x 01 04 48 0p 0q 0r 0s FF pqrs Focus Position Auto Focus 8x 01 04 38 02 FF Manual Focus 8x 01 04 38 03 FF One Push mode 8x 01 04 38 04 FF CAM _Zoom Focus Direct 8x 01 04 47 0p 0q 0r 0s 0t 0u 0v 0w FF pqrs Zoom Position tuvw...

Page 20: ... FF Bright mode CAM_Shutter Reset 8x 01 04 0A 00 FF Shutter Setting Up 8x 01 04 0A 02 FF Down 8x 01 04 0A 03 FF Direct 8x 01 04 4A 00 00 0p 0q FF pq Shutter Position CAM_Iris Reset 8x 01 04 0B 00 FF Iris Setting Up 8x 01 04 0B 02 FF Down 8x 01 04 0B 03 FF Direct 8x 01 04 4B 00 00 0p 0q FF pq Iris Position CAM_Gain Limit Gain Limit 8x 01 04 2C 0p FF p Gain Positon CAM_Bright Reset 8x 01 04 0D 00 FF...

Page 21: ...esponds to 0 to 9 on the Remote Commander Set 8x 01 04 3F 01 pq FF Recall 8x 01 04 3F 02 pq FF CAM_LR_Reverse On 8x 01 04 61 02 FF Image Flip Horizontal ON OFF Off 8x 01 04 61 03 FF CAM_PictureFlip On 8x 01 04 66 02 FF Image Flip Vertical ON OFF Off 8x 01 04 66 03 FF CAM_ ColorSaturation Direct 8x 01 04 49 00 00 00 0p FF P 0 E 0 60 1 70 2 80 3 90 4 100 5 110 6 120 7 130 8 140 9 150 10 160 11 160 1...

Page 22: ...80P25 8 720P30 9 720P25 A 1080P59 94 B 1080i59 94 C 720P59 94 D 1080P29 97 E 720P29 97 Pan_tiltDrive Up 8x 01 06 01 VV WW 03 01 FF VV Pan speed 0x01 low speed to 0x18 high speed WW Tilt speed 0x01 low speed to 0x14 high speed YYYY Pan Position ZZZZ Tilt Position Down 8x 01 06 01 VV WW 03 02 FF Left 8x 01 06 01 VV WW 01 03 FF Right 8x 01 06 01 VV WW 02 03 FF Upleft 8x 01 06 01 VV WW 01 01 FF Uprigh...

Page 23: ... 50 0p 0q 0r 0s FF pqrs Focus Position CAM_WBModeInq 8x 09 04 35 FF y0 50 00 FF Auto y0 50 01 FF 3000K y0 50 02 FF 4000K y0 50 03 FF One Push Mode y0 50 04 FF 5000K y0 50 05 FF Manual y0 50 00 FF 6500K y0 50 06 FF 6500K y0 50 07 FF 3500K y0 50 08 FF 4500K y0 50 09 FF 5500K y0 50 0A FF 6000K CAM_RGainInq 8x 09 04 43 FF y0 50 0B FF 7000K CAM_BGainInq 8x 09 04 44 FF y0 50 00 00 0p 0q FF pq B Gain CAM...

Page 24: ...er last operated SYS_MenuModeInq 8x 09 06 06 FF y0 50 02 FF On y0 50 03 FF Off CAM_LR_ReverseInq 8x 09 04 61 FF y0 50 02 FF On y0 50 03 FF Off CAM_PictureFlipInq 8x 09 04 66 FF y0 50 02 FF On y0 50 03 FF Off CAM_ ColorSaturationInq 8x 09 04 49 FF y0 50 00 00 00 0p FF p Color Gain setting 0h 60 to Eh 130 CAM_IDInq 8x 09 04 22 FF y0 50 0p FF p Gamma ID IR_ReceiveInq 8x 09 06 08 FF y0 50 02 FF On y0 ...

Page 25: ... y0 50 0p FF P 0 E Video format 0 1080P60 8 720P30 1 1080P50 9 720P25 2 1080i60 3 1080i50 4 720P60 5 720P50 6 1080P30 7 1080P25 A 1080P59 94 B 1080i59 94 C 720P59 94 D 1080P29 97 E 720P29 97 Pan tiltMaxSpeedInq 8x 09 06 11 FF y0 50 ww zz FF ww Pan Max Speed zz Tilt Max Speed Pan tiltPosInq 8x 09 06 12 FF y0 50 0w 0w 0w 0w 0z 0z 0z 0z FF wwww Pan Position zzzz Tilt Position Note X in the above tabl...

Page 26: ...M Left 0xFF Address 0x00 0x04 Pan Speed Tilt Speed SUM Right 0xFF Address 0x00 0x02 Pan Speed Tilt Speed SUM Upleft 0xFF Address 0x00 0x0C Pan Speed Tilt Speed SUM Upright 0xFF Address 0x00 0x0A Pan Speed Tilt Speed SUM DownLeft 0xFF Address 0x00 0x14 Pan Speed Tilt Speed SUM DownRight 0xFF Address 0x00 0x12 Pan Speed Tilt Speed SUM Zoom In 0xFF Address 0x00 0x20 0x00 0x00 SUM Zoom Out 0xFF Addres...

Page 27: ...0x40 0x00 0x00 0xAF XOR Stop 0xA0 Address 0x00 0x00 0x00 0x00 0xAF XOR Focus Far 0xA0 Address 0x01 0x00 0x00 0x00 0xAF XOR Focus Near 0xA0 Address 0x02 0x00 0x00 0x00 0xAF XOR Set Preset 0xA0 Address 0x00 0x03 0x00 Preset ID 0xAF XOR Clear Preset 0xA0 Address 0x00 0x05 0x00 Preset ID 0xAF XOR Call Preset 0xA0 Address 0x00 0x07 0x00 Preset ID 0xAF XOR Query Pan Position 0xA0 Address 0x00 0x51 0x00 ...

Page 28: ...0 480 30 25 20 15 10 5fps 640 360 30 25 20 15 10 5fps 320 180 30 25 20 15 10 5fps View Angle 8 8 66 Focus Length f 4 34mm 41 66mm AV F1 85 F2 43 Optical Zoom 10X Digital Zoom 10X Minimum Illumination 0 5Lux F1 8 AGC ON DNR 2D 3D DNR White Balance Auto Manual One Push 3000K 3500K 4000K 4500K 5000K 5500 K 6000K 6500K 7000K Focus Auto Manual One Push Focus Exposure Auto Manual BLC On Off Video Adjust...

Page 29: ...d 0 1 40 sec Preset Speed Pan 60 sec Tilt 40 sec Preset Number 255 presets 10 presets via remote control Other Parameter Input Voltage 12V Input Current Maximum 4 98A Power Consumption Maximum 2 5W Stored Temperature 40 C 70 C Storage Humidity 20 90 Working Temperature 10 C 50 C Working Humidity 20 80 Dimension W H D 156 8mm 112 6mm 139 5mm Weight 1KG Application Indoor Package Power Supply RS232 ...

Page 30: ...30 QUICK GUIDE DL USB PTZ10 B Measurements are in millimeters PRODUCT DIMENSIONS ...

Page 31: ...31 QUICK GUIDE DL USB PTZ10 B Thank you for your purchase For technical support please call our toll free number at 800 530 8998 or email us at supportlibav libav com www libav com 800 530 8998 ...

Reviews: