

DL-USB-360SPKMIC Quick Guide
3
Setting Up Your Device
• Requirements - A conference host by USB (Compatible to any host OS of Windows/Android/ios)
• Install a video conferencing desktop app such as Zoom, Teams or Google Meet onto the computer.
Note: verify your preferred video calling application requirements
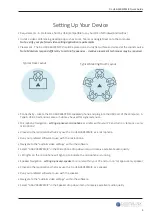
• Placement - The DL-USB-360SPKMIC should be placed on a sturdy flat surface and aimed at the sound source.
Note: Materials respond differently to certain frequencies - creative placement techniques may be required.
Typical Desk Layout
Typical Meeting Room Layout
• Connectivity - Locate the DL-USB-360SPKMIC speakewrphone and plug into the USB port of the computer. A
Type A USB 2.0 extension cable or hub may be used for signal extension.
• Microphone Navigation -
settings>privacy>microphone
or similar within your PC and turn on ‘let apps use my
microphone’
• Close all other applications that may use the
DL-USB-360SPKMIC as a microphone.
• Run your prefered software to use with the microphone.
• Navigate to the “audio & video settings” within the software
• Select “LibAV 360SPKMIC”in the Microphone drop down menu to receive excellent audio quality.
• LED lights on the microphone will light up to indicate the microphone is running.
• Speaker Navigation -
settings>privacy>speaker
or similar within your PC and turn on ‘let apps use my speaker’
• Close all other applications that may use the
DL-USB-360SPKMIC as a speaker.
• Run your prefered software to use with the speaker.
• Navigate to the “audio & video settings” within the software.
• Select “LibAV 360SPKMIC”in the Speaker drop down menu to receive excellent audio quality.


