background image

8


a


1

1  

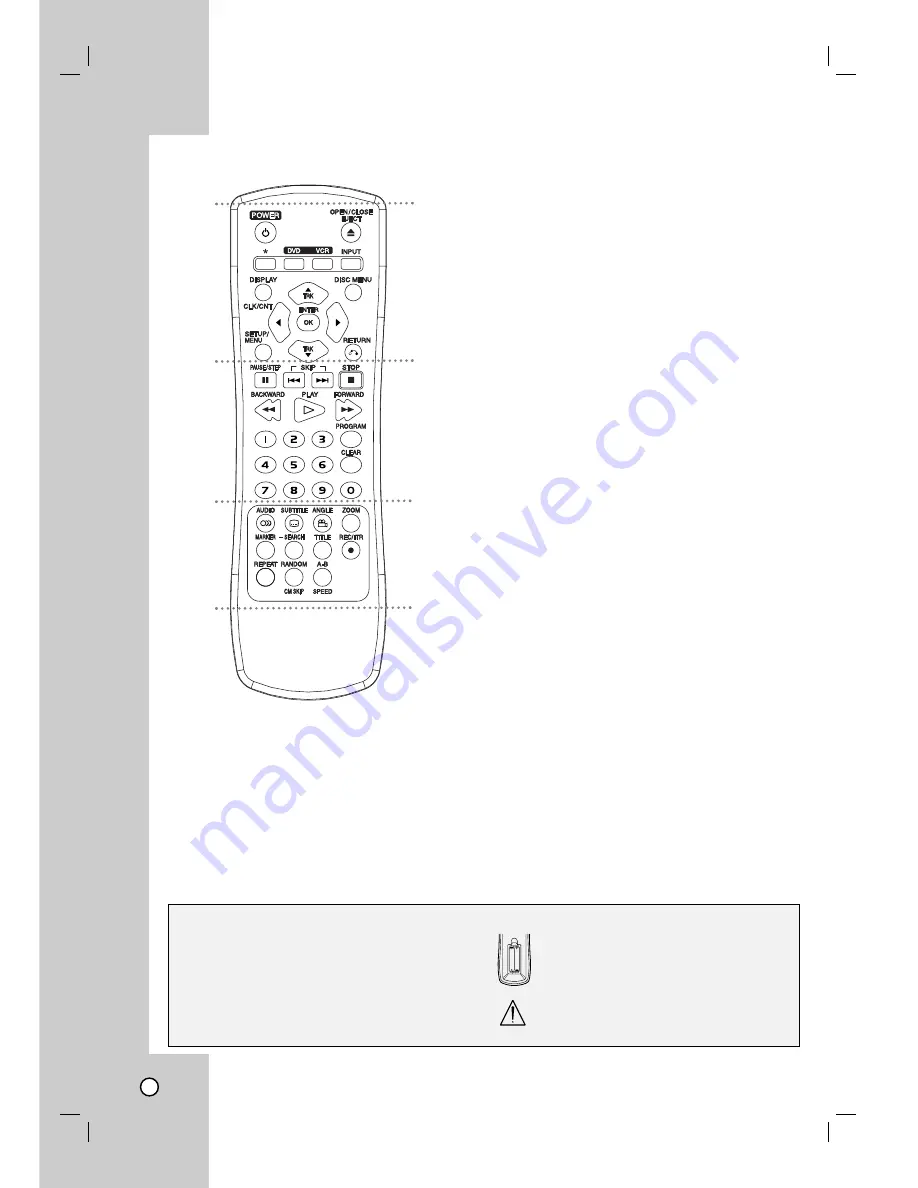
(POWER)

:

Switches unit ON and OFF.

*

This button is not available.

Z

Z  

(OPEN/CLOSE) : 

Opens and closes the disc tray.

DVD :

Select the unit function mode to DVD. 

VCR :

Select the unit function mode to VCR.

INPUT : 

Selects the VCR deck’s source (LINE 1 or 

LINE 2).

DISPLAY : 

Accesses On-Screen Display.

CLK/CNT : 

Switches between the clock, tape counter and

tape remaining modes on the display.

DISC MENU : 

Accesses menu on a DVD disc. 

b

B

v

V

:

Selects menu options.

v

v

/

V

V

(

TRK) : 

Adjusts manually the tape’s picture onscreen.

SETUP/MENU : 

Accesses or removes DVD Setup menu

and VCR menu. 

ENTER (OK)

Confirms menu selections. Displays func-

tions on the TV screen.

RETURN (

O

O

) : 

Removes the setup menu.


b


(PAUSE/STEP) : 

Pause playback or recording temporarily. 
Press repeatedly for frame-by-frame playback.

.

/

(SKIP) : 

Go to next the chapter or track. 
Returns to beginning of current chapter or track or go to 
previous chapter or track.

x

x  

(STOP) : 

Stops playback or recording.

m

/

(BACKWARD / FORWARD) : 

- DVD: Search backward or forward.
- VCR: Rewinds/Advances the tape during the STOP mode,

for fast backward/forward picture search.

H

H

(PLAY) : 

Starts playback.

0-9  

Selects numbered options in a menu.

PROGRAM : 

Shows or hides Program menu.

CLEAR : 

Removes a mark on the Marker Search menu.


c


AUDIO : 

Selects an audio language (DVD). 

SUBTITLE

Selects a subtitle language.

ANGLE 

:

Selects a DVD camera angle, if available.

ZOOM : 

Enlarges DVD video image.

MARKER : 

Marks any point during playback.

SEARCH : 

Displays Marker Search menu.

TITLE : 

Displays the disc’s Title menu, if available.

z

z  

(REC/ITR) : 

Starts recording.

REPEAT 

:

Repeat chapter, track, title or all.

RANDOM : 

Plays tracks in random order.

CM SKIP : 

Fast forwards picture search through 30 sec-

onds of recording.

A-B : 

Repeats sequence between two points (A and B). 

SPEED : 

Selects recording speed.

Remote Control

About the Remote Control

Operation Range

Point the Remote Control at the remote sensor and
press the buttons.

Distance:

About 23 ft (7 m) from the front of the
remote sensor.

Angle:

About 30° in each direction of the front of
the remote sensor.

Battery installation

Detach the battery cover on the rear of
the Remote Control, and insert two
(R03/AAA) size batteries with 

3

and 

#

aligned correctly.

Do not mix old and new batteries and never
mix different types of batteries such as
standard, alkaline, etc.

AAA

AAA

a

b

c

Summary of Contents for XBV713 - XBV 713 - DVD/VCR

Page 1: ... M NA1ULZ_ENG Installation and Operating Guide Warranty Model Number XBV713 DVD Player Video Cassette Recorder Copyright 2007 LG Electronics U S A Inc For service support Call Toll Free Number 1 800 243 0000 ...

Page 2: ...lass B digital device pursuant to Part 15 of the FCC Rules These limits are designed to provide reasonable protection against harmful interference in a residential installation This equipment generates uses and can radiate radio fre quency energy and if not installed and used in accordance with the instructions may cause harmful interference to radio communications However there is no guarantee th...

Page 3: ... plug has two blades and a third grounding prong The wide blade or the third prong are provided for your safety If the provided plug does not fit into your outlet consult an electrician for replacement of the obsolete outlet 10 Protect the power cord from being walked on or pinched particularly at plugs convenience recepta cles and the point where they exit from the product 11 Only use attachments...

Page 4: ... 17 B L E Black Level Expansion 17 Operation 18 VCR Tape Playback 18 Basic Instructions 18 Auto Tracking 18 Manual Tracking 18 Search 18 Still Picture and Frame by Frame Playback 18 Slow Motion 19 CM SKIP Commercial Skip 19 VCR Tape Recording 19 20 Basic Instructions 19 External Timer Recording 19 20 Instant Timer Recording 20 Recording from External Components 20 Copying from DVD to VCR 21 On Scr...

Page 5: ...ymbol All discs listed below DVD and finalized DVD R RW Audio CDs MP3 files WMA files About the Symbol Display may appear on your TV display during opera tion and indicates that the function is not permitted by this unit or the disc Notes on Discs Handling Discs Do not touch the playback side of the disc Hold the disc by the edges so that fingerprints do not get on the surface Never stick paper or...

Page 6: ... from the copyright owner Regional Code This unit has a regional code printed on the rear of the unit This unit can play only DVD discs labeled as the same as the rear of the unit or ALL Notes on Regional Codes Most DVD discs have a globe with one or more numbers in it clearly visible on the cover This num ber must match your DVD player s regional code or the disc cannot play If you try to play a ...

Page 7: ...Stops playback of the disc or tape j DVD VCR output select Select one of your output sources to view on the TV screen between DVD and VCR k INPUT Selects the VCR deck s source LINE 1 or LINE 2 l Z Z DVD Opens or closes the disc tray m Display Windows DVD The DVD deck is selected A disc is in the DVD deck Lights when a disc is in the DVD deck and Flashes when no disc Indicates repeat mode P Indicat...

Page 8: ... backward forward picture search H H PLAY Starts playback 0 9 Selects numbered options in a menu PROGRAM Shows or hides Program menu CLEAR Removes a mark on the Marker Search menu c AUDIO Selects an audio language DVD SUBTITLE Selects a subtitle language ANGLE Selects a DVD camera angle if available ZOOM Enlarges DVD video image MARKER Marks any point during playback SEARCH Displays Marker Search ...

Page 9: ...UT Connect to a TV with Y Pb Pr inputs d AUDIO OUT Left Right DVD EXCLUSIVE OUT Connect to a TV or other equipment with audio inputs e AC Power Cord Plug into the power source f COAXIAL DIGITAL AUDIO OUT jack DVD EXCLUSIVE OUT Connect to digital coaxial audio equipment g S VIDEO OUT DVD EXCLUSIVE OUT Connect to a S Video Input on TV a b c d e f Rear Panel Caution Do not touch the inner pins of the...

Page 10: ...s A1 Note If you use this connection set the TV s source selec tor to VIDEO Optional TV Connections These connections support only DVD playback The tuner and VCR still output through the DVD VCR OUT A1 V jacks S Video connection Connect the S VIDEO OUT jack on the unit to the S Video jack on the TV using the optional S Video cable S Component Video Progressive Scan connection If your television is...

Page 11: ...receiver that supports one or more of the audio formats supported by your unit MPEG 2 Dolby Digital and DTS Check the receiver manual and the logos on the front of the receiver Caution Due to the DTS Licensing agreement the digital output will be in DTS digital out when DTS audio stream is selected Notes If the audio format of the digital output does not match the capabilities of your receiver the...

Page 12: ...ppears 2 Use v V to choose the PROGRAM option and press ENTER OK If eight programs are already entered the FULLY PROGRAMMED message appears for a moment and then PROGRAM 1 appears on the TV screen 3 Use the v V buttons to switch between the program options and the b B buttons to input the program information Input the MONTH DAY START and STOP times of the program you want to record INPUT Select a ...

Page 13: ...ess CLEAR 4 Press SETUP MENU to return to the TV screen Program Priority If the recording start and end times of preset programs overlap on the same day see the example the second program is not recorded until the first is finished In this example the first part of program numbers 2 and 3 are not recorded SETUP FUNCTION OSD The on screen display can be turned on or off AUDIO MODE The unit has two ...

Page 14: ...d You can also set a language for the subtitles and the Setup menu among other things For details on each Setup menu item see pages 14 to 17 To display and exit the Menu Press SETUP MENU to display the menu A second press of SETUP MENU will take you back to initial screen To go to the next level Press B on the Remote Control To go back to the previous level Press b on the Remote Control General Op...

Page 15: ...the portions that do not fit Progressive Scan Progressive Scan Video provides the highest quality pictures with less flickering If you are using the Component Video jacks for con nection to a TV or a monitor that is compatible with a progressive scan signal set Progressive Scan to On To Turn ON progressive scan Connect component video out of the this unit to the input of your monitor television se...

Page 16: ...Vocal Set to On only when a multi channel karaoke DVD is playing The karaoke channels on the disc mix into normal stereo sound LOCK Parental Control Rating Blocks playback of rated DVDs based on their content Not all discs are rated 1 Select Rating on the LOCK menu then press B 2 To access the LOCK options you must input the password you have created If you have not yet entered password you are pr...

Page 17: ...previous page Rating 3 Select the first character using v V buttons 4 Press B and select the second character using v V buttons 5 Press ENTER OK to confirm your Area code selection OTHERS B L E Black Level Expansion To select the black level of playback pictures Set your preference and monitor s ability On Expanded grey scale 0 IRE cut off Off Standard grey scale 7 5 IRE cut off On B L E OTHERS Mo...

Page 18: ...s on the Remote Control during playback Notes Vertical jitter requires a very fine adjustment Tracking is automatically reset to normal when the tape is ejected or the power cord is unplugged for more than 3 seconds Search This function lets you visually search for a tape sec tion in either direction forward and backward During the high speed picture search modes the audio is muted and horizontal ...

Page 19: ...er reservation function this unit can record the input signal the external device via the timer LINE1 jack 1 Connect the LINE1 input jacks on this unit to the AUDIO VIDEO OUTPUT jack on the external device using the audio video cables 2 Set the timer reservation setting of the external device 3 Turn off the external device 4 Insert a video cassette with the safety tab intact to this unit 5 Press z...

Page 20: ...ck the recording time The recalled setting automatically returns to the TV screen after 6 seconds Extending the Recording Time The recording time can be extended anytime by pressing z REC ITR Subsequent presses result in advancing the recording time by 30 minute increments Note If you press X PAUSE during instant timer record ing the instant timer recording is cancelled It goes to normal recording...

Page 21: ...s illustrated below Counter Memory This feature is useful if there is a section of tape you want to view immediately after recording or if you want to return to the same point several times 1 Begin recording or playing a tape 2 Press CLK CNT until the real time counter is dis played on the TV screen 3 At the point that you want to locate later reset the real time counter to 0 00 00 by pressing CLE...

Page 22: ...o hook up more than one televi sion set to the unit for either recording or playback VCR Auto Play System This unit features automatic playback When you load a tape with the safety tab removed the following occurs The Output Source is changed to VCR mode automatically The power turns on automatically and playback begins At the end of the tape the unit stops then rewinds The tape is ejected after r...

Page 23: ... the A B button one at time to select a point A and point B and repeats a sequence from point A Starting point to point B End point ZOOM During playback or pause mode press ZOOM to enlarge the video image 3 steps You can move through the zoomed picture using b B v V buttons Press CLEAR to exit RANDOM During playback or in stop mode press RANDOM for random playback TITLE If the current DVD title ha...

Page 24: ...k from up to nine memorized points To enter a marker press MARKER at the desired point on the disc The Marker icon appears on the TV screen briefly Repeat to enter up to nine markers To Recall or Clear a Marked Scene 1 During disc playback press SEARCH The marker search menu appears on the screen 2 Within 10 seconds press b B to select a marker number that you want to recall or clear 3 Press ENTER...

Page 25: ...ogram list have played once 6 To resume normal playback from programmed playback select a track on the list and then press PLAY Repeat Programmed Tracks Press REPEAT to select a desired repeat mode Track repeats the current track All repeats all the tracks on programmed list Off No display does not play repeatedly Note If you press once during Repeat Track playback the repeat playback cancels Eras...

Page 26: ...how The player will now go into PAUSE mode 2 To return to the slide show press H H PLAY or press X PAUSE STEP again Moving to another File Press or or cursor b or B once while viewing a picture to advance to the next or previous file Zoom During watching pictures press ZOOM to enlarge the video image 3 steps You can move through the zoomed picture using b B v V buttons Rotating the picture Press v...

Page 27: ...pter before contacting a service technician Handling the Unit When shipping the unit Please save the original shipping carton and packing materials If you need to ship the unit for maximum protection re pack the unit as it was originally packed at the factory Keeping the exterior surfaces clean Do not use volatile liquids such as insecticide spray near the unit Do not leave rubber or plastic produ...

Page 28: ...89 Byelorussian 6669 Cambodian 7577 Catalan 6765 Chinese 9072 Corsican 6779 Croatian 7282 Czech 6783 Danish 6865 Dutch 7876 English 6978 Esperanto 6979 Estonian 6984 Faroese 7079 Language Code Fiji 7074 Finnish 7073 French 7082 Frisian 7089 Galician 7176 Georgian 7565 German 6869 Greek 6976 Greenlandic 7576 Guarani 7178 Gujarati 7185 Hausa 7265 Hebrew 7387 Hindi 7273 Hungarian 7285 Icelandic 7383 ...

Page 29: ...ord into the wall out let securely Insert a disc or tape Check that the disc or tape indicator in the display window is lit Select the appropriate video input mode on the TV so the picture from the unit player appears on the TV screen Check TV capability Check mode of connections eg S Video Components etc Check the connection Select the correct input mode of the audio receiver so you can listen to...

Page 30: ...sor of the unit The remote control is too far from the unit This Remote Control use the same buttons for VCR and DVD functions ex PLAY Camcorder is off Unit SOURCE SELECT is not set to LINE1 or LINE2 Correction Eject the tape in Select STEREO by repeatedly pressing AUDIO on the Remote Control Remove the obstacle Replace the batteries with new ones Point the Remote Control at the remote sensor of t...

Page 31: ...Vrms 1 KHz 0 dB 600 ohms RCA jack L R x 2 VCR Specifications Head system Four head helical scan azimuth system Timer 12 hour display type with AM PM Tape speed SP 33 35 mm sec LP 16 67 mm sec SLP 11 12 mm sec Tape width 12 7 mm Maximum recording time SP 2 HOURS T 120 SLP 6 HOURS T 120 8 HOURS T 160 Rewind time About 3 minutes T 120 Frequency range 20 Hz to 20 kHz Signal to noise ratio More than 43...

Page 32: ...4 hours a day 365 days per year and select an appropriate option from the menu to confirm the product is defective and to obtain a Return Authorization RA If the defect has occurred during the first 90 days of the Warranty Period Zenith will send you a return shipping label After you obtain an RA for return please box your unit with a legible copy of the sales receipt and enough packing material t...

Reviews: