background image

16

OPERATION

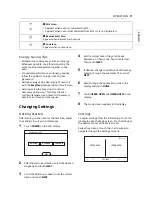
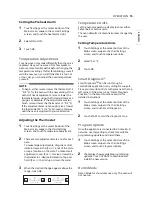
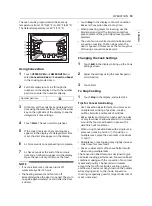
Touch Settings at the center bottom of the 

Main screen, swipe to the third Settings 

screen, and touch Demo Mode.

Select either the ON or OFF mode.

Touch OK.

NOTE

• When Demo Mode is on, the appliance will not 

heat up.

• The oven Demo Mode icon appears in the 

display if the Demo Mode is on.

Factory Data Reset

This function returns all settings to the factory 

defaults.

CAUTION

• All stored data will be deleted.

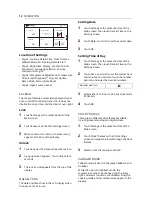
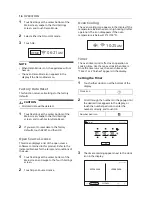
Touch Settings at the center bottom of the 

Main screen, swipe to the third Settings 

screen, and touch Factory Data Reset.

If you want to reset data to the factory 

defaults, touch RESET and then OK.

Open Source License

This screen displays a list of the open source 

software contained in this product. Refer to the 

indicated licenses for the terms and conditions of 

their use.

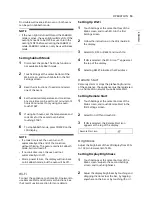
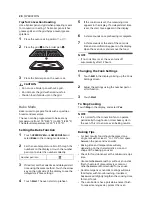
Touch Settings at the center bottom of the 

Main screen and swipe to the fourth Settings 

screen.

Touch Open Source License.

Oven Cooling

The oven cooling icon appears in the display if the 

temperature inside the oven is high during or after 

operation. The icon disappears if the oven 

temperature is below 210 

 (100 

).

Timer

The oven timers don't affect oven operation or 

cooking time. Use them as extra kitchen timers. 

Once the time runs out, the oven chimes and 

"Timer 1 or 2 finished" appears in the display.

Setting the Timer

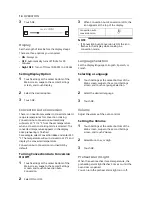
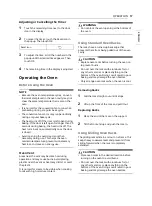
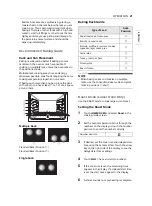
Touch either clock icon at the bottom of the 

display.

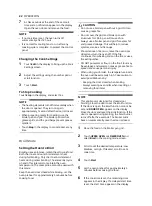
Scroll through the numbers in the popup until 

the desired time appears in the display, or 

touch the number pad icon to enter the 

numbers directly, and touch OK.

The time remaining appears next to the clock 

icon in the display.

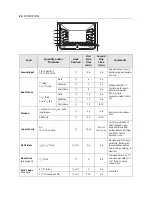
06:21 

AM

DEMO

Clock icon

Number pad icon

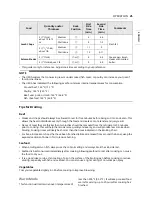
10:25 

AM

9:20 

PM

7LPHU

2.

KU

PLQ

VHF


1:40 

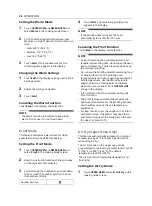
AM

833(529(1

/2:(529(1

6(77,1*6

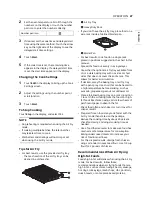
œš†”ˆ•U‰––’U‰––’GGwˆŽŒGX]GGm™‹ˆ SGqœ“ GYZSGYWYXGGZaY^Gwt

Summary of Contents for WDES9428F

Page 1: ... s manual thoroughly before operating the appliance and keep it handy for reference at all times ENGLISH WDES9428F MFL51224542 Rev 00_072321 www lg com Copyright 2021 LG Electronics Inc All Rights Reserved U U GGw GXGGm SGq GYZSGYWYXGGZaY Gwt ...

Page 2: ...perating the Oven 17 Before Using the Oven 17 Using Standard Oven Racks 17 Using Gliding Oven Racks 18 Instaview 18 Convection Bake and Roast Mode 20 Bake Mode 21 Recommended Baking Guide 21 Roast Mode Lower Oven Only 22 Broil Mode 23 Recommended Broiling Guide 25 Warm Mode 26 Proof Mode 26 Air Fry Upper Oven Only 28 Recommended Air Frying Guide 29 Probe Mode 30 Recommended Probe Guide 32 Favorite...

Page 3: ...rior 50 Using Evaporation Function 51 Periodic Maintenance 51 Changing the Oven Light 52 TROUBLESHOOTING 52 FAQs 52 Frequently Asked Questions 55 Before Calling for Service 55 Cooking 57 Parts Features 58 Noises 58 Wi Fi 59 LIMITED WARRANTY 59 USA 59 TERMS AND CONDITIONS 59 THIS LIMITED WARRANTY DOES NOT COVER 60 PROCEDURE FOR RESOLVING DISPUTES U U GGw GZGGm SGq GYZSGYWYXGGZaY Gwt ...

Page 4: ... or any other material to line the oven bottom Improper installation of oven liners may result in a risk of electric shock or fire Make sure your appliance is properly installed and grounded by a qualified installer according to the installation instructions Any adjustment and service should be performed only by qualified installers or service technicians Be certain that all packing materials are ...

Page 5: ...k to the stop lock position when loading and unloading food from the oven This helps prevent burns caused by touching hot surfaces of the door and oven walls Do not use the oven if a heating element develops a glowing spot during use or shows other signs of damage A glowing spot indicates the heating element may fail and present a potential burn fire or shock hazard Turn the oven off immediately a...

Page 6: ...ing or disposing of hot grease Wear proper apparel Do not wear loose fitting or hanging garments which may ignite if they contact hot surfaces and cause severe burns Do not use the oven for drying clothes Only use the oven for its intended purpose If cabinet storage is provided directly above the oven use it to store items that are not frequently used and can be safely stored in an area subjected ...

Page 7: ...d technician Do not use harsh etching abrasive cleaners or sharp metal scrapers to clean the oven door glass since they can scratch the surface Scratches may cause the glass to shatter Make sure oven lights are cool before cleaning Do not clean the door gasket The door gasket is essential for a good seal Care should be taken not to rub damage or move the gasket Never keep pet birds in the kitchen ...

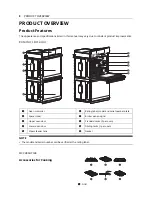
Page 8: ...ior NOTE The model and serial number can be verified at the rating label Accessories Accessories for Cooking a Grid a Oven controller f Rating label model and serial number plate b Spacer 2ea g Broiler pan and grid c Upper oven door h Standard racks 2 per oven d Lower oven door i Gliding racks 1 per oven e Steam feeder tank j Gasket U U GGw G_GGm SGq GYZSGYWYXGGZaY Gwt ...

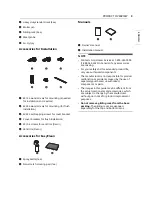
Page 9: ...ner s manual b Installation manual NOTE Contact LG Customer Service at 1 800 243 0000 1 888 542 2623 in Canada if any accessories are missing For your safety and for extended product life only use authorized components The manufacturer is not responsible for product malfunction or accidents caused by the use of separately purchased unauthorized components or parts The images in this guide may be d...

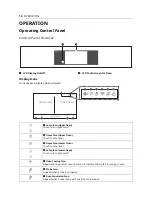
Page 10: ... Icon Upper Oven Touch to set a timer c Timer Icon Lower Oven Touch to set a timer d Lamp Icon Lower Oven Touch to turn light on off e Oven Cooling Icon Appears during or after oven operation to indicate cooling fan is running in oven f Probe Icon Appears when probe is connected g Auto Conversion Icon Appears when Convection Auto Conversion is turned on 1 23 AM wwlyGv lu sv lyGv lu zl punz U U GGw...

Page 11: ...fields up or down to set the correct date and touch NEXT 4 Set the correct time of day and choose between a 12 hour or 24 hour time format Then touch NEXT 5 If desired change the default clock theme by swiping through the examples Then touch NEXT 6 Read through the application guide in the display and touch DONE 7 Touch UPPER OVEN or LOWER OVEN in the display 8 The mode screen appears in the displ...

Page 12: ...e center bottom of the Main screen Then touch Date Time on the Settings screen 2 Touch Date and scroll to set the correct date 3 Touch OK Setting Time of Day 1 Touch Settings at the center bottom of the Main screen Then touch Date Time on the Settings screen 2 Touch Time and scroll to set the correct hour and minutes You can also touch the number pad icon and enter the desired numbers 3 Select eit...

Page 13: ... will turn back on in Sabbath mode but the oven will be off Wi Fi Connect the appliance to a home Wi Fi network to use Remote Start and other smart functions See the Smart Functions section for more details Setting Up Wi Fi 1 Touch Settings at the center bottom of the Main screen and touch Wi Fi in the first Settings screen 2 Follow the instructions in the Wi Fi Guide in the display 3 Select ON OF...

Page 14: ...Turning Convection Auto Conversion On Off 1 Touch Settings at the center bottom of the Main screen swipe to the second Settings screen and touch Convection Auto Conversion 2 Select ON or OFF 3 When Convection Auto Conversion is ON the icon appears at the top of the display NOTE If Convection Auto Conversion is ON the icon flashes in the display while cooking in a convection mode Language Selection...

Page 15: ...ion on the scale To make small adjustments tap or to raise or lower the thermostat in 1 degree increments Tap and hold or to scroll up or down the scale 3 When the desired change appears above the range touch OK Temperature Units Set the oven temperature display to show either Fahrenheit or Celsius units The oven defaults to Fahrenheit unless changed by the user Setting Temperature Units 1 Touch S...

Page 16: ...tions of their use 1 Touch Settings at the center bottom of the Main screen and swipe to the fourth Settings screen 2 Touch Open Source License Oven Cooling The oven cooling icon appears in the display if the temperature inside the oven is high during or after operation The icon disappears if the oven temperature is below 210 ૢ 100 Timer The oven timers don t affect oven operation or cooking time ...

Page 17: ...lacing plastics near the vent as heat may distort or melt the plastic It is normal for steam to be visible when cooking foods with high moisture content WARNING Do not block the vent opening at the bottom of the oven Using Standard Oven Racks The racks have a turned up back edge that prevents them from being pulled out of the oven cavity CAUTION Replace oven racks before turning the oven on to pre...

Page 18: ...ION Do not hit the glass door panel with excessive force Do not allow hard objects like cookware or glass bottles to hit the glass door panel The glass could break resulting in a risk of personal injury NOTE Knocking twice on the glass panel turns the interior light on or off The light turns off automatically after 150 seconds The InstaView function is disabled when the oven door is opened and for...

Page 19: ...e grid helps prevent grease splatters The oven fan runs while convection baking and convection roasting The fan stops when the door is opened In some cases the fan may shut off during a convection bake cycle Changing the Cook Settings 1 Touch Edit in the display to bring up the Cook Settings screen 2 Adjust the settings using the number pad or scroll function 3 Touch Start To Stop Cooking 1 Touch ...

Page 20: ...t the start time appears in the display 6 A chime sounds once preheating is complete 7 A chime sounds at the end of the set cook time and a notification appears in the display Open the oven door and remove the food NOTE If no cook time is set the oven turns off automatically after 12 hours Changing the Cook Settings 1 Touch Edit in the display to bring up the Cook Settings screen 2 Adjust the sett...

Page 21: ...D Single Rack Baking Rack Guide NOTE When baking cakes and cookies on multiple racks use the Convection Bake mode and place racks in positions B and D Roast Mode Lower Oven Only Use the ROAST mode to cook large cuts of meat Setting the Roast Mode 1 Touch LOWER OVEN and select Roast in the cooking mode screen 2 Set the oven temperature Scroll through the numbers on the display or touch the number p...

Page 22: ...se a grease fire Do not cover the grid and broiler pan with aluminum foil Doing so will cause a fire Always use a broiler pan and grid for excess fat and grease drainage This will help to reduce splatter smoke and flare ups Should an oven fire occur leave the oven door closed and turn the oven off If the fire continues throw baking soda on the fire or use a fire extinguisher DO NOT put water or fl...

Page 23: ...m temperature at the beginning of cooking ALWAYS run your cooktop ventilation system or vent hood during broiling Keep the interior of your oven as clean as possible Leftover debris from prior meals can burn or catch fire Avoid fatty marinades and sugary glazes Both of these will increase the amount of smoke you experience If you would like to use a glaze apply it at the very end of cooking If you...

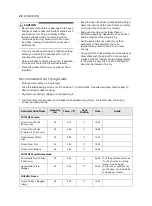
Page 24: ...8 10 Chicken 1 whole 2 to 21 2 lbs split lengthwise C 20 6 8 Broil skin side down first 2 Breasts C 20 6 10 Lobster Tails 2 4 10 to 12 oz each C 12 14 Do not turn over Cut through back of shell Spread open Brush with melted butter before broiling and after half of broiling time Fish Fillets 1 4 to 1 2 thick D or E 5 6 3 4 Handle and turn very carefully Brush with lemon butter before and during coo...

Page 25: ...n frenched all meat removed from around the bone wrap the exposed sections of bone in foil to reduce burning Seafood When broiling skin on fish always use the Lo broil setting and always broil the skin side last Seafood is best consumed immediately after cooking Allowing seafood to rest after cooking can cause the food to dry out It is a good idea to rub a thin coating of oil on the surface of the...

Page 26: ...nceling the Proof Function Touch Stop in the display and select Yes NOTE To avoid lowering the oven temperature and lengthening proofing time do not open the oven door unnecessarily Check bread products early to avoid over proofing Do not use the Proofing mode for warming food or keeping food hot The proofing oven temperature is not hot enough to keep foods at safe temperatures Use the Warm featur...

Page 27: ... food out evenly in a single layer Use either the optional air fry tray available from LG or a dark baking tray with no sides or short sides that does not cover the entire rack This allows for better air circulation If desired spray the baking tray or air fry tray with a pan spray Use an oil that can be heated to a high temperature before smoking such as avocado grapeseed peanut or sunflower oil P...

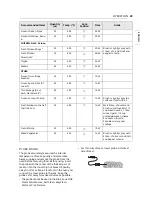
Page 28: ... wings or drumsticks with the skin left on can produce smoke as the fat renders at high temperatures If the smoke is excessive use the Convection Roast mode instead of Air Fry Recommended Air Frying Guide Arrange food evenly in a single layer Put a foil lined baking pan on a rack in position B to catch drips If needed add parchment paper to absorb oil and reduce smoking Flip food over during cooki...

Page 29: ...esh Skin on Fresh Chicken Wings 40 450 C 25 35 Brush or lightly spray with 1 tbsp of oil Add salt and pepper to taste Fresh Chicken Drumsticks 70 450 C 30 40 Thighs 40 450 C 25 35 Breasts 40 450 C 25 35 OTHER Frozen Onion Rings Breaded 20 400 C 15 25 Frozen Spring Rolls 0 7 oz each 45 400 C 15 25 Thin Sausage 2 5 oz each diameter 0 8 90 400 C 15 25 Frozen Coconut Shrimp 25 400 C 15 25 Brush or lig...

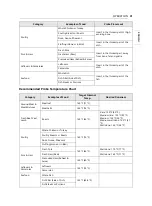
Page 30: ...splay to see the additional settings 6 Touch Start If a delayed start time has been set the start time appears in the display 7 When the set probe temperature is reached the oven shuts off automatically NOTE Calculating a total cooking time by weight is no longer necessary using this feature See the Recommended Probe Temperature Chart to set the probe temperature Changing the Probe Temperature whi...

Page 31: ...of Fish Fish Steaks or Portions Category Examples of Food Target Internal Temp Desired Doneness Ground Meat Meat Mixtures Meatloaf 160 ૢ 71 Meatballs 165 ૢ 74 Fresh Beef Veal Lamb Roasts 145 ૢ 63 Rare 120 ૢ 49 Medium rare 125 ૢ 52 Medium 130 ૢ 54 Medium well done 135 ૢ 57 Well done 140 ૢ 60 Poultry Whole Chicken or Turkey 165 ૢ 74 Poultry Breasts or Roasts Duck Goose Pheasant Stuffing Alone or in ...

Page 32: ...ion is run To avoid this delay run the Descaling function after every 2 3 uses of the steam mode If the descaling reminder appears press OK to run the Descaling function Proofing doesn t operate when the oven is above 125 ૢ 52 If using Proof after cooking wait for the oven to cool first The Proof mode can only be set as a single stage not as part of multi stage cooking Editing a Favorite The Edit ...

Page 33: ...d touch Auto Cook in the Cooking Modes screen 2 Touch a category to filter the options 3 Scroll through or tap the letters to find and select an item 4 Follow the recommendations in the display regarding accessories and rack position 5 Touch Start U U GGw GZZGGm SGq GYZSGYWYXGGZaY Gwt ...

Page 34: ... Tenderloin Rare Grid on broiler pan B 30 60 Medium rare B 35 65 Medium B 40 70 Medium well done B 45 75 Well done B 50 80 Pot Roast Ovenproof pot with cover B 50 80 Roast Beef Rare Grid on broiler pan B 40 70 Medium rare B 45 75 Medium B 50 80 Medium well done B 55 85 Well done B 60 90 London Broil Rare E 3 10 3 10 Medium rare E 5 15 3 10 Medium E 5 15 5 10 Medium well done E 8 15 5 10 Well done ...

Page 35: ...illet Baking dish D 10 15 Whole D 15 30 Shrimp Grid on broiler pan E 5 15 Lobster Tails D 20 30 Salmon Steak Rare Baking dish D 15 20 Medium rare D 20 25 Well done D 15 30 Poultry Chicken Legs Thighs D 20 40 Wings Fresh Grid on broiler pan E 8 20 Wings Frozen D 20 40 Breasts Baking dish D 20 40 Cutlet Casserole dish D 20 30 Whole Grid on broiler pan B 60 80 Whole Turkey B 150 240 Casserole Lasagna...

Page 36: ...ie Pie pan C 25 45 Par Bake Bottom Crust Only C 20 40 Fruit tart Tart pan C 20 40 Cakes Layer Cake Cake pan C 25 45 Angel Food Cake C 30 40 Muffins Cupcakes Muffin pan C 20 30 Puff Pastry Baking sheet C 20 40 Cookies Single Tray C 15 20 Multiple Tray B D 20 28 Biscuits Scones C 10 20 Souffle Souffle dish B 60 80 Miscellaneous Proof Ovenproof bowl with cover C 30 40 Drying Dehydrating Fruit or Vege...

Page 37: ... running during the drying function Using the Steam Feeder Tank The steam feeder tank is located over the upper oven cavity 1 Gently push the front of the steam feeder tank to slide it out 2 Remove the tank and place it on a flat surface 3 Remove the tank cover or flip open the fill lid at the front of the tank cover 4 Fill the tank to the max line located at the front of the tank Use softened fil...

Page 38: ...am heat The oven can be programmed to cook at any temperature from 210 ૢ 100 to 550 ૢ 285 Preset temperature options start at 350 ૢ 175 Setting Steam Bake Mode 1 Touch UPPER OVEN and Steam Cook in the Cooking Modes screen 2 Touch Steam Bake in the display 3 Select the desired temperature and steam level Low Medium or High 4 If desired scroll to set the cook time and delayed start time Touch the ar...

Page 39: ...ed retain more of the moisture in food than conventional cooking methods After cooking a final sear in a frying pan adds the perfect crisp finish Setting Sous Vide Mode 1 Fill the tank with water up to the max line located at the front of the tank 2 Place the standard rack in position C and place the sealed food bag on it 3 Touch UPPER OVEN and Steam Cook in the Cooking Modes screen 4 Touch Sous v...

Page 40: ...ow the instructions on the popup that opens in the display 3 Follow the instructions in the LG ThinQ smartphone app for using the Remote Start function NOTE Remote Start is disconnected in the following situations Remote Start is never set up in the smartphone app The Remote Start status is ready Remote Start experiences a problem during operation The Wi Fi icon on the display shows the status of ...

Page 41: ...the time of publication The application is subject to change for product improvement purposes without notice to users Before Using LG ThinQ Application 1 Use a smartphone to check the strength of the wireless router Wi Fi network near the appliance If the appliance is too far from the wireless router the signal becomes weak It may take a long time to connect or fail to install the application 2 Tu...

Page 42: ...ts are designed to provide reasonable protection against harmful interference in a residential installation This equipment generates uses and can radiate radio frequency energy and if not installed and used in accordance with the instructions may cause harmful interference to radio communications However there is no guarantee that interference will not occur in a particular installation If this eq...

Page 43: ...bility Wi Fi disconnection local app store policy or app unavailability The feature may be subject to change without prior notice and may have a different form depending on where you are located Using LG ThinQ to Diagnose Issues If you experience a problem with your Wi Fi equipped appliance it can transmit troubleshooting data to a smartphone using the LG ThinQ application Launch the LG ThinQ appl...

Page 44: ...s wipe in the direction of the metal surface finish Stainless steel appliance cleaner or polish can be purchased online or from most retailers of appliances or home goods Oven Cavity DO NOT use oven cleaners NEVER wipe a warm or hot porcelain surface with a damp sponge it may cause chipping or crazing tiny hairlike cracks Food spills should be cleaned when the oven cools At high temperature foods ...

Page 45: ...ls before hand cleaning While EasyClean is quick and effective for small and LIGHT soils the Self Clean feature can be used to remove HEAVY built up soils The intensity and high heat of the Self Clean cycle may result in smoke which will require the opening up of windows to provide ventilation Compared to the more intense Self Clean process your LG oven gives you the option of cleaning with LESS H...

Page 46: ... an entire bottle of water to clean each oven Do not spray water directly on the door Doing so will result in water dripping to the floor 6 Select the UPPER OVEN or LOWER OVEN and touch Clean in the Cooking Modes screen Touch EasyClean in the display 7 Touch Start The remaining time appears in the display CAUTION Some surfaces may be hot after the EasyClean cycle Wear rubber gloves while cleaning ...

Page 47: ...ted in manual Remove the water tank oven racks broiler pan broiler grid all cookware aluminum foil or any other material from the oven If oven racks are left in the oven cavity during the Self Clean cycle they will discolor and become difficult to slide in and out If you don t remove the water tank from the oven a beep sounds and the Self Clean cycle does not start The kitchen should be well venti...

Page 48: ... cycle As the oven heats you may hear sounds of metal parts expanding and contracting This is normal and will not damage the oven You may notice some white ash in the oven Wipe it off with a damp cloth or a soap filled steel wool pad after the oven cools If the oven is not clean after one Self Clean cycle repeat the cycle If oven racks were left in the oven and do not slide smoothly after a Self C...

Page 49: ...While running the Self Clean cycle you may notice smoking or an odor This is normal especially if the oven is heavily soiled As the oven heats you may hear sounds of metal parts expanding and contracting This is normal and will not damage the oven Do not force the oven door open when the lock k is displayed The oven door remains locked until the oven temperature has cooled Forcing the door open wi...

Page 50: ...Modes screen Touch Steam Maintenance and Descaling in that order 4 After 1 hour 43 minutes of descaling a popup will appear in the display Following the instructions drain the tank and fill it with clean water 5 Insert the tank and start the Rinsing function 6 Once the Rinsing function is complete dry the inside of the oven with a soft cloth Leave the oven door open and allow the oven to dry compl...

Page 51: ...ng the oven light Glass fragments from broken bulbs can cause risk of injury Gently twist the screwdriver blade while changing the oven light If you apply force the glass or oven may crack 1 Unplug the oven or disconnect power 2 Remove the oven racks 3 Slide a flat blade screwdriver a between the housing and the glass light cover b 4 Support the glass light cover with two fingers to prevent the co...

Page 52: ...e aluminum foil to catch drippings in my oven cavity A Never use aluminum foil to line the bottom or sides of the oven The foil will melt and stick to the bottom surface of the oven and will not be removable Use a foil lined sheet pan placed on a lower oven rack to catch drippings instead If foil has already melted onto the bottom of the oven it will not interfere with the oven s performance Q Can...

Page 53: ...in water this can negatively affect cleaning performance If stubborn or built up stains remain use the Self Clean feature Refer to the Self Clean section of your owner s manual Q Are there any tricks to getting some of the stubborn soils out A Scraping the soils with a plastic scraper before and during hand cleaning is recommended Fully saturating soils with water is also recommended However certa...

Page 54: ...stic scraper a non scratch scrubbing pad and a towel You should not use abrasive scrubbers such as heavy duty scouring pads or steel wool Except for a towel all of the materials you need are included in a special cleaning kit with your new appliance U U GGw G GGm SGq GYZSGYWYXGGZaY Gwt ...

Page 55: ...company for service Oven smokes excessively during broiling Control not set properly Follow instructions under Setting Oven Controls Meat too close to the element Reposition the rack to provide proper clearance between the meat and the element Preheat broil element for searing Meat not properly prepared Remove excess fat from meat Cut remaining fatty edges to prevent curling Insert on broiler pan ...

Page 56: ...indow Do not use excessive moisture when cleaning the window Warm air venting into kitchen after oven has been turned off Warm air exhaust is needed to maintain and cool down oven temperatures It turns off automatically when the heat cools to a safe temperature This is normal Oven will not steam cook Improper assembly Make sure to slide the tank into the slot until it clicks into place The drain i...

Page 57: ...Self Clean cycle cannot be started if oven door is open Close the oven door Oven door does not open after a Self Clean cycle Oven is too hot Allow the oven to cool below locking temperature The control and door may be locked Allow about one hour for the oven to cool after the completion of a Self Clean cycle The door can be opened when the lock k is no longer displayed The oven is not clean after ...

Page 58: ... is supported Set the wireless router to 2 4 GHz and connect the appliance to the wireless router To check the router frequency check with your Internet service provider or the router manufacturer The distance between the appliance and the router is too far If the appliance is too far from the router the signal may be weak and the connection may not be configured correctly Move the router closer t...

Page 59: ...S BE LIABLE FOR ANY INDIRECT INCIDENTAL CONSEQUENTIAL SPECIAL OR PUNITIVE DAMAGES INCLUDING WITHOUT LIMITATION LOST GOODWILL LOST REVENUES OR PROFITS WORK STOPPAGE IMPAIRMENT OF OTHER GOODS COST OF REMOVAL AND REINSTALLATION OF THE PRODUCT LOSS OF USE OR ANY OTHER DAMAGES WHETHER BASED IN CONTRACT TORT OR OTHERWISE LG S TOTAL LIABILITY IF ANY SHALL NOT EXCEED THE PURCHASE PRICE PAID BY YOU FOR THE...

Page 60: ...D EXCLUSIVELY THROUGH BINDING ARBITRATION AND NOT IN A COURT OF GENERAL JURISDICTION BINDING ARBITRATION MEANS THAT YOU AND LG ARE EACH WAIVING THE RIGHT TO A JURY TRIAL AND TO BRING OR PARTICIPATE IN A CLASS ACTION Definitions For the purposes of this section references to LG mean LG Electronics U S A Inc its parents subsidiaries and affiliates and each of their officers directors employees agent...

Page 61: ... foregoing if applicable law allows for an award of reasonable attorneys fees and expenses an arbitrator can award them to the same extent that a court would If the arbitrator finds either the substance of your claim or the relief sought in the demand is frivolous or brought for an improper purpose as measured by the standards set forth in Federal Rule of Civil Procedure 11 b then the payment of a...

Page 62: ...62 Memo U U GGw G YGGm SGq GYZSGYWYXGGZaY Gwt ...

Page 63: ...63 Memo U U GGw G ZGGm SGq GYZSGYWYXGGZaY Gwt ...

Page 64: ...64 Memo U U GGw G GGm SGq GYZSGYWYXGGZaY Gwt ...

Page 65: ...nual del propietario detenidamente previo a operar el electrodoméstico y mantengalo al alcance para futuras referencias ESPAÑOL WDES9428F www lg com Copyright 2021 LG Electronics Inc Todos los derechos reservados U U GGw GXGGm SGq GYZSGYWYXGGZaYZGwt ...

Page 66: ...porizador 18 Funcionamiento del horno 18 Antes de usar el horno 19 Uso de los estantes estándar del horno 19 Uso de los estantes deslizantes del horno 20 InstaView 20 Modos Convection Bake Hornear por convección y Convection Roast Rostizado por convección 21 Modo Bake Hornear 23 Guía de recomendaciones para asar 23 Rostizado Solo horno inferior 24 Modo Broil Asar 26 Guía de recomendaciones para as...

Page 67: ...o en la parte inferior del horno 57 Secado del interior del horno 57 Uso de la función Evaporation Evaporación 57 Mantenimiento periódico 57 Cambio de la luz del horno 59 SOLUCIÓN DE PROBLEMAS 59 Preguntas Frecuentes 59 Preguntas frecuentes 62 Antes de llamar al servicio técnico 62 Cocción 64 Partes y Características 65 Ruidos 66 Wi Fi 67 GARANTÍA LIMITADA 67 EE UU 67 TÉRMINOS Y CONDICIONES 67 EST...

Page 68: ...manentes al interior del horno el papel de aluminio se fundirá en la superficie interior del horno No utilice papel de aluminio ni ningún otro material para revestir la base del horno La instalación inadecuada de los revestimientos del horno podría causar riesgo de descarga eléctrica o incendio Haga que un instalador calificado instale y conecte a tierra su electrodoméstico de manera apropiada de ...

Page 69: ...s o mojadas sobre superficies calientes podrían producir quemaduras por vapor No permita que la agarradera toque los elementos calentadores No utilice una toalla u otra tela gruesa para retirar alimentos No caliente recipientes de alimentos cerrados La presión puede causar una explosión que podría generar lesiones No permita que el papel de aluminio ni la sonda de temperatura entren en contacto co...

Page 70: ...no antes de volver a utilizarlo El aceite puede provocar un incendio En caso de un incendio en el horno durante la autolimpieza apáguelo y espere a que se apague el fuego No fuerce la puerta para abrirla El ingreso de aire fresco a las temperaturas de autolimpieza puede producir un estallido de llamas en el horno Si no sigue estas instrucciones podría sufrir quemaduras graves Si su horno se cae o ...

Page 71: ... C Carne de vaca ternera cerdo o cordero 145 F 68 C Pescado mariscos 145 F 68 C No use este horno para fines comerciales Está destinado únicamente al uso doméstico La puerta y la superficie externa del horno pueden calentarse cuando el electrodoméstico se encuentra en funcionamiento No use este horno para otro fin que no sea de cocción Tenga cuidado si abre la puerta cuando el horno esté funcionan...

Page 72: ...mpiarse con regularidad y debe retirarse cualquier resto de comida Si no se mantiene en condiciones de limpieza la superficie puede deteriorarse y esto podría afectar negativamente la vida útil del electrodoméstico y ocasionar situaciones de peligro U U GGw G_GGm SGq GYZSGYWYXGGZaYZGwt ...

Page 73: ...El número de serie y el modelo pueden verificarse en la etiqueta de clasificación Accesorios Accesorios para cocinar a Controlador del horno f Etiqueta de clasificación placa con el número de serie y el modelo b Espaciador 2 c u g Asadera y rejilla c Puerta del horno superior h Estantes estándar 2 por horno d Puerta del horno inferior i Estantes deslizantes 1 por horno e Tanque del alimentador de ...

Page 74: ...sponja de limpieza que no raya 1 c u Manuales a Manual del propietario b Manual de instalación NOTA Comuníquese con el Servicio de atención al cliente de LG al 1 800 243 0000 1 888 542 2623 en Canadá si le falta algún accesorio Para su seguridad y una mayor duración del producto utilice únicamente componentes autorizados El fabricante no es responsable del mal funcionamiento del producto ni de acc...

Page 75: ...a luz b Timer Icon Upper Oven Icono de temporizador Horno superior Pulse para configurar un tiempo c Timer Icon Lower Oven Icono de temporizador Horno inferior Pulse para configurar un tiempo d Lamp Icon Lower Oven Icono de lámpara Horno inferior Pulse para encender o apagar la luz e Oven Cooling Icon Icono de enfriamiento del horno Aparece durante o después del funcionamiento para indicar que el ...

Page 76: ...ente 4 Configure la hora del día correcta y elija el formato de 12 o 24 horas Luego pulse NEXT Siguiente 5 Si lo desea cambie el tema de reloj predeterminado pasando por los ejemplos Luego pulse NEXT Siguiente 6 Lea la guía de la aplicación en la pantalla y pulse DONE Listo 7 Pulse UPPER OVEN Horno superior o LOWER OVEN Horno inferior en la pantalla 8 Aparece la pantalla de modos Configuración Par...

Page 77: ...e de la parte superior de la pantalla Fecha y hora La fecha y hora se muestran en la pantalla LCD cuando los hornos no están en uso Fecha de configuración 1 Pulse Configuración en la parte inferior central de la pantalla principal Luego pulse Fecha y hora en la pantalla Configuración 2 Pulse Fecha y desplácese para programar la fecha correcta 3 Presione OK INICIAR Configuración de la hora 1 Pulse ...

Page 78: ...cendido Apagado en la pantalla LCD NOTA Si se configura un tiempo de cocción el horno se apaga automáticamente al final de ese tiempo de cocción sin que suene El horno permanece en modo Sabbath pero está apagado Si no se configura un tiempo de cocción el horno no se apagará automáticamente Después de un corte de energía la pantalla se volverá a encender en modo Sabbath pero el horno se apagará Wi ...

Page 79: ...ૢ 14 a la temperatura programada cuando se selecciona un modo de cocción a convección La temperatura convertida aparece en la pantalla una vez que finaliza el precalentamiento Por ejemplo seleccione Convection Bake Hornear por convección e ingrese 350 ૢ La temperatura se convertirá automáticamente a 325 ૢ y mostrará la temperatura convertida La conversión automática a convección se enciende de man...

Page 80: ...el horno aún necesita un ajuste suba o baje nuevamente el termostato y utilice el primer ajuste como referencia medidora Por ejemplo si el ajuste fue excesivo suba o baje el termostato 10 F 5 C Si el ajuste no fue suficiente suba o baje el termostato 20 F 12 C Proceda de esta manera hasta que el horno quede ajustado para su satisfacción Ajuste del termostato 1 Pulse Configuración en la parte infer...

Page 81: ...central de la pantalla principal cambie a la tercera pantalla de Configuración y pulse Modo Demo 2 Seleccione el modo ON u OFF 3 Presione OK INICIAR NOTA Cuando el Modo Demo está activado el electrodoméstico no se calentará Si el Modo Demo está activado aparecerá en la pantalla el icono correspondiente Restablecimiento de datos de fábrica Esta función regresa todas las configuraciones a los valore...

Page 82: ...osible que el termómetro que está dentro de la cavidad del horno no indique la misma temperatura configurada Es normal que el ventilador de convección funcione durante el precalentamiento en un ciclo normal de horneado El motor del ventilador de convección puede funcionar periódicamente durante un ciclo normal de horneado Si la puerta queda abierta durante el proceso de horneado el calor se apaga ...

Page 83: ... y evita que se deslicen cuando el estante está completamente extendido PRECAUCIÓN Para evitar quemaduras coloque los estantes del horno en la ubicación deseada antes de encenderlo No cubra los estantes con papel de aluminio o cualquier otro material ni coloque nada sobre la parte inferior del horno Si lo hace podría generar un proceso de horneado deficiente y dañar la base del horno Instalación d...

Page 84: ...ción El sistema de convección usa un ventilador para hacer circular el calor de manera uniforme dentro del horno Esto mejora la distribución del calor y permite una cocción uniforme y excelentes resultados mientras se cocina con un solo estante o con varios Es posible programar el horno para hornear a cualquier temperatura entre 170 F 80 C y 550 F 285 C La temperatura predeterminada es 350 F 175 C...

Page 85: ...bandejas sin lados o con lados muy bajos para permitir que el aire caliente circule alrededor de la comida Los alimentos horneados en bandejas con un acabado oscuro se cocinarán más rápido Si utiliza el horneado por convección en un solo estante coloque el estante del horno en la posición C Si cocina en varios estantes coloque los estantes del horno en las posiciones B y D La cocción con varios es...

Page 86: ...mérico o la función de deslizamiento 3 Pulse Start Iniciar Para detener la cocción Pulse Stop Detener en la pantalla y seleccione Yes Sí NOTA Es normal que el ventilador de convección funcione periódicamente durante un ciclo normal de horneado Esto sucede para asegurar resultados uniformes de horneado Consejos de horneado Para obtener mejores resultados los alimentos deben colocarse en un solo est...

Page 87: ...estantes en las posiciones B y D Rostizado Solo horno inferior Utilice el modo ROAST Rostizado para cocinar cortes de carne grandes Configuración del modo Roast 1 Pulse LOWER OVEN Horno inferior y seleccione Roast Rostizar en la pantalla del modo de cocción 2 Configure la temperatura del horno Deslícese por los números en la pantalla o pulse el ícono del teclado numérico para ingresar los números ...

Page 88: ...ral solo se calienta el elemento asador interno El ciclo de los elementos se enciende y apaga a intervalos para mantener la temperatura del horno La sonda para carne no se puede utilizar con este modo Mantenga la puerta del horno cerrada durante el asado Deje que el horno se precaliente durante aproximadamente 5 minutos antes de cocinar los alimentos PRECAUCIÓN No utilice una asadera sin rejilla E...

Page 89: ...tart Iniciar Cómo detener el asado Pulse Stop Detener en la pantalla y seleccione Yes Sí Consejos para reducir el humo Debido al intenso calor asociado con el asado es normal experimentar humo durante el proceso de cocción Este humo es un producto secundario natural del proceso de dorado y no debe preocuparlo Si hay más humo del esperado siga estos consejos para reducir la cantidad de humo en su h...

Page 90: ... estante Tiempo en el primer lado min Tiempo en el segundo lado min Comentarios Carne vacuna molida 1 lb 9 hamburguesas de 1 2 a 3 4 de espesor E 4 6 3 4 Espaciar de manera uniforme Se pueden asar hasta 9 hamburguesas Bistecs de carne vacuna 1 de espesor 1 a 11 2 lb Poco cocidos D 6 2 3 Los bistecs de menos de 1 de espesor se cocinan totalmente antes de dorarse Se recomienda usar una sartén Corte ...

Page 91: ...5 6 3 4 Mueva y gire con mucho cuidado Pincele con mantequilla con limón antes de la cocción y durante la cocción si lo desea Fetas de jamón precocidas 1 2 de espesor D 5 3 5 Aumente el tiempo de 5 a 10 minutos por lado para un espesor de 1 1 2 o para jamón ahumado casero Chuletas de cerdo Bien cocidos 2 1 2 de espesor D o E 7 6 8 Corte la grasa 2 1 de espesor de alrededor de 1 lb D o E 9 10 7 9 C...

Page 92: ...a configuración de Asar en Lo y ase siempre por último el lado de la piel Es mejor consumir los mariscos inmediatamente después de cocinarlos Dejar reposar los mariscos después de cocinarlos puede hacer que los alimentos se sequen Es una buena idea frotar una capa fina de aceite en la superficie de la asadera antes de cocinar para evitar que se pegue especialmente con pescados y mariscos También p...

Page 93: ...horno y que se prolongue el tiempo de leudado no abra la puerta del horno si no es necesario Revise los alimentos panificados con tiempo para evitar un leudado excesivo No use el modo de leudado para calentar comida ni para mantener calientes los alimentos La temperatura del horno para el leudado no es lo suficientemente alta para mantener alimentos a temperaturas seguras Use la función Warm Calen...

Page 94: ...tos húmedos no se doran ni se endurecen cuando se usa el modo Freír con aire Consejos para Air Fry Freír con aire Para obtener mejores resultados utilice el estante para Air Fry La sección de la malla de la bandeja para freír con aire se puede limpiar en lavavajillas a Bandeja para freír con aire b Estante resistente Si no tiene la bandeja para freír con aire coloque los alimentos sobre un estante...

Page 95: ...te del horno Encienda la campana extractora en una configuración de ventilador alta antes de iniciar el modo Freír con aire y déjela encendida durante 15 minutos después de que haya terminado En lo posible abra una ventana o una puerta para asegurarse de que la cocina esté bien ventilada Limpie los filtros de grasa de la campana extractora con regularidad Mantenga el horno libre de grasa acumulada...

Page 96: ...llo congeladas 30 400 C 15 25 Tiras de pollo congeladas 35 400 C 25 35 Alitas de pollo congeladas 50 400 C 25 35 POLLO fresco con piel Alitas de pollo frescas 40 450 C 25 35 Pinte o rocíe ligeramente con 1 cucharadas de aceite Agregue sal y pimienta a gusto Patitas de pollo frescas 70 450 C 30 40 Muslos 40 450 C 25 35 Pechugas 40 450 C 25 35 OTRAS Aros de cebolla empanados congelados 20 400 C 15 2...

Page 97: ...o del horno 1 Inserte la sonda en el alimento 2 Conecte la sonda al conector hembra del horno Aparecerá en la pantalla la leyenda Probe is connected La sonda está conectada y aparece el ícono de la sonda en la parte superior de la pantalla 3 Pulse UPPER OVEN Horno superior para seleccionar un modo de cocción apropiado 4 Configure la temperatura del horno y de la sonda Deslícese por los números en ...

Page 98: ...a evitar que se dañe la sonda asegúrese de que la comida esté totalmente descongelada antes de insertarla Mientras el modo de sonda está en funcionamiento la función EasyClean no responde Guía para sonda recomendada Cuadro de ubicaciones recomendadas de la sonda Categoría Ejemplos de alimento Ubicación de la sonda Carne picada y mezclas de carnes Pastel de carne americano Insértela en la parte más...

Page 99: ... Mariscos Pescado entero Insértela en la parte más gruesa del pescado Filete de pescado corte lateral Rodajas o porciones Categoría Ejemplos de alimento Temperatura interna objetivo Cocción deseada Carne picada y mezclas de carnes Pastel de carne americano 160 F 71 C Albóndigas 165 F 74 C Ternera cordero carne vacuna fresca Asados 145 F 63 C Poco cocida 120 F 49 C Medio cocido 125 F 52 C Término m...

Page 100: ...ar como una etapa única no como parte de una cocción de múltiples etapas Cómo editar un favorito La función Edit Editar no puede agregar o eliminar fases de cocción a una receta Solo se puede modificar la temperatura del horno la temperatura de la sonda y el tiempo de cocción 1 Seleccione UPPER OVEN Horno superior o LOWER OVEN Horno inferior y pulse Favorite Favorito en la pantalla del modo de coc...

Page 101: ...ón 2 Pulse una categoría para filtrar las opciones 3 Deslícese o presione las letras para encontrar y seleccionar un elemento 4 Siga las recomendaciones en la pantalla en relación con los accesorios y la posición del estante 5 Pulse Start Iniciar U U GGw GZ GGm SGq GYZSGYWYXGGZaYZGwt ...

Page 102: ...utos durante el asado Si utiliza una sonda inserte después de precalentar NOTA Si cocina cortes de carne finos inserte la sonda en la parte más gruesa de la carne Si la sonda no se inserta de manera correcta el horno podría apagarse antes de lo debido Consulte la sección Probe Sonda para ver instrucciones U U GGw GZ_GGm SGq GYZSGYWYXGGZaYZGwt ...

Page 103: ...rne asada Poco cocidos Rostizar en la asadera B 40 70 Medio cocido B 45 75 Término medio B 50 80 Término medio bien cocido B 55 85 Bien cocidos B 60 90 Asado londinense Poco cocidos E 3 10 3 10 Medio cocido E 5 15 3 10 Término medio E 5 15 5 10 Término medio bien cocido E 8 15 5 10 Bien cocidos E 10 15 8 15 Filete Poco cocidos E 3 10 3 10 Medio cocido E 5 15 3 10 Término medio E 5 15 5 10 Término ...

Page 104: ...do Fuente para el horno D 10 15 Entero D 15 30 Camarones Rostizar en la asadera E 5 15 Colas de langostas D 20 30 Filete de salmón Poco cocidos Fuente para el horno D 15 20 Medio cocido D 20 25 Bien cocidos D 15 30 Aves Pechuga Patas y muslos D 20 40 Alitas Frescas Rostizar en la asadera E 8 20 Alitas Congeladas D 20 40 Pechugas Fuente para el horno D 20 40 Filetes Cacerola D 20 30 Entero Rostizar...

Page 105: ... Fuente para el horno C 30 40 Tarta de queso Molde para pasteles C 60 70 Pastel de frutas Toda la tarta Molde de tarta C 25 45 Horneado parcial de la corteza inferior solamente C 20 40 Tarta de frutas Molde para tarta C 20 40 Pasteles Pastel en capas Molde para pasteles C 25 45 Pastel de ángel C 30 40 Muffins Pastelitos Molde para muffins C 20 30 Hojaldre Bandejas para hornear C 20 40 Galletas Ban...

Page 106: ... cocción al vapor o cuando esta haya finalizado ya que el vapor caliente puede causar quemaduras Después de cualquier ciclo de cocción al vapor se ejecutará automáticamente la función de secado Es normal escuchar el funcionamiento de la bomba de vapor durante la función de secado Varios Proof Leudar Bol para horno con tapa C 30 40 Secado Deshidratación frutas o vegetales Bandejas para hornear C 12...

Page 107: ... No incline el tanque del alimentador de vapor mientras está lleno Descarte cualquier agua sobrante y limpie el tanque del alimentador de vapor después de cocinar Utilice el tanque del alimentador de vapor solo para su uso previsto que es el de proporcionar agua para la cocción al vapor Controle el nivel del agua en el tanque y rellene cuando sea necesario para la cocción al vapor Utilice guantes ...

Page 108: ...ión Sous vide Cocción al vacío utiliza vapor para cocinar alimentos de modo lento y suave Utilícela para cocinar carne pescado mariscos aves o verduras Los alimentos deben estar envasados al vacío en bolsas No es necesario precalentar el horno cuando se utiliza la función de cocción al vacío Consulte la guía de cocción para conocer las configuraciones de cocción al vacío recomendadas Beneficios de...

Page 109: ...arán los tiempos de funcionamiento Esta guía es solo una referencia Ajuste el tiempo de cocción según su preferencia Cocine durante 30 min o 1 hora más si utiliza carnes de un espesor superior a 1 Si utiliza cortes de carne más grandes trócelos para que coincidan con el peso recomendado Tenga cuidado de no colocar los trozos de carne demasiado juntos Modo de Inicio remoto Si el electrodoméstico es...

Page 110: ...o remoto se encuentra desconectada en las siguientes situaciones Inicio remoto nunca está configurado en la aplicación del teléfono inteligente El estado del Inicio remoto indica ready listo Inicio remoto experimenta un problema durante el funcionamiento El ícono de Wi Fi en la pantalla muestra el estado de la conexión de red del electrodoméstico Si el ícono de Wi Fi no se ilumina con su teléfono ...

Page 111: ...sta información está actualizada en el momento de su publicación La aplicación está sujeta a cambios con fines de mejorar el producto sin previo aviso a los usuarios Antes de usar la aplicación LG ThinQ 1 Utilice un teléfono inteligente para verificar la potencia del enrutador Red Wi Fi cerca del electrodoméstico Si el electrodoméstico está demasiado lejos del enrutador inalámbrico la señal será d...

Page 112: ...ar el electrodoméstico Especificaciones del módulo LAN inalámbrico Aviso de la FCC El siguiente aviso cubre el módulo transmisor contenido en este producto Este equipo fue probado y se determinó que cumple con los límites para los dispositivos digitales de Clase B en conformidad con la parte 15 de las normas de la FCC Estos límites están diseñados para ofrecer una protección razonable contra inter...

Page 113: ...as con su electrodoméstico NOTA Por motivos no atribuibles a la negligencia de LGE es posible que el servicio no funcione debido a factores externos como por ejemplo la falta de disponibilidad de Wi Fi desconexión de Wi Fi política de la tienda de aplicaciones local o falta de disponibilidad de aplicaciones entre otros Esta función puede estar sujeta a cambios sin previo aviso y puede tener una fo...

Page 114: ...abonosa limpiador o pulidor para acero inoxidable Limpie siempre en la dirección del acabado de la superficie de metal Los limpiadores o pulidores para electrodomésticos de acero inoxidable pueden comprarse por Internet o en la mayoría de los comercios minoristas de electrodomésticos o artículos para el hogar Cavidad del horno NO utilice limpiadores para horno NUNCA limpie una superficie de porcel...

Page 115: ...maltada de LG EasyClean ofrece dos opciones de limpieza para el interior del horno inferior La función EasyClean se beneficia con el nuevo esmalte de LG que ayuda a despegar la suciedad sin usar químicos fuertes y funciona SOLAMENTE CON AGUA durante apenas 10 minutos a baja temperatura para aflojar la suciedad LEVE antes de la limpieza manual Si bien la función EasyClean es rápida y eficaz para la...

Page 116: ... plástico para pintura Tarjeta de crédito vieja 3 Llene un envase rociador con agua 10 oz o 300 ml y utilícelo para rociar bien las superficies interiores del horno 4 Use por lo menos 1 5 2 oz o 60 ml del agua de la botella para saturar completamente la suciedad en las paredes y las esquinas del horno 5 Rocíe o vierta el agua restante 8 oz o 240 ml en el centro de la base de la cavidad del horno L...

Page 117: ...A La junta de la cavidad puede quedar mojada cuando termine el ciclo EasyClean Esto es normal No limpie la junta Si quedan depósitos minerales en la base del horno después de la limpieza use un paño o una esponja impregnada en vinagre para quitarlos Es normal que el ventilador funcione durante el ciclo EasyClean No es recomendable el uso de limpiadores comerciales o blanqueadores para limpiar el h...

Page 118: ...de bloqueo de la puerta Tenga cuidado cuando abra la puerta del horno después del ciclo Self Clean Ubíquese al costado del horno cuando abra la puerta para dejar que salgan el aire y el vapor calientes El horno todavía puede estar MUY CALIENTE NOTA La luz del horno no se puede encender durante el ciclo Self Clean La luz del horno no se puede encender hasta que la temperatura sea inferior a 500 ૢ 2...

Page 119: ...autolimpieza de cuatro horas recomendado para un horno moderadamente sucio 3 Seleccione el tiempo de ciclo deseado 4 Si lo desea deslícese por las opciones para configurar una hora de inicio retardado o pulse el icono de botón numérico para ingresar la hora de inicio directamente 5 Pulse Start Iniciar Aparece el tiempo restante o el tiempo de inicio retardado en la pantalla 6 Una vez que configura...

Page 120: ... bacterias limpie y seque el tanque del alimentador de vapor después de cada uso No lo lave en lavavajillas Si el tanque del alimentador de vapor no se desliza normalmente hacia adentro limpie la parte inferior del tanque Sarro generado por el agua dura Al usarse agua dura en el tanque del alimentador de vapor el generador de vapor puede quedar obstruido con el sarro propio del agua dura En áreas ...

Page 121: ...ar de forma manual de ser necesario Configuración de Drying Secado 1 Asegúrese de que el tanque del alimentador de vapor esté vacío 2 Seleccione UPPER OVEN Horno superior o LOWER OVEN Horno inferior y pulse Clean Limpiar en la pantalla de Modos de cocción 3 Pulse Start Iniciar para iniciar el secado El tiempo restante aparece en pantalla Uso de la función Evaporation Evaporación Utilice la función...

Page 122: ...s dedos para evitar que la tapa caiga en la parte inferior del horno 5 Gire suavemente el destornillador para aflojar la tapa de la luz de vidrio c 6 Retire la bombilla de la cavidad 7 Reemplace la bombilla y vuelva a colocar la tapa de la luz hasta ajustarla correctamente en su lugar 8 Enchufe el horno o vuelva a conectar la energía eléctrica U U GGw G _GGm SGq GYZSGYWYXGGZaYZGwt ...

Page 123: ...ne hasta que se cierra la puerta P Puedo usar papel de aluminio para que recolecte el goteo en la cavidad del horno R Nunca utilice papel de aluminio para revestir la base o los laterales del horno El papel se derretirá y se pegará a la superficie de la base del horno y no se podrá quitar En lugar de eso coloque una bandeja forrada con papel de aluminio sobre un estante inferior del horno y úsela ...

Page 124: ...y las manchas por completo R Depende del tipo de suciedad Las manchas de azúcar y algunas de grasa son particularmente difíciles de limpiar Además si las manchas no están muy empapadas en agua esto puede tener un efecto negativo en el desempeño de la limpieza Si todavía quedan manchas rebeldes o acumulación use la función Self Clean Consulte la sección Self Clean Autolimpieza del manual del propie...

Page 125: ...ección EasyClean del manual del propietario para obtener más información P Qué se necesita para EasyClean R Un envase rociador con 1 tazas 10 oz o 300 ml de agua un raspador plástico una esponja que no raye y una toalla No debe usar esponjas abrasivas como las de trabajo pesado ni lana de acero Excepto por la toalla todos los materiales necesarios se incluyen en un kit de limpieza especial con su ...

Page 126: ...nte al tomacorriente Verifique los disyuntores El cableado de servicio no está completo Comuníquese con un electricista para obtener ayuda Corte de energía Controle las luces de la vivienda para asegurarse Llame a la compañía de servicio eléctrico local para recibir mantenimiento El horno hace demasiado humo durante el asado El control no está configurado correctamente Siga las instrucciones de Co...

Page 127: ...o alta o baja Se debe ajustar el sensor del horno Consulte la sección Ajuste de temperatura en el capítulo Funcionamiento Hay demasiado humo durante el ciclo SelfClean Suciedad excesiva Apague la función SelfClean Abra las ventanas para que salga el humo Espere hasta que se cancele el modo de autolimpieza Limpie el exceso de suciedad y vuelva a configurar el ciclo de limpieza Un olor a quemado o a...

Page 128: ...gue la función del horno que está usando para borrar la pantalla y detener el pitido Reprograme el horno Si la falla se repite registre el número de falla y comuníquese con un agente del servicio técnico Caso 1 Código F 9 Causa el horno no calienta horno superior Caso 2 Código F 19 Causa el horno no calienta horno inferior Se enciende k en la pantalla cuando usted quiere cocinar La puerta del horn...

Page 129: ...e horneado por convección Esto sucede para lograr un calor más parejo durante el ciclo No es una falla de la cocina y debe considerarse un funcionamiento normal La hora mostrada está parpadeando en algunos modelos Esto significa que el producto se ha enchufado recién o que se ha interrumpido el suministro eléctrico Toque la tecla Clock Reloj y restablezca la hora o toque cualquier tecla para deten...

Page 130: ...e con su proveedor de servicios de internet o con el fabricante del enrutador La distancia entre el electrodoméstico y el enrutador es muy grande Si el electrodoméstico se encuentra muy lejos del enrutador puede que la señal sea débil y que la conexión no sea configurada correctamente Coloque el enrutador más cerca del electrodoméstico o compre e instale un repetidor Wi Fi Durante la configuración...

Page 131: ...NTES SER RESPONSABLE POR CUALQUIER DAÑO INDIRECTO INCIDENTAL CONSECUENTE ESPECIAL O PUNITIVO LO CUAL INCLUYE PERO NO SE LIMITA A PÉRDIDA DE FONDOS DEL COMERCIO GANANCIAS PERDIDAS INTERRUPCIÓN DEL TRABAJO DETERIORO DE OTROS BIENES COSTO DE REMOVER Y REINSTALAR EL PRODUCTO PÉRDIDA DE USO O CUALQUIER OTRO DAÑO YA SEA BASADO EN CONTRATO PERJUICIO U OTROS LA RESPONSABILIDAD TOTAL DE LG EN CASO EXISTA N...

Page 132: ...ntes y accesorios a excepción de las partes internas funcionales cubiertas bajo esta garantía limitada El costo de la reparación o el reemplazo en estas circunstancias excluidas estará a cargo del consumidor PARA OBTENER SERVICIO EN GARANTÍA E INFORMACIÓN ADICIONAL Llame al 1 800 243 0000 y seleccione la opción apropiada desde el menú O visite nuestro sitio web en http www lg com O por correo LG E...

Page 133: ...rbitro se regirá por los términos de esta disposición Legislación vigente La legislación del estado de su residencia regirá esta Garantía Limitada así como todas las disputas entre nosotros salvo que sea invalidada o inconsistente con leyes federales aplicables Tarifas Costos Usted no debe pagar ninguna tarifa para comenzar un arbitraje Al recibir su solicitud de arbitraje por escrito LG pagará to...

Page 134: ...vice schedule repair continued al hacer clic en Find My Model Serial Number Sólo puede excluirse del procedimiento de resolución de conflictos en la forma descrita anteriormente es decir por correo electrónico o por teléfono ninguna otra forma de notificación será efectiva para hacerlo Excluirse de este procedimiento de resolución de controversias no afectará de ninguna manera la cobertura de la G...

Page 135: ...71 Memorándum U U GGw G XGGm SGq GYZSGYWYXGGZaYZGwt ...

Page 136: ...72 Memorándum U U GGw G YGGm SGq GYZSGYWYXGGZaYZGwt ...

Page 137: ...73 Memorándum U U GGw G ZGGm SGq GYZSGYWYXGGZaYZGwt ...

Page 138: ...74 Memorándum U U GGw G GGm SGq GYZSGYWYXGGZaYZGwt ...

Page 139: ...75 Memorándum U U GGw G GGm SGq GYZSGYWYXGGZaYZGwt ...

Page 140: ...LG Customer Information Center Register your product Online www lg com For inquiries or comments visit www lg com or call 1 800 243 0000 U S A 1 888 542 2623 CANADA U U GGw G XGGm SGq GYZSGYWYXGGZaYZGwt ...
Reviews: