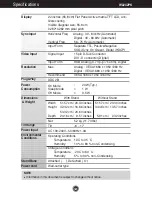


A22
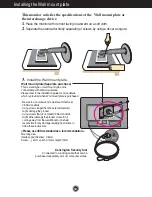
Installing the Wall mount plate
This monitor satisfies the specifications of the Wall mount plate or
the interchange device.
1
.
Place the monitor with its front facing downward on a soft cloth.
2
.
Separate the stand after firstly separating 4 screws by using a driver as figure.
3
.
Install the Wall mount plate.
Wall mount plate(Separate purchase)
This is stand-type or wall mount type and is
connectable with Wall mount plate.
Please refer to the installation guide for more details,
which is provided when Wall mount plate is purchased.
Kensington Security Slot
Connected to a locking cable that can be
purchased separately at most computer stores.
- Be sure to use screws and a wall mount that meet
VESA standards.
- Using screws longer than those recommended
might damage the product.
- Using screws that do not meet VESA standards
might either damage the product or result in it
coming away from the wall.We will not be held
responsible for any damage resulting from failure to
follow these instructions.
<Please use VESA standard as a recommendation.>
Mounting crew:
Interface pad thickness: 2.6mm
Screw :
4mm x pitch 0.7mm x length 10mm
Summary of Contents for W2242PK
Page 24: ...Digitally yours ...


