background image

165

ENGLISH

164

SERVICE SETTING

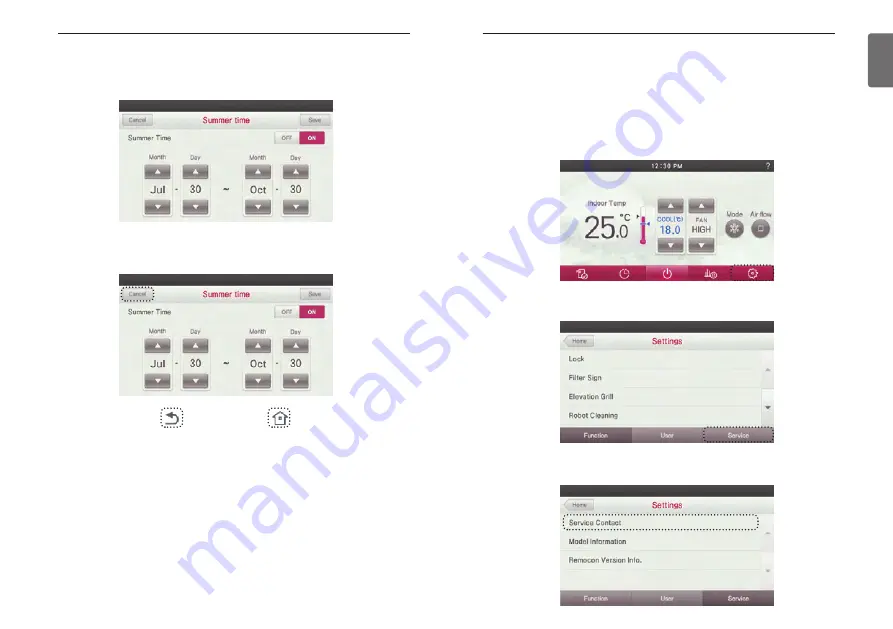
Press the screen’s Set’ button. 

- It moves to the settings menu screen. 

In setting screen, press ‘Service’ button. 

- It moves to the Service Setting screen. 

In the service screen, press ‘Service Contact’ button. 

- It moves to the Check Service Number screen.

Service Contact

It is the function to check and input the telephone number of the service center that can be con-
tacted when a defect occurs in the product. 

SERVICE SETTING

USER SETTING

Set summer time duration, and press ‘Save’ button when done. 

- If you exit without pressing the Save button, your changes will not be applied. 

- If you press the Save button, your changes will be applied and the controller will exit from the set-

ting screen.

If you press ‘Cancel’, ‘Go Back’, or ‘Home’ button, it will exit from the Summer time setting
screen without saving any of the settings.

Summary of Contents for V-NET ACS PREMTA000B

Page 1: ...lease read this installation manual completely before installing the product Installation work must be performed in accordance with the national wiring standards by authorized personnel only Please retain this installation manual for future reference after reading it thoroughly ENGLISH DEUTSCH POLSKI ČEŠTINA ...

Page 2: ... explosion equipment malfunction or injury Avoid dropping the product There is risk of fire electric shock explosion equipment malfunction or injury If product gets wet contact your dealer or authorized service center There is risk of fire electric shock explosion equipment malfunction or injury If the instructions are not followed it may cause death or severe injury of the user Do not use sharp o...

Page 3: ...elligence Automatic Oper ation 35 2 set point auto operation North America Only 36 Override control 39 Hold 40 Zone Control 42 TEMPERATURE SET TING Advanced Mode 42 Controlling Desired Temperature 43 Check Room Temperature 44 WIND SETTING Ad vanced Mode 44 Fan speed Control 45 Airflow Control 46 SUB FUNCTION SETTING 46 Up Down Vane Angle Setting 49 Plasma Purification Setting 51 Energy Saving Cool...

Page 4: ...ontroller 175 Group Control 177 Air conditioner and ventilation interface 178 INSTALLER S SETTING OPTIONS 178 How to enter installer setting mode 179 Installer setting code table 182 Test Run Operation air conditioner DX type ventilator 183 Central control address air conditioner General DX type ventilator 184 ESP setting air conditioner Gerneral DX type ventilator 185 Indoor temperature detection...

Page 5: ...eset button Reset wired remote controller If you press the reset hole with a sharp object the power will be reset If you press it too hard it may cause failure LG Premium Wired remote controller Accessories Connecting cable 1 EA Remote controller fixing screws 4 EA User Installation Manual PART DESCRIPTION On Off Air conditioner and ventilator will be turned on or off Press remote controller scree...

Page 6: ...ontroller screen 1 time to turn on If remote controller operation is not used screen will go into energy savings mode During the operation of the product press the fan speed button on the screen The fan speed selection screen is displayed During the cooling operation if you press fan speed button power cooling is performed after fan speed HIGH h For some indoor units products according to whether ...

Page 7: ...xit from the setting menu If there is no button input for about 60 seconds it automatically exits from the setting menu In operation mode selection screen press the Heat button The initial temperature set for Heating operation is 30 C 86 F Depending on the indoor unit type the desired temperature can be controlled in increments 1 C or 0 5 C 2 F or 1 F If you press On Off button during the use prod...

Page 8: ...mode During the operation of the product press the mode button on the screen It moves to the operation mode selection screen NOTE Using this function in the rainy season or high humidity you can operate simultaneously de humidifier and cooling mode to remove humidity effectively Monsoon Dehumidifying Mode This is monsoon region specific dehumidification function In operation mode selection screen ...

Page 9: ...creen will go into energy savings mode During the operation of the product press the mode button on the screen It moves to the operation mode selection screen Artificial Intelligence Automatic Operation Operation provides heating and cooling to satisfy space requirements In operation mode selection screen press the AUTO button Press remote controller screen 1 time to turn on If remote controller o...

Page 10: ...TE If it does not work as desired select another operation mode 2 set point auto operation North America Only The indoor unit automatically manages room temperature with heating and cooling with extended setting temperature ranges 2 set point auto mode can operate in 2 set point control mode Press remote controller screen 1 time to turn on If remote controller operation is not used screen will go ...

Page 11: ...ature During the heating operation If the desired temperature is lower than the indoor temperature heating is not performed Set the desired temperature higher than the indoor temperature TEMPERATURE SETTING STANDARD MODE NOTE According to Control type setting value 1Set points You can select the desired temperature from 18 C 30 C 64 86 F for cooling opera tion and 16 C 30 C 60 86 F for heating ope...

Page 12: ...fan speed button You can select the fan speed in the order of SLOW LOW MED HIGH POWER AUTO Depending on the product function some fan speed may not be selected WIND SETTING STANDARD MODE Airflow Control In the airflow selection screen press the button in the desired air flow direction Some Air Flow options may not be available due to the of indoor unit selected During the indoor unit operation pre...

Page 13: ...Go Back button s backlight and Home button s backlight will be off If you press On Off button during the use product operation will stop ENGLISH OPERATION SETTING ADVANCED MODE In operation mode selection screen press the Cool button The initial temperature set for cooling operation is 18 C 64 F Press remote controller screen 1 time to turn on If remote controller operation is not used screen will...

Page 14: ...e compressor from malfunctioning Compressor starts 3 minutes after and the fan starts Press remote controller screen 1 time to turn on If remote controller operation is not used screen will go into energy savings mode During the cooling operation if you press fan speed button power cooling is performed after fan speed HIGH h For some indoor units products according to whether there is a wind amoun...

Page 15: ...creen Heating Operation Provides warm air to the space Pressing the On Off button during the use product operation will stop Press the temperature control button to set the desired temperature higher than the indoor temperature Indoor temperature is displayed on the remote controller default screen As below the pic ture According to the indoor unit type the desired temperature can be controlled in...

Page 16: ...s mode During the operation of the product press the mode button on the screen It moves to the operation mode selection screen NOTE Using this function in the rainy season or high humidity you can operate simultaneously de humidifier and cooling mode to remove humidity effectively Monsoon Dehumidifying Mode This is monsoon region specific dehumidification function In operation mode selection scree...

Page 17: ...creen will go into energy savings mode During the operation of the product press the mode button on the screen It moves to the operation mode selection screen Artificial Intelligence Automatic Operation Operation provides heating and cooling to satisfy space requirements In operation mode selection screen press the AUTO button Press remote controller screen 1 time to turn on If remote controller o...

Page 18: ...E If it does not work as desired select another operation mode 2 set point auto operation North America Only The indoor unit automatically manages room temperature with heating and cooling with extended setting temperature ranges 2 set point auto mode can operate in 2 set point control mode Press remote controller screen 1 time to turn on If remote controller operation is not used screen will go i...

Page 19: ...savings mode Press the Program button on the screen It moves to schedule operation mode selection screen NOTE It revert to default operation setting if Thermostat doesn t have last occupied schedule in unoccupied override default operation setting Auto operation mode set temperature 86 F 30 C cool 60 F 16 C heat It revert to set back operation setting if Thermostat doesn t have last unoccupied sch...

Page 20: ...o weekly schedule the set point shall go to the last set points before the home leave operation If there are no set point before the setback operation the set points will go to the default if the values have not been adjusted Default setting will be auto heat 60 F 16 C cool 86 F 30 C NOTE You can You can t change setting in Hold except cancel the Hold It can be canceled if Thermostat receive comma...

Page 21: ... s Zone button It moves to the direction of Zone open close screen Select zone button that you want to control If you press Go Back or Home button it will exit from the setting menu NOTE according to installation setting value If no function is supported This entry can not function old type Zone control is currently only available to monitor new type 4zone or 8Zone Any number of zones is installed...

Page 22: ...rent TEMPERATURE SETTING ADVANCED MODE NOTE According to Control type setting value 1Set points You can select the desired temperature from 18 C 30 C 64 86 F for cooling opera tion and 16 C 30 C 60 86 F for heating operation 2Set points You can select the desired temperature from 18 C 30 C 64 86 F for cooling opera tion and 16 C 30 C 60 86 F for heating operation A temperature area of extended ran...

Page 23: ...igure Description Automatically changes the airflow to up and down Automatically changes the airflow to left and right If it is connected to a indoor unit with 4 vanes exits Air moves by crossing over and swinging 1 3 and 2 4 vanes WIND SETTING ADVANCED MODE Fan speed Control Press the fan speed button to set the desired fan speed Every time you press the fan speed button You can select the fan sp...

Page 24: ...ent are offered 5 stages or 6 stages according to each indoor unit To reset to the initial factory default setting state press Initialize button Initialize is selected and select all the vanes are fixed to the initial value vane angle 3 SUB FUNCTION SETTING Up Down Vane Angle Setting In the setting menu list press Vane Angle Up Down It moves to Vane Angle Up Down Setting screen During the indoor u...

Page 25: ...s the Save button only the values currently displayed on the screen will be ap plied Example Select vane 1 Change angle Save Select vane 3 Save Verify by sight that the new vane angle setting has been applied If the vane angle stays at the original pre setting change angle your changes were not saved through the screen dis play Set the vane angles of the remaining vanes using the same procedure as...

Page 26: ...et or turn off the Energy Saving cooling through the additional operation menu During the indoor unit operation press the screen s additional function menu button It moves to the additional function selection screen SUB FUNCTION SETTING If you press Go Back or Home button it will exit from the setting menu If no buttons are pressed within 60 seconds after setting functions it automatically exits f...

Page 27: ...you press Go Back or Home button it will exit from the setting menu If no buttons are pressed for 60 seconds it automatically exits from the setting menu SUB FUNCTION SETTING If you press Go Back or Home button it will exit from the setting menu If no buttons are pressed for 60 seconds it automatically exits from the setting menu In additional function setting screen press Energy Saving category s...

Page 28: ...urn off the desired state During the indoor unit operation press the screen s additional function menu button It moves to additional function selection screen If you press Go Back or Home button it will exit from the setting mode If there is no button input for about 60 seconds it automatically exits from the setting mode SUB FUNCTION SETTING The set additional operation is displayed at the top ri...

Page 29: ...ss the Robot Cleaning OFF ON button to set or turn off the desired state During the indoor unit operation press the screen s additional function menu button It moves to additional function selection screen If you press Go Back or Home button it will exit from the setting menu If no buttons are pressed for 60 seconds it automatically exits from the setting menu SUB FUNCTION SETTING The set addition...

Page 30: ...nit operation press the screen s additional function menu button It moves to additional function selection screen If you press Go Back or Home button it will exit from the setting menu If no buttons are pressed for 60 seconds after the setting it will automatically exit from the setting menu SUB FUNCTION SETTING The set additional operation is displayed at the top right of the default screen NOTE ...

Page 31: ...uct operation press the screen s additional function menu button It moves to additional function selection screen If you press Go Back or Home button it will exit from the setting menu If no buttons are pressed for 60 seconds it automatically exits from the setting menu SUB FUNCTION SETTING The set additional operation is displayed at the top right of the default screen NOTE Ventilation kit contro...

Page 32: ...requency which mosquitoes don t like In additional function setting screen press the Mosquito Away OFF ON button to set or turn off the desired state During the indoor unit operation press the screen s additional function menu button It moves to additional function selection screen If you press Go Back or Home button it will exit from the setting menu If no buttons are pressed for 60 seconds after...

Page 33: ...reen press the Himalaya Cooling OFF ON button to set or turn off the desired state During the indoor unit operation press the screen s additional function menu button It moves to additional function selection screen If you press Go Back or Home button it will exit from the setting menu If no buttons are pressed for 60 seconds after the setting it will automatically exit from the setting menu NOTE ...

Page 34: ...the Comfort Saving OFF ON button to set or turn off the desired state During the indoor unit operation press the screen s additional function menu button It moves to additional function selection screen If you press Go Back or Home button it will exit from the setting menu If no buttons are pressed for 60 seconds after the setting it will automatically exit from the setting menu NOTE Himalaya cool...

Page 35: ... During the product operation press the ERV tab It switches from the air conditioner mode to the ventilation mode How to switch to the air conditioner mode Automatic switching If no buttons are pressed for 15 seconds or longer in ventilation mode it automatically switches to the air conditioner control monitoring interface Manual switching If you press the air conditioner Tab in ERV interface it m...

Page 36: ...ling heating and automatic mode you can control the desired temperature OPERATION SETTING VENTILATION General Ventilation Operation Mode You can select the ventilation mode when it is connected to a ventilation product Press remote controller screen 1 time to turn on If remote controller operation is not used screen will go into energy savings mode During the indoor unit operation press the desire...

Page 37: ... of the air cleaning heater humidifier etc are the same as the air conditioner FAN SPEED SETTING Ventilator Fan speed Control Remove sentence Choose a fan speed button to set the desired Fan speed You can select the fan speed among Auto Low High or Power For direct ventilation press the fan speed button to select the fan speed in the order of Low High Power Auto You can set and use the automatic f...

Page 38: ...t without pressing the Save button your settings will not be saved TIMER PROGRAM Simple Reservation Setting has the option to be set between 1 7 hours in 1 hour increments In the Timer Setting menu screen press Timer button It moves to the timer setting screen Press the remote controller screen s Timer Setting menu button It moves to the Timer Setting menu screen In the timer setting menu screen p...

Page 39: ...er Setting menu screen press the Timer button It moves to the timer setting screen Press the remote controller screen s Timer Setting menu button It moves to the Timer Setting menu screen In the timer setting menu screen press the Sleep Reservation It moves to the Sleep Reservation Setting screen Sleep Reservation can be activated when the indoor unit is in operation TIMER PROGRAM If you press Can...

Page 40: ... Sleep Reservation setting press button to set the sleep activation time Air conditioner You can select from 1 7 hours Ventilation You can select from 1 12 hours In the Sleep Reservation Setting menu screen press Disable Enable button to set or turn off this function Press the Save button when you are done to save all changes If you exit without pressing the Save button your setting changes will n...

Page 41: ...ave button your changes will not be applied TIMER PROGRAM Turn On Reservation The unit is instructed to turn on at a set time automatically In the Timer Setting menu screen press Daily button It moves to the Daily Timer Setting screen Press the remote controller screen s Timer Setting menu button It moves to the Timer Setting menu screen In Daily Timer Setting menu screen press Turn On Reservation...

Page 42: ...ng screen Press the remote controller screen s Timer Setting menu button It moves to the Timer Setting menu screen In the Daily Timer Setting menu screen press Turn Off Reservation category It moves to the OFF Timer setting screen TIMER PROGRAM If you press Cancel or Home button it will exit from the setting menu If no buttons are pressed for 60 seconds it will automatically exit from the setting ...

Page 43: ...d for 60 seconds it will automatically exit from the setting menu TIMER PROGRAM Press button to set to turn off time In the OFF Timer Setting menu screen press Disable Enable button to set or turn off the OFF Timer Press the Save button well done If you exit without pressing the Save button your changes will not be applied ...

Page 44: ...ed to change the pattern name you can move directly to the next step TIMER PROGRAM Create and Edit 7 Days Pattern You can create and edit 7 day patterns that can be applied to weekly and yearly schedules Edit the existing patterns In the 7 Days schedule screen press Edit button enter to edit patterns Select a pattern to edit among the existing registered patterns Create a new pattern In the 7 Days...

Page 45: ...period you can make choices in half and hour increments 30 minute time units Set the detail event When setting up a specific time through the weekly schedule screen start by pressing the up or down smaller arrows located above and below the ON circle as shown below Pressing the center area of the circle toggles the time On or Off and advances to the next event example mode temperature fan speed as...

Page 46: ...ress Edit button It switches to the weekly timer edit state Press Delete button next to the pattern name to delete TIMER PROGRAM You can register up to 5 events per day of week The following warning display will pop up on the screen if you try to schedule over 5 events Delete a detail event To delete an event press and hold for 2 seconds a message to confirm whether to delete the event is displaye...

Page 47: ...Paste In the weekly timer setting timer event setting screen press and hold the day of week button for 3 seconds to copy The timer copied day of week button will have a frame mark The screen to select day of week will be displayed The day of w eek to copy TIMER PROGRAM The following confirmation message window is displayed Press OK button to delete ...

Page 48: ... to the Timer Setting menu screen In the Timer Setting menu screen press 7 Days button It moves to the Weekly Timer Setting screen In the weekly timer pattern list select the pattern to apply to the weekly timer When you select the desired pattern among the weekly schedule a confirmation message window is displayed If you select Confirm in the confirm message window it is immediately applied and t...

Page 49: ... by pressing the center circle TIMER PROGRAM Press the remote controller screen s Timer Setting menu button It moves to the Timer Setting menu screen In the Timer Setting menu screen press Yearly button It moves to the Yearly schedule Setting screen Press button to advance through each month s numerical equivalent 1 Jan 2 Feb etc You can adjust in the units of month Example June July August Yearly...

Page 50: ...atically stops on the set date If the operation is set the operation stops at every o clock TIMER PROGRAM Press the Save button to save the set desired reservation If you exit this screen before pressing the Save button the changes will not be applied Delete Yearly Schedule In the yearly schedule screen press Edit button The yearly schedule screen will be placed into edit mode Press the yearly eve...

Page 51: ...lose the edit mode of this screen Press Home Go Back or Home button to exit from the setting screen TIMER PROGRAM Press empty to add a scheduled Holiday event It moves to Add Holiday screen You can make any changes to an already set timer for that Holiday Press button to set the date for a scheduled holiday Press Done to commit any date changes If you exit without pressing the Finish button your c...

Page 52: ...changed to the state that you can delete a Holiday Delete button is displayed on the right side of the section set as a holiday Press the Holiday you want to delete and then press the Delete button to the right of that Holi day After the deletion press Done If you exit without pressing the Done button your changes will not be applied Delete Holiday ...

Page 53: ...e 4 or 5 week bars In the Energy Saving menu screen press Yearly button to check the yearly energy usage goal and the usage amount The bars are color coded to indicate if the usage is under green near yellow or over red the target goal energy setpoint The energy usage is displayed in the units of month ENERGY Press the remote controller screen s Energy Saving menu button It moves to the Energy Sav...

Page 54: ...enario Green indicates a significant energy savings Yel low is a normal or on target energy savings Red indicates that there was a higher energy usage than the previous year of the same month Target Energy Consumption This function is that user can set daily amount target usage After setting the daily target value weekly and monthly targets will be calculated and applied au tomatically Please refe...

Page 55: ...e Energy setting screen In the Energy Saving setting screen press Operation Time Limit from the menu It moves to the Operation Time Limit setting screen ENERGY In the Target Energy Consumption setting screen press Disable Enable button to select whether to set the target amount Set the energy usage If you touch the box at the bottom of the daily target amount you can set the energy usage using the...

Page 56: ... It moves to the Time Restriction Operation Setting screen ENERGY In the Operation Time Limit setting screen press Disable Enable button to select whether to set the target amount Set the operation hours If you touch the box at the bottom of the daily target amount you can set the operation hours using the umeric keypad During the daily target amount setting the weekly target amount and the monthl...

Page 57: ...Press Alarm Popup button It moves to the Alarm Popup setting screen ENERGY In the Time Limit Control Setting screen press the Enable button to begin setting a time limit Press button to set the operation hours Press the Done button to save the set time value If you exit without pressing the Done button your changes will not be applied h When the operation stops the calculated time value will reset...

Page 58: ...tion Usage Data button It moves to the Energy information initialization screen ENERGY Press Disable Enable button to set or turn off the category to use Once you press Enable the notice determination period daily weekly monthly will be dis played on the screen Choose the notice determination period After setting the alarm or notice display setting you can press Back Go Back or Home button to exit...

Page 59: ...n It moves to the Lock setting screen From the Release Lock button choices press Lock to activate the lock function and press Done button to save the setting If you exit without pressing the Done button your changes will not be applied Once you press the Done button the setting screen will close FUNCTION SETTING ENERGY Select the checkbox to the left of Initialization Usage Data If you press Done ...

Page 60: ...ontrol type In the Temperature Range Lock setting menu press Release Lock button to activate the lock function and press Done to complete the tempera ture range lock setting If you press the Done button it will exit from the setting screen Press the up and down arrow buttons from the Minimum and Maximum settings to adjust the temperature range as needed Be sure that the Lock button is set once you...

Page 61: ...ime to clean the filter the filter icon appears on the top right side of the screen and you can enter the Filter Sign menu h If your units functionality allows it to display time remaining until the filter cleaning you can enter the Filter Sign menu even if the filter cleaning alarm icon is not displayed 120 FUNCTION SETTING If you press Cancel Go Back or Home button it will exit from the setting ...

Page 62: ...If you unit has the capability to display the remaining time until the filter cleaning alarm the following screen below is displayed in the current time display area If there is time remaining until the next filter cleaning alarm you can enter the Filter Sign menu even if the filter cleaning alarm icon has not displayed as yet If you press Cancel Go Back or Home button the system will exist out of...

Page 63: ...it will exit from the setting screen NOTE Robot cleaning function may not work in some indoor unit products Robot Cleaning Robot cleaning is the function for the cleaner attached to the product to perform automatic filter cleaning after certain time of the air conditioner usage Set the robot cleaning to operate manu ally or automatically It can be set 30 seconds after indoor unit turn off Press Ba...

Page 64: ...ll exit from the setting screen Change Temperature This function allows you to set the temperature to automatically switch between cooling and heating operation as setup in the artificial intelligence operation mode Press the screen s Set button It moves to the settings menu In the settings menu press Auto Dry button Press Disable Enable button to set the desired state and If you press Back Go Bac...

Page 65: ...ode Wireless Module AP mode function that wireless module change to AP mode Press Cancel Go Back or Home button to exit from the setting screen Conditions 1 Mode artificial intelligence mode 2 Desired temperature 22 C 3 Change temperature 3 Difference of change temperature is 3 C The illustration in this section shows the exam ple of operation as set through the conditions in the example above Exa...

Page 66: ...e Select zone name and then press the Done button Press the screen s Set button It moves to the settings menu In the settings menu press Zone Control button NOTE Zone Control setting function may not work in some indoor unit products Zone Name Setting Zone Control settings allow you to select zone name ...

Page 67: ... Leave Set Temperature function is used in 2 Set control mode When customer operate as home leave mode this setting temperature value will be applied Press the screen s Set button It moves to the settings menu In the settings menu press Override Set Time button Select time increment using buttons and then press Save If you press Cancel Go Back or Home button before pressing Save you will exit the ...

Page 68: ... When changing the desired cooling temperature in case of that the difference with the heating temperature becomes lesser than its minimal value of difference it lowers the de sired heating temperature automatically When changing the desired heating temperature in case of that the difference with the heating temperature becomes lesser than its minimal value of difference it raises the de sired coo...

Page 69: ...creen and you changes will not be applied If no buttons are pressed after 60 seconds it will automatically exit from the edit menu FUNCTION SETTING Press the screen s Set button It moves to the settings menu In the settings menu press Delay Time button Select delay time OFF ON button If you select ON the number key pad and edit box are displayed at the bottom Delay Time Ventilator Ventilation mode...

Page 70: ...ess Cancel Go Back or Home button without pressing Save you will exit the setting screen and you changes will not be applied USER SETTING Press the screen s Set button It moves to the settings menu screen In setting screen press User button at the bottom of the screen It moves to the User Setting screen In User Setting screen press Date button It moves to the Date Setting screen Date Setting This ...

Page 71: ...n If you press Cancel Go Back or Home button without pressing Save you will exit the setting screen and your changes will not be applied USER SETTING Press the screen s Set button It moves to the settings menu screen In setting screen press User button It moves to the User Setting screen In User Setting screen press Time button It moves to the Time Setting screen Time Setting This functions allows...

Page 72: ...sappear when done In the Password Setting screen press Change Password button It moves to the password change screen USER SETTING DPress the screen s Set button It moves to the settings menu screen In setting screen press User button It moves to the User Setting screen In User Setting screen press Password button It moves to the Password Setting screen Password Setting This function allows you to ...

Page 73: ...emote controller s default screen USER SETTING In order to change the password you will be asked to input the current password as verifica tion When done move to entering the new password code in the Input New Password screen Then you will be asked to reenter to confirm the new password in the Re enter the password fields as shown below Enter each password and you need to press Done button to proc...

Page 74: ...button It moves to the Brightness Setting screen LCD brightness in idle This function allows you to adjust the brightness of the remote controller s standby screen USER SETTING Press Hide Show button to set the which elements should display on the default screen Note that the elements are dependant on the type of unit in operation If you press Back Go Back or Home button it will exit from the main...

Page 75: ...l stay on before turning off sleep mode USER SETTING Set the desired screen brightness percentage by and press Save button to save the setting If you exit without pressing the Save button your changes will not be applied Your choices are 0 10 20 30 Once you press the Save button the screen will exit If you press Cancel Go Back or Home button without pressing Save your changes will not be applied a...

Page 76: ... time screen will stay on before it goes into sleep mode and then press Save button to save the setting If you exit without pressing the Save button your changes will not be applied Your choices are 15 seconds 30 seconds 1 minute not used Once you press the Save button it will exit from the setting screen If you press Cancel Go Back or Home button without pressing Save your changes will not be app...

Page 77: ... setting screen Touch Beep This function allows you to choose whether or not you would like a touch screen sound effect USER SETTING Press the check box and press Done button to initialize all timer settings of the remote controller Pressing the Done button it will exit from the setting screen If you press Back Go Back or Home button without pressing done you will be returned to the previous scree...

Page 78: ...he amount of information you would like displayed on the home screen There are two modes Standard mode and simple mode USER SETTING Press Sound category s Disable Enable button to set whether to use the touch beep If you select Disable no sound effect will occur when you press the keypad display If you select Enable you will have an audible beep for key presses on the display Press Back Go Back or...

Page 79: ...e Unit Setting This function allows you to set your unit of measure in whole or half degree increments USER SETTING Select the desired Screen Mode and press the Save button Standard mode displays only the frequently used functions in the main screen If you press Cancel Go Back or Home button without pressing Save the Home Theme screen will be closed and your changes will not be applied If you choo...

Page 80: ...r the display screen USER SETTING Set the temperature unit increments that you want to display and press Save button to save the setting You can select the temperature control in the units of 1 C 0 5 C If you exit without pressing the Save button your changes will not be applied If you press the Save button it will exit from the setting screen If you press Cancel Go Back or Home button without pre...

Page 81: ...ted to use this feature inconvenient We recommend that you use it only in the region North America USER SETTING Set the language to use and then press Save If you exit without pressing the Save button your changes will not be applied Once the Save button is press after change value it will Pop up window appears After waiting about 5 seconds if you push the reset button on the bottom of the remote ...

Page 82: ...er system date and time USER SETTING Set the control type to use and press Save button when done If you exit without pressing the Save button your changes will not be applied If the setting is changed by pressing the Save button a pop up window appears perform the ini tialization schedule If you press Cancel Go Back or Home button without pressing Save it will exit from the Control Type setting sc...

Page 83: ...k and input the telephone number of the service center that can be con tacted when a defect occurs in the product SERVICE SETTING USER SETTING Set summer time duration and press Save button when done If you exit without pressing the Save button your changes will not be applied If you press the Save button your changes will be applied and the controller will exit from the set ting screen If you pre...

Page 84: ...o Back or Home button without pressing the Save button it will exit from the service number screen and you changes will not be applied SERVICE SETTING Check the service number If the service number is not registered 1544 7777 will be displayed In the service number screen press Telephone It moves to the service number change screen Service number registration and change In the service number chang...

Page 85: ...ot available on all products SERVICE SETTING Press the screen s Set button It moves to the settings menu screen In setting screen press Service button It moves to the Service Setting screen In service screen press Model Information button It moves to indoor outdoor unit information screen Model Information It is the function to check indoor outdoor unit product type connected to the remote control...

Page 86: ...ice screen press Remocon Version Info button It moves to remote controller version information Remocon version information It is the function to check remote controller model name and software version This information is useful when having a service call placed Check software version information of wired remote controller If you press Back Go Back or Home button it will exit from the setting scree...

Page 87: ...plate Press together so that there is no gap between the remote controller and the top bottom left right side of the back plate Before combining with the installation plate arrange the cable so that it does not interfere with the circuit parts Installation of Remote Controller 2 Top side guide groove 3 Left side guide groove 1 Wall reclamation Wall Wall 2 Top side guide groove 3 Left side guide gr...

Page 88: ...iver in the bot tom part separation hole and turn clockwise There are 2 separation holes at the bottom side Slowly separate using each hole During the separation be careful not to damage the internal parts Use the connection cable to connect the indoor unit and the remote controller In the following cases separately purchase and use the cable suitable for the situation Do not install the cable for...

Page 89: ...to the remote con troller manual group control page h Ventilation units represent general ventilation units and direct expenditure type ventilation units NOTE During the group control set only one indoor unit as master During the group control some functions except default operation setting fan Setting Low medium high remote controller lock setting and time setting may be restricted Slave set indo...

Page 90: ...TE Some categories of the menu may not be displayed or menu name may differ depending on your specific indoor unit model type h During the input of the installer code refer to the installer code If no buttons are pressed h If no buttons are pressed for about 60 seconds it automatically exits from the setting screen INSTALLER S SETTING OPTIONS Code Setting Mode Setting Value Value 1 Value 2 Value 3...

Page 91: ...e Setting Value Value 1 Value 2 Value 3 19 Function setting in group control 000 use basic function only 001 use basic function some Master indoor unit function 20 Plasma 000 Not Installed 001 Installed 21 Heater 22 Humidification 23 Elevation grill 24 Ventilation Kit 25 Auxiliary heater 000 Not installed 001 installed General 002 installed Duct type 26 Check indoor unit Ad dress Number 29 Use Ref...

Page 92: ...address of the indoor units during the cen tral controller connection INSTALLER S SETTING OPTIONS Press and hold wireless remote controller signal receiver part of the remote controller for 3 seconds or longer to enter the installer function In the Code input field select test run code value 01 You can press button to change the code value At the Value 1 field press the button to select the test r...

Page 93: ...ect the temperature sensor to determine the indoor temperature INSTALLER S SETTING OPTIONS Press and hold wireless remote controller signal receiver part of the remote controller for 3 seconds or longer to enter the installer function In the Code field set the ESP setting value to 03 h For ventilation product code values are divided to 03 supply air and 04 discharge air ESP setting Refer to the in...

Page 94: ...utton to select the sensor location setting value and press Done button to apply the indoor temperature detection sensor location setting If you do not press Done button your settings will not be applied h Sensor location setting value 01 remote controller 02 indoor unit 03 2TH h 2TH function s operation characteristics may be different for each product h If no buttons are pressed for about 60 sec...

Page 95: ...ow INSTALLER S SETTING OPTIONS Ceiling height Function Low Fan speed operates one step slower than the default value Standard Operates at the default fan speed High Fan speed operates one step faster than the default value Very high Fan speed operates two steps faster than the default value h If no buttons are pressed for about 60 seconds after the setting it automatically exits from the setting m...

Page 96: ...r remote con troller are set as slaves h If no buttons are pressed for about 60 seconds after the setting it automatically exits from the setting mode INSTALLER S SETTING OPTIONS h Remote controller setting value 00 slave 01 master Press and hold wireless remote controller signal receiver part of the remote controller for 3 seconds or longer to enter the installer function At the Code field select...

Page 97: ... sensor etc is used with the air conditioner h If no buttons are pressed for about 60 seconds after the setting it automatically exits from the setting mode NOTE For detailed functions related to the dry contact mode refer to the dry contact manual INSTALLER S SETTING OPTIONS h Operation setting value 00 slave 01 master At the Value 1 field press the button to select operation setting value and pr...

Page 98: ... ROW fan speed Fixed When COMP is ON operate as the set fan speed and when COMP is OFF also oper ate at the set fan speed Celsius Fahrenheit Switching air conditioner This function is used for switching the display between Celsius and Fahrenheit Optimized only for U S A Press and hold wireless remote controller signal receiver part of the remote controller for 3seconds or longer to enter the insta...

Page 99: ...e h If there is no button input for about 60 seconds after the setting it automatically exits from the setting mode Zone Number Setting air conditioner This function is only available on some products Zone Number is to set the number of installed zones It s possible to control only in zone new type Press and hold wireless remote controller signal receiver part of the remote controller for 3seconds...

Page 100: ...et the Emergency Heater Setting Emergency Heater is used to heat the space in emergency case such as heat pump error Emergency heat is in place of and does not supplement heat pump h Emergency Heater setting Function sets following conditions 1 Emergency Heater operation while in error or outdoor unit operates cooling cycle 2 Emergency Heater operation in Low Ambient temperature 3 Fan speed settin...

Page 101: ... 60 seconds after the setting it automatically exits from the setting mode NOTE Common functions and some indoor unit master based settings shall be set only for the group control of the products with the same indoor unit types For the group control of the product groups with different indoor unit types set it with the value of 000 and use the existing group control method NOTE This function setti...

Page 102: ...r part of the remote controller for 3 seconds or longer to enter the installer function At the Code field select the code value of the desired functional product as shown in the table below You can press button to change the code value In the Value 1 field press the button to select the setting value for each function and press Done button when complete If you do not press Done button your setting...

Page 103: ... values are changed the items below will be initialized Setting temperature default Cooling 86 F 30 C Heating 60 F 16 C Set back temperature default Cooling 86 F 30 C Heating 60 F 16 C In case of the setting temperature range option2 31 001 please note that the setting of the re mote controller with cable can be altered under below circumstances Changes in setting ex ample In case of cooling at 30...

Page 104: ...32 set value Guard timer air conditioner It is a function that sets the minimum running time of outdoor unit cycle mode when switching from cooling mode to heating mode and vice versa during Auto Operation mode Under the condition of cooling heating switching it switches between cooling and heating mode after operation during the time scheduled in the Guard timer Press and hold wireless remote con...

Page 105: ... not be applied Value Fan operation in the cooling mode and thermal off conditions 0 Fan speed Low 1 Fan off 2 Fan speed Setting value Primary Heater control setting air conditioner It is a function that sets the outdoor unit to operate with auxiliary heat source and the heater to run with main heat source in heating mode Press and hold wireless remote controller signal receiver part of the remote...

Page 106: ...ting If you do not press Done button the setting value will not be applied Value Primary Heater control setting 000 air conditioner fan off 001 air conditioner fan operate very low Indoor unit Auto Start setting air conditioner It is a function that sets whether to restore the indoor unit operation by resuming the previous power on state or as power off state in the power failure compensation Pres...

Page 107: ...plete set ting If you do not press Done button the setting value will not be applied Value Occupancy Duration Time 000 0 minute 001 10 minutes 002 30 minutes 003 60 minutes Setting for Simple Dry contact unit This function is used when simple dry contact unit is additionally installed in the indoor unit or the installed simple dry contact unit is removed Press and hold wireless remote controller s...

Page 108: ...tton the setting value will not be applied Product direction General ventilator It is the function to set the direction of the ventilation product h Product direction setting value 01 normal 02 reverse h If there is no button input for about 60 seconds after the setting it automatically exits from the setting mode h If there is no button input for about 60 seconds after the setting it automaticall...

Page 109: ...If there is no button input for about 60 seconds after the setting it automatically exits from the setting mode INSTALLER S SETTING OPTIONS Press and hold wireless remote controller signal receiver part of the remote controller for 3 seconds or longer to enter the installer function Select remote controller Celsius control unit setting code value 06 You can press button to change the code value In...

Page 110: ...2 20 decrease h If there is no button input for about 60 seconds after the setting it automatically exits from the setting mode Press and hold wireless remote controller signal receiver part of the remote controller for 3 seconds or longer to enter the installer function Select remote controller Celsius control unit setting code value 14 You can press button to change the code value In value1 use ...

Page 111: ......

Reviews: