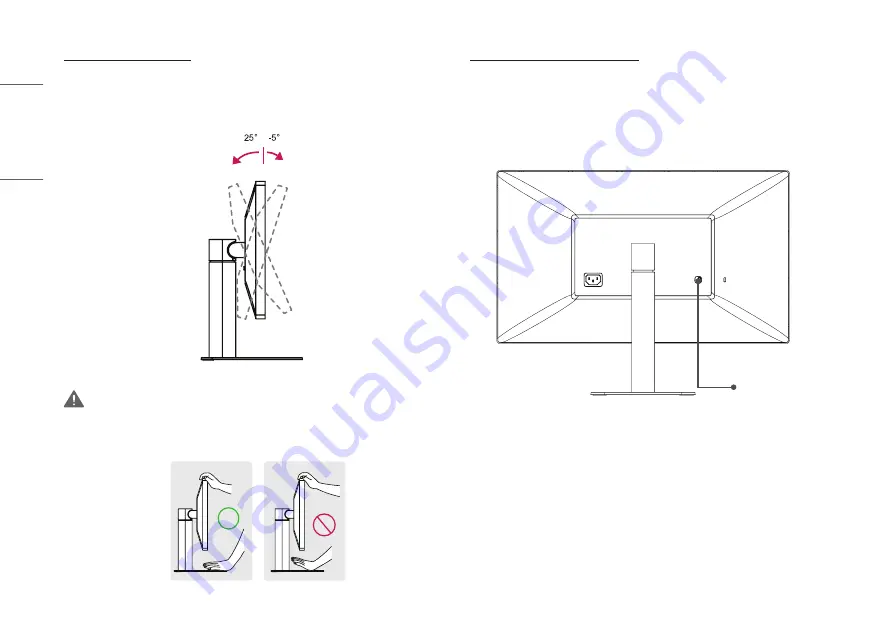
LG UltraFine 27MD5KL Owner'S Manual Download Page 16

16

ENGLISH

Adjusting the Angle

Place the monitor in an upright position, mounted on the stand base.

Adjust the angle of the screen. The angle of the screen can be adjusted forwards or backwards for a 
comfortable viewing experience.

Front

Rear

 WARNING


To avoid injury to the fingers when adjusting the screen, do not hold the lower part of the monitor’s frame as 
illustrated below.

Using the Kensington Lock

The connector for the Kensington security system is located at the back of the monitor.
For more information on installation and usage, refer to the Kensington lock owner’s manual or visit the website 
at 

http://www.kensington.com

.

Connect the monitor to a table using the Kensington security system cable.

Kensington lock hole

Summary of Contents for UltraFine 27MD5KL

Page 1: ...Please read this manual carefully before operating your set and retain it for future reference 27MD5KL www lg com Copyright 2019 LG Electronics Inc All Rights Reserved OWNER S MANUAL For Mac ...

Page 2: ...trademarksofIntel CorporationoritssubsidiariesintheU S and orothercountries MacandtheMaclogoaretrademarksofAppleInc registeredin theU S andothercountries CONTENTS LICENSE 2 IMPORTANT PRECAUTIONS 3 OPEN SOURCE SOFTWARE NOTICE INFORMATION 6 ASSEMBLING AND PREPARING 6 MAKING CONNECTIONS 23 TROUBLESHOOTING 26 PRODUCT SPECIFICATION 28 ...

Page 3: ...edpowercordsandbrokenplugs They mayresultinashockorfirehazard Callyourservicetechnicianforreplacement AslongasthisunitisconnectedtotheACwalloutlet itisnotdisconnectedfromtheACpowersourceevenif theunitisturnedoff Do not Open the Display Therearenouserserviceablecomponentsinside ThereareDangerousHighVoltagesinside evenwhenthepowerisOFF Contactyourdealerifthedisplayisnotoperatingproperly To Avoid Per...

Page 4: ...yingastillimageforlongtimeonthemonitormayleavepersistentimageorstainonthemonitorscreen Toavoidthisproblem useascreensaverandpoweroffwhenthisproductisnotused Persistent imageorstain causedbylongtimeusagearenotcoveredbythewarrantyonthisproduct Donotshockorscratchthefrontandsidesofthescreenwithmetallicobjects Otherwise itmaycausedamagetothescreen Makesurethepanelfacesforwardandholditwithbothhandstomo...

Page 5: ...adapter andpinsofthepowerplugcleanfromdustandetc Thismaycauseafire On Cleaning Unplugthedisplaybeforecleaningthefaceofthedisplayscreen Useaslightlydamp notwet cloth Donotuseanaerosoldirectlyonthedisplayscreenbecauseover sprayingmaycauseelectricalshock Whencleaningtheproduct unplugthepowercordandscrubgentlywithasoftclothtopreventscratching Donotcleanwithawetclothorspraywaterorotherliquidsdirectlyon...

Page 6: ...ion ASSEMBLING AND PREPARING CAUTION AlwaysusegenuineLGcomponentstoensuresafetyandproductperformance Theproductwarrantywillnotcoverdamageorinjurycausedbytheuseofunauthorizedcomponents Itisrecommendedtousethesuppliedcomponents NOTE Withoutpriornotice allproductinformationandspecificationscontainedinthismanualaresubjectto changetoimprovetheperformanceoftheproduct Topurchaseoptionalaccessories visita...

Page 7: ...7 ENGLISH Product Description Front Camera indicator light Camera Microphone and Ambient light sensor ...

Page 8: ...8 ENGLISH Back Kensington lock hole Power connector Stand detach button NOTE TheambientlightsensorisforautobrightnesscontrolofdisplayandcanbecontrolledbyMacOS ...

Page 9: ...9 ENGLISH Input Connector USB expansion port ThunderboltTM 3 USB C Host Mac connection port ...

Page 10: ...10 ENGLISH ID Label Sub ID Label Youcanviewthemonitor sIDLabelandSubIDLabel Sub ID Label ...

Page 11: ... Label NOTE IDLabel themonitor sstandardIDlabelthatstatesmodelname productiondate countryofproduction specifications etc SubIDLabel asecondaryIDlabelthatstatesonlythemodelnameandbasicspecifications CAUTION ToviewtheIDLabel youmustdetachthestand ...

Page 12: ...amefirmly Donotholdthepanelitself Whenholdingthemonitor thescreenshouldfaceawayfromyoutopreventitfrombeingscratched Whentransportingthemonitor donotexposethemonitortoshockorexcessivevibration Whenmovingthemonitor keepituprightandneverturnthemonitoronitssideortiltitsideways CAUTION Avoidtouchingthemonitorscreenasmuchaspossible Thismayresultindamagetothescreenorsomeofthepixelsusedtocreateimages Ifyo...

Page 13: ...rightposition Placethemonitoratleast100mmaway fromthewalltoensuresufficientventilation 100mm 100mm 100mm 100mm 2 Connectthepowercordtothemonitorandthenplugthepowercordintothewalloutlet 1 2 CAUTION Unplugthepowercordbeforemovingorinstallingthemonitor Thereisriskofelectricshock ...

Page 14: ...atisprovidedintheproductpackageandconnectittoagroundedpower outlet Ifyouneedanotherpowercord pleasecontactyourlocaldealerorthenearestretailstore Adjusting the Stand Height 1 Placethemonitormountedonthestandbaseinanuprightposition 2 Handlethemonitorwithbothhandsforsafety Max 110 0 mm ...

Page 15: ...ght donotplaceyourhandonthestandbodytoavoidinjurytoyour fingers Becarefulnottotouchorpressthescreenareawhenadjustingtheangleofthemonitor NOTE Theleftorrightsideofthemonitorheadcanbeslightlyrotatedupordown Adjustthehorizontallevelof themonitorhead ...

Page 16: ...RNING Toavoidinjurytothefingerswhenadjustingthescreen donotholdthelowerpartofthemonitor sframeas illustratedbelow Using the Kensington Lock TheconnectorfortheKensingtonsecuritysystemislocatedatthebackofthemonitor Formoreinformationoninstallationandusage refertotheKensingtonlockowner smanualorvisitthewebsite athttp www kensington com ConnectthemonitortoatableusingtheKensingtonsecuritysystemcable Ke...

Page 17: ...17 ENGLISH NOTE TheKensingtonsecuritysystemisoptional Youcanobtainoptionalaccessoriesfrommostelectronicsstores ...

Page 18: ...Placethemonitor sscreenfacedown Toprotectthescreenfromscratches coverthesurfacewitha softcloth 2 PushtheDetachbuttononthebackofthemonitortotheleft 3 Liftupthestand slightlyrotatingit 4 Pullthestandawayfromthemonitorinitsrotatedposition ...

Page 19: ...kwhetherthehooksonthestandareseparatedfromtheslotsofthemainunit Standhooks Mainunitslots 6 Removethestandoncethehooksonthestandhavebeenreleasedfromtheslotsofthemainunit CAUTION Becarefulnottodropthestandwhiledetachingit ...

Page 20: ...igncoveronthemonitorinaslightlyslantedpositionsoitshookscanbeinsertedto theslotsofthemainunit 3 PushtheVESAdesigncoverintheslantedpositionuntilittouchestheotherside 4 PushdownontheVESAdesigncover CAUTION CheckwhetherthedetachbuttonhasbeenpushedtotherightafterattachingtheVESAdesigncover If thebuttonhasnotbeenpushedtotheright pushitintopositionwithyourhands ...

Page 21: ... ENGLISH Installing theWall Mount Bracket 1 Placethemonitor sscreenfacedown Toprotectthescreenfromscratches coverthesurfacewitha softcloth 2 Usefourscrewstoattachthewallmountbracket Standardscrews M4xL10 ...

Page 22: ... BesuretoattachtheVESAdesigncoverbeforeattachingthewallmountbracket Ifyouusescrewslongerthanthestandardlength itmaydamagetheinsideoftheproduct Topreventinjury thisapparatusmustbesecurelyattachedtothewallinaccordancewiththeinstallation instructions Wall Mount mm 100x100 Standard screw M4xL10 Number of screws 4 Wall Mount Plate Optional RW120 NOTE Verticalorientationisnotrecommended ...

Page 23: ...ion Donottouchtheplugforalongtime NOTE Whenconnectingthepowercordtotheoutlet useagrounded 3 hole powerstriporagroundedpoweroutlet Themonitormayflickerwhenturnedoninanareawherethetemperatureislow Thisisnormal Sometimesred green orbluespotsmayappearonthescreen Thisisnormal Connecting to a host Thismonitorsupportsthe PlugandPlayfeature PlugandPlay Afeaturethatallowsyoutoaddadevicetoyourcomputerwithou...

Page 24: ...rtheMonitorPowersourcebutforaPCpowersource ConnectthePowercordtosupplypowertotheMonitor Makesuretousethesuppliedcable Otherwise thismaycausethedevicetomalfunction Thechargingspeedmayvarydependingontheportanddevice ThunderboltTM 3 USB CHost Mac issupportedinsuchenvironmentsasWindows10andMacproduct InaccordancewithMacproductsmaynotsupporttherecommendedresolutionorthesomefeatures Formoreinformationab...

Page 25: ...25 ENGLISH Connecting to USB Device PowerDelivery5V 1 5AissupportedviatheUSBexpansionport USB NOTE Peripheraldevicesaresoldseparately ...

Page 26: ...y Images displayed on the monitor leave shadow trails Didyouselecttheappropriateresolution Setyourmonitortotherecommended optimal resolution UpdateyourMacOSordrivertothelatestversion NOTE Notsettingthegraphicscardtotherecommended optimal resolutionmayresultinblurredtext adimmedscreen atruncateddisplayareaormisalignmentofthedisplay Thesettingmethodsmaybedifferentdependingonthecomputeroroperatingsys...

Page 27: ...red green blue white orblack mayappearonthescreen ThisisnormalforanLCDscreen Itisnotanerror norisitrelated tothemonitor sperformance The brightness cannot be adjusted The ALS Ambient Light Sensor does not work HaveyouupdatedMacOSorHostforthisoperation TheambientlightsensoroperatesinaccordancewithMacOS SomeMacOSdoesn tsupportthedisplayALS AmbientLightSensor Youcanalsoadjustthemonitorbrightnessbycon...

Page 28: ...on ThunderboltTM 3 MaxResolution 5120 2880 60Hz RecommendedResolution USB C MaxResolution 3840 2160 60Hz RecommendedResolution VideoSignal HorizontalFrequency 88kHzto178kHz VerticalFrequency 48Hzto60Hz InputConnector ThunderboltTM 3 USB CHost Mac connectionport USBexpansionportx3 PowerSources PowerRating 100 240V 50 60Hz2 5A PowerConsumption OnMode 37WTyp ENERGYSTAR standard OffMode 0 3W Nocableco...

Page 29: ...Speakers Camera Built inUSBCamera Microphone Built inUSBMicrophone Dimensions MonitorSize WidthxHeightxDepth WithStand mm 625 6x464 4x239 9 WithoutStand mm 625 6x375 1x53 8 Weight WithoutPackaging WithStand kg 8 5 WithoutStand kg 6 4 TheOnModeofpowerconsumptionismeasuredwithENERGYSTAR teststandard Thepowerconsumptionlevelcanbedifferentbyoperatingconditionandmonitorsetting ...

Page 30: ...SignalTiming Resolution Horizontal Frequency kHz Vertical Frequency Hz Polarity H V Remarks 640x480 31 469 59 94 3840x2160 133 32 60 3200x1800 111 12 60 2560x1440 88 86 60 5120x2880 177 71 60 MainRecommendedTiming ...

Page 31: ...Themodelandserialnumberoftheproductarelocatedonthebackandononesideoftheproduct Record thembelowincaseyoueverneedservice Model SerialNo ...

Reviews: