background image

ENGLISH

17

TSP510-M to 49WFB LVDS Connection

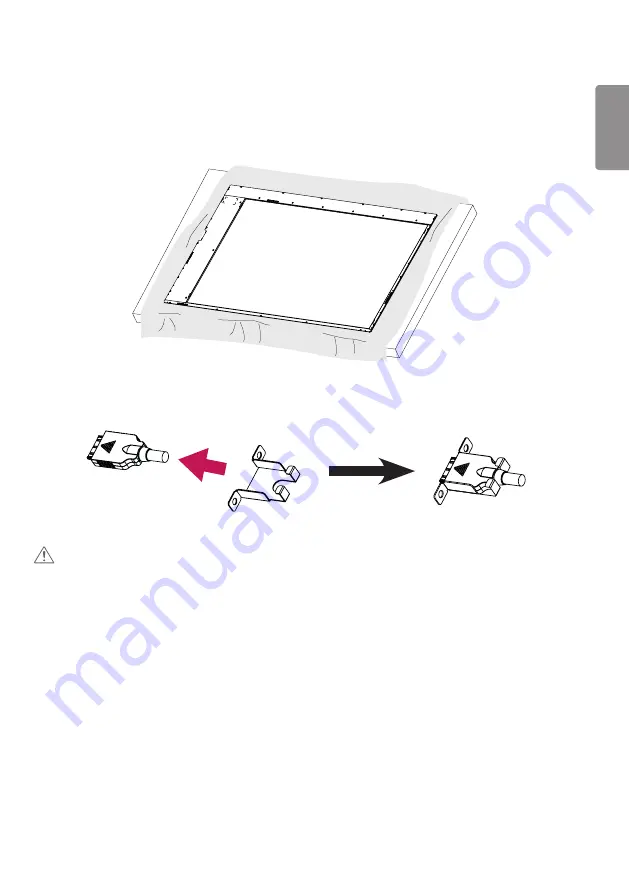
Place a soft cloth on the table and put the set on it as illustrated.

Put a LVDS cable in a holder. Cable head has to be properly oriented.

 CAUTION


To prevent the cable from being separated, you must use a holder.


Check the direction of the LVDS cable to prevent damage to the cable.

Summary of Contents for TSP510-A

Page 1: ...Copyright 2018 LG Electronics Inc All Rights Reserved OWNER S MANUAL AD Box For Transparent Display Please read this manual carefully before operating your set and retain it for future reference TSP510 M TSP510 A ...

Page 2: ... 8 ASSEMBLY AND PREPARATION 9 Parts and Buttons 10 Installing the Guide Brackets 12 PRODUCT INSTALLATION 13 TSP510 M LVDS Connection 13 TSP510 M to 55WFB LVDS Connection 15 TSP510 M to 49WFB LVDS Connection 17 TSP510 A LVDS Connection 19 TSP510 A to 32WFC LVDS Connection 20 REMOTE CONTROL 21 USING THE TSP510 M TSP510 A SET 23 Connecting to a PC 23 External Device Connection 23 TROUBLESHOOTING 24 P...

Page 3: ...ed or injured Or the product might be damaged Do not use a damaged or loose plug This may cause electrical shock or fire Operate the display only from a power source i e voltage indicated in the product specification Otherwise the product can be damaged fire can occur or you may be electrocuted If you are not sure what type of power supply you have consult a certified electrician In the presence o...

Page 4: ...d The power line can be damaged which may cause electric shock or fire Do not insert metal or other conductive materials into the product openings Additionally do not touch the power cable right after plugging into the wall input terminal You may be electrocuted Use an appliance coupler as a disconnect device Please make sure the device is installed near the wall outlet to which it is connected an...

Page 5: ...per measures electrical shock or fire can occur If you dropped the product or the case is broken turn off the product and unplug the power cord If you continue to use without taking proper measures electrical shock or fire can occur Contact LG Customer Service Do not drop an object on or apply impact to the product Do not throw any toys or objects at the product It can cause injury to humans probl...

Page 6: ... or the product can be damaged Make sure to remove all cables before moving the product You may be electrocuted or the product can be damaged Do not shock the product when moving it You may be electrocuted or the product can be damaged If you drop the product the damaged product can cause electric shock or fire ...

Page 7: ... thinners or alcohol Keep the product away from water Fire or electric shock accident can occur Avoid high temperatures and humidity Do not put or store flammable substances near the product There is a danger of explosion or fire Keep the product clean at all times Take a comfortable and natural position when working with the product Take a regular break when working with the product for a long ti...

Page 8: ...DivX video To play purchased DivX movies first register your device at vod divx com Find your registration code in the DivX VOD section of your device setup menu DivX Certified to play DivX video up to HD 1080p including premium content DivX DivX Certified and associated logos are trademarks of DivX LLC and are used under license Covered by DivX Patents 7 295 673 7 515 710 RE45 052 and others avai...

Page 9: ... instructions NOTE The accessories provided with your product may vary depending on the model or region Product specifications or contents in this manual may be changed without prior notice due to upgrade of product functions SuperSign Software Manual Downloading from the LG Electronics website Visit the LG Electronics website http partner lge com and download the latest software for your model Th...

Page 10: ...AN RS 232C AUDIO OUT USB REMOTE CONTROL IN USB IN AUTO SET MENU INPUT DC IN 19 V LVDS OUT Buttons Turns the power on or off Displays the current signal and mode Adjusts the volume level Adjusts the up and down Accesses the main menus or saves your input and exits the menus Changes the input source ...

Page 11: ...NTROL IN USB IN AUTO SET MENU INPUT DC IN 19 V LVDS OUT Buttons Turns the power on or off Displays the current signal and mode Adjusts the volume level Adjusts the up and down Accesses the main menus or saves your input and exits the menus Changes the input source ...

Page 12: ...nstall the guide brackets to the set using the screws supplied as accessories Back of the Product AUTO SET MENU INPUT Guide Bracket Screws For Guide Bracket 224 2 mm 8 8 inches 2 Fix the set with the guide brackets installed using the screws supplied as accessories Front of the Product AUTO SET MENU INPUT Guide Bracket ...

Page 13: ...ews to assemble LVDS cable and Holder Don t throw away the screws 2 Put a LVDS cable in a holder Cable head has to be properly oriented CAUTION To prevent the cable from being separated you must use a holder Check the direction of the LVDS cable to prevent damage to the cable ...

Page 14: ... Attach LVDS cable and holder to TSP510 M with two screws saved in step 1 CAUTION To prevent the cable from being separated you must use a holder Check the direction of the LVDS cable to prevent damage to the cable ...

Page 15: ...oth on the table and put the set on it as illustrated 2 Put a LVDS cable in a holder Cable head has to be properly oriented CAUTION To prevent the cable from being separated you must use a holder Check the direction of the LVDS cable to prevent damage to the cable ...

Page 16: ...ews These screws are included with TSP510 M 4 Cable head has to be toward the back of the set Label is located on back of set CAUTION To prevent the cable from being separated you must use a holder Check the direction of the LVDS cable to prevent damage to the cable ...

Page 17: ...oth on the table and put the set on it as illustrated 2 Put a LVDS cable in a holder Cable head has to be properly oriented CAUTION To prevent the cable from being separated you must use a holder Check the direction of the LVDS cable to prevent damage to the cable ...

Page 18: ...ews These screws are included with TSP510 M 4 Cable head has to be toward the back of the set Label is located on back of set CAUTION To prevent the cable from being separated you must use a holder Check the direction of the LVDS cable to prevent damage to the cable ...

Page 19: ...ENGLISH 19 TSP510 A LVDS Connection Attach LVDS cable to TSP510 A CAUTION Check the direction of the LVDS cable to prevent damage to the cable ...

Page 20: ...TSP510 A to 32WFC LVDS Connection 1 Place a soft cloth on the table and put the set on it as illustrated 2 Attach LVDS cable to the set CAUTION Check the direction of the LVDS cable to prevent damage to the cable ...

Page 21: ...10 A and then turn it back on Reduces power consumption by adjusting peak screen brightness This model does not support this Used for viewing 3D videos This model does not support this Number and Alphabet buttons Enters numerical or alphabetical characters depending upon the setting Depending upon the model this feature may not be supported Toggles between numerical and alphabetical Depending upon...

Page 22: ...tions Selects menus or options and confirms your input Allows you to move back one step in the user interaction function Quit all OSD tasks and applications Allows you to control various multimedia devices to enjoy multimedia simply by using the remote control through the SimpLink menu This model does not support this Selects the TILE Mode When the Picture ID number matches the Set ID number you c...

Page 23: ... TSP510 M TSP510 A set with an HDMI connection for the best image quality To minimize the impact of electromagnetic waves secure the cables with cable ties Use a High Speed HDMI TM Cable If you want to use HDMI PC mode you must set the input label to PC mode When HDMI PC is used a compatibility problem might occur Use a certified cable with the HDMI logo attached If you do not use a certified HDMI...

Page 24: ...cable Access the input menu to check the input signal Unknown Product message appears when the product is connected Problem Action Did you install the driver Check if the Plug and Play function is supported by referring to the user manual for your graphics card The screen image looks abnormal Problem Action Is the screen position incorrect See if the video card resolution and frequency are support...

Page 25: ...to 24 bits or higher true color Select Control Panel Display Settings Color Table in Windows The settings may differ depending on your operating system The screen color is unstable or mono colored Check the connection status of the signal cable You can also re insert your PC graphics card The operation does not work normally Problem Action The power suddenly turned off Is Off Time set Check the po...

Page 26: ...zontal frequency HDMI 28 1 kHz to 83 kHz Vertical frequency HDMI 50 Hz to 60 Hz Synchronization Digital Input Output ports TSP510 M 40p TSP510 A 51p Power Rated power 19 V 3 42 A Power consumption On Mode 15 W Typ Sleep Mode 0 5 W Off Mode 0 5 W AC DC Adapter DA 65G19 type manufactured by APD Output 19 V 3 42 A Embedded battery Applied Environmental Conditions Operating Temperature 0 C to 40 C 32 ...

Page 27: ...1080 60p 67 5 60 NOTE Resolutions available for the Input Label option in HDMI input modes PC resolutions 640 x 480 60 Hz 1280 x 720 60 Hz 1920 x 1080 60 Hz DTV resolutions 480p 720p 1080p Vertical frequency The product display functions by the screen image changing dozens of times every second like a fluorescent lamp The vertical frequency or refresh rate is the number of image displays per secon...

Page 28: ...ions before using the product The model and serial numbers of the SET are located on the back and one side of the SET Record it below should you ever need service MODEL SERIAL Temporary noise is normal when powering ON or OFF this device ...

Reviews: