background image

Getting Started

3

Getting Star

ted

1

CAUTION: 

Only use the AC adapter supplied with 

this device. Do not use a power supply from another 
device or another manufacturer. Using any other 
power cable or power supply may cause damage to 
the device and void your warranty.

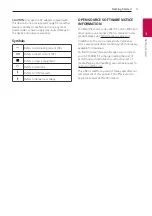
Symbols

~

Refers to alternating current (AC).

0

Refers to direct current (DC).

Refers to class II equipment.

1

Refers to stand-by.

!

Refers to “ON” (power).

Refers to dangerous voltage.

OPEN SOURCE SOFTWARE NOTICE 

INFORMATION

To obtain the source code under GPL, LGPL, MPL, and 
other open source licenses, that is contained in this 
product, please visit http://opensource.lge.com

.

In addition to the source code, all referred license 
terms, warranty disclaimers and copyright notices are 
available for download.
LG Electronics will also provide open source code to 
you on CD-ROM for a charge covering the cost of 
performing such distribution (such as the cost of 
media, shipping and handling) upon email request to 
[email protected]

.

This offer is valid for a period of three years after our 
last shipment of this product. This offer is valid to 
anyone in receipt of this information.

Summary of Contents for SL5YF

Page 1: ... Wireless Sound Bar Please read this manual carefully before operating your set and retain it for future reference MODEL SL5YF SL5YF SPL5B W 1905_Rev01 www lg com Copyright 2019 LG Electronics Inc All Rights Reserved ...

Page 2: ...or ventilation and to ensure reliable operation of the product and to protect it from over heating The openings should never be blocked by placing the product on a bed sofa rug or other similar surface This product shall not be placed in a built in installation such as a bookcase or rack unless proper ventilation is provided or the manufacturer s instruction has been adhered to CAUTION No naked fl...

Page 3: ...CE INFORMATION To obtain the source code under GPL LGPL MPL and other open source licenses that is contained in this product please visit http opensource lge com In addition to the source code all referred license terms warranty disclaimers and copyright notices are available for download LG Electronics will also provide open source code to you on CD ROM for a charge covering the cost of performin...

Page 4: ...ing an OPTICAL cable 21 LG Sound Sync 23 Using an HDMI cable 23 ARC Audio Return Channel function 23 What is SIMPLINK 24 Additional information for HDMI 25 Optional equipment connection 25 HDMI connection 26 OPTICAL IN connection 26 Antenna Connection 26 USB connection 26 Compatible USB devices 27 USB device requirement 27 Playable file 1 Getting Started 2 Safety Information 6 Introduction 7 Front...

Page 5: ...s connected Bluetooth device 35 Bluetooth connection lock BT LOCK 35 Using BLUETOOTH App 35 Install Music Flow Bluetooth App onto Your BLUETOOTH Device 36 Activate BLUETOOTH with Music Flow Bluetooth App 37 Radio Operations 37 Listening to the radio 37 Presetting the Radio Stations 37 Deleting a saved station 37 Deleting all the saved stations 4 Troubleshooting 38 Troubleshooting 38 General 39 NOT...

Page 6: ...Getting Started 6 Getting Started 1 Introduction Symbol used in this manual Note Indicates special notes and operating features Caution Indicates cautions for preventing possible damages from abuse ...

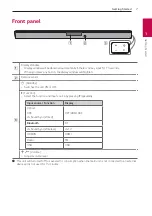
Page 7: ...andby Switches the unit ON or OFF F Function Select the function and input source by pressing F repeatedly Input source Function Display Optical ARC LG Sound Sync Wired OPT HDMI ARC Bluetooth BT LG Sound Sync Wireless LG TV HDMI IN HDMI Radio FM USB USB o p Volume Adjusts volume level This unit will turn itself off to save electric consumption when the main unit is not connected to an external dev...

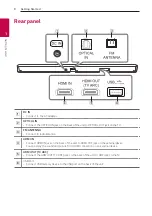
Page 8: ... ANTENNA Connect to radio antenna D HDMI IN Connect HDMI IN jack on the back of the unit to HDMI OUT jack on the external device You can enjoy the sound and picture from HDMI connection on an external device E HDMI OUT TV ARC Connect the HDMI OUT TV ARC jack on the back of the unit to ARC jack on the TV F USB Port Connect USB memory device to the USB port on the back of the unit ...

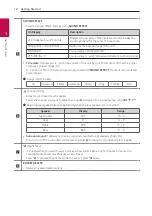
Page 9: ... Press C or V to go to next or previous file Press and hold C or V during playback and release it at the point you want Select the radio stations by using C or V d N Play Pause Starts playback Pauses playback y y BT Bluetooth connection Lock It allows you to connect a Bluetooth device only on Bluetooth and LG TV functions Page 35 To turn on or off the Bluetooth connection lock press and hold N for...

Page 10: ...ds and press it again Supported TV brands LG Panasonic Philips Samsung Sharp Sony Toshiba Vizio f Sound tuning Adjusts sound level of each speaker Select the speaker you want to adjust by using and adjust the sound level by using VOL o p Adjusting rear speakers level is applied only when the rear speakers are connected Speaker Display Range Sub Woofer WF 15 6 Rear R 6 6 Treble TRE 5 5 Bass BAS 5 5...

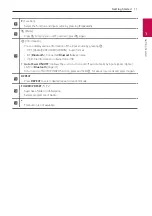
Page 11: ...dio format BT Bluetooth Connected Bluetooth device name USB File information contained on a USB y y Auto Power ON OFF It allows the unit to turn on and off automatically by input signals Optical LG TV or Bluetooth Page 31 To turn on or off AUTO POWER function press and hold J for about 3 seconds and press it again l REPEAT Press REPEAT to select desired repeat or random mode m FOLDER PRESET W S Se...

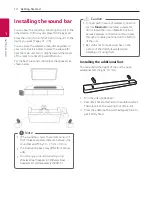
Page 12: ...r more y y The illustration above may differ from actual units y y You can enjoy surround sound by using Wireless Rear Speaker kit Wireless Rear Speakers Kit sold separately SPK8 S Note y y For best performance of wireless connection such as Bluetooth or wireless subwoofer do not install the unit on Metallic furniture because wireless connection communicates through a module positioned on the bott...

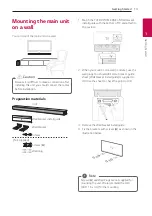
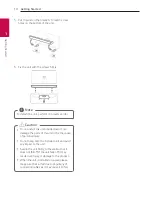
Page 13: ... supplied 1 Match the TV s BOTTOM EDGE of Wall bracket install guide with the bottom of TV and attach to the position 2 When you mount it on a wall concrete use the wall plugs You should drill some holes A guide sheet Wall bracket install guide is supplied to drill Use the sheet to check the point to drill 3 Remove the Wall bracket install guide 4 Fix the brackets with screws A as shown in the ill...

Page 14: ...de down It can damage the parts of this unit or be the cause of personal injury y y Do not hang onto the installed unit and avoid any impact to the unit y y Secure the unit firmly to the wall so that it does not fall off If the unit falls off it may result in an injury or damage to the product y y When the unit is installed on a wall please make sure that a child does not pull any of connecting ca...

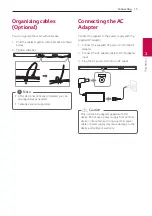
Page 15: ...ported Note Connecting the AC Adapter Connect the speaker to the power supply with the supplied AC adapter 1 Connect the supplied AC power cord to the AC adapter 2 Connect the AC adapter cable to DC IN adapter input 3 Plug the AC power cord into an AC outlet Only use the AC adapter supplied with this device Do not use a power supply from another device or manufacturer Using any other power cable o...

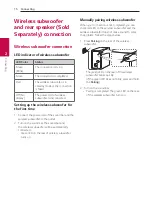
Page 16: ... the wireless subwoofer to the outlet 2 Turn on the sound bar The sound bar and the wireless subwoofer will be automatically connected Green LED on the rear of wireless subwoofer turns on Manually pairing wireless subwoofer When your connection is not completed you can check red LED on the wireless subwoofer and the wireless subwoofer does not make sound To solve the problem follow the steps below...

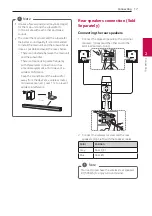
Page 17: ...ith this wireless connection such as a medical equipment a microwave or a wireless LAN device Keep the sound bar and the subwoofer away from the device ex wireless router microwave oven etc over 1 m to prevent wireless interference 1 m Note Rear speakers connection Sold Separately Connecting the rear speakers 1 Connect the black stripe wire to the terminal marked minus and the other end to the ter...

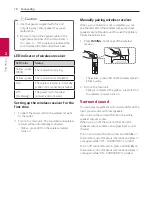
Page 18: ... the wireless receiver turns on Manually pairing wireless receiver When your connection is not completed you can see the red LED on the wireless receiver and rear speakers are not made sound To solve the problem follow the below steps 1 Press PAIRING on the rear of the wireless receiver The yellow green LED on the wireless receiver blinks quickly 2 Turn on the main unit Paring is completed The yel...

Page 19: ...ected ASC 2 0 Ch 5 1 Ch STANDARD 2 0 Ch 5 1 Ch BASS BLAST or BASS BLAST 2 0 Ch 5 1 Ch DTS VIRTUAL X 2 0 Ch 5 1 Ch Surround function OFF Sound Effect Input Output No rear speakers Rear speakers connected ASC 2 0 Ch 5 1 Ch STANDARD 2 0 Ch 5 1 Ch BASS BLAST or BASS BLAST 2 0 Ch 5 1 Ch DTS VIRTUAL X 2 0 Ch 5 1 Ch ...

Page 20: ...w minutes after the sound bar is turned off When the wireless receiver is in standby mode the LED will turn on in red y y When you turn on the sound bar the wireless receiver will turn on and the LED will change to yellow green and then the rear speakers makes sound within a few seconds y y It takes a few seconds and may take longer for the main unit and Wireless Receiver to communicate with each ...

Page 21: ...e time the ARC signal is a high priority Note LG Sound Sync You can control some functions of this unit by your TV s remote control with LG Sound Sync It is compatible with the LG TV that is supported LG Sound Sync Make sure of the LG Sound Sync logo on your TV Controllable function by LG TV s remote control Volume up down mute Refer to the TV s instruction manual for the details of LG Sound Sync ...

Page 22: ...ally between this unit and your TV Details of TV setting menu vary depending on the models of your TV Note LG Sound Sync with wireless connection 1 Turn on the unit by pressing 1 2 Select the LG TV function by pressing F repeatedly 3 Set up the sound output of TV to listen to the sound through this unit TV setting menu Sound TV Sound output LG Sound Sync Wireless PAIRED appears on the display wind...

Page 23: ...he input source to OPT HDMI ARC Then this unit changes to ARC function automatically Note ARC Audio Return Channel function The ARC function enables an HDMI capable TV to send the audio stream to HDMI OUT of the unit To use this function Your TV must support the HDMI CEC and ARC function and the HDMI CEC and ARC must be set to On The setting method of HDMI CEC and ARC may differ depending on the T...

Page 24: ...video resolution of the connected component y y If the video output signal is abnormal when your personal computer is connected to HDMI IN jack change the resolution of your personal computer to 576p or 480p 720p 1080i or 1080p Note HDMI cable Checklist Some HDMI cables have poor signal transmission which can cause problems with sound and video transmission Even after HDMI cable connections if no ...

Page 25: ...epeatedly For enjoying both sound and picture You can enjoy both sound and picture from the external device you connect HDMI cable HDMI cable 1 Connect HDMI IN jack on the back of the unit to HDMI OUT jack on the external device such as Blu ray disc player DVD player etc 2 Connect HDMI OUT TV ARC jack on the back of the unit to HDMI IN jack on the TV 3 Select the input source to HDMI by pressing F...

Page 26: ...fter connecting the FM wire antenna be sure to fully extend it y y If the radio is not picking up well or the noise is excessive even though you are adjusting the FM antenna you can install the radio app on your smartphone and connect it with Bluetooth to listen to the clear radio Note USB connection Connect USB memory device to the USB port on the back of the unit If HDMI cable is connected on th...

Page 27: ... recognize the followings on this unit External HDD Card readers Locked devices Hard type USB devices USB hub Using USB extension cable iPhone iPod iPad Android device Playable file Sampling Frequency MP3 within 32 to 48 kHz WMA within 32 to 48 kHz OGG within 32 to 48 kHz FLAC 32 kHz 44 1 kHz 48 kHz 88 2 kHz 96 kHz 176 4 kHz and 192 kHz 16 bit 24 bit WAV 32 kHz 44 1 kHz 48 kHz 88 2 kHz 96 kHz 176 ...

Page 28: ...folder will not appear y y File will be played from file A to file J one by one y y Files will be played in order recorded and it may be different depending on the record circumstances y y This unit can display file or folder names that contain numbers or English characters only y y ROOT The first screen you can see when a this unit recognize the USB is ROOT Note ...

Page 29: ...ntrol during playback and release it at the point you want to listen to Play repeatedly or randomly Press REPEAT on the remote control repeatedly Refer to the note for details about the display change Search a folder Press FOLDER PRESET W S on the remote control Resume playback This unit memorizes a current song which is played before changing the function or turning off the unit y y The resume po...

Page 30: ...our TV remote control To check the status of this function press and hold SOUND EFFECT on the remote control To turn off this function press and hold SOUND EFFECT on the remote control and press it once again while ON TV REMOTE is scrolled y y Make sure that the sound output of your TV is set to External speaker y y This function does not operate on LG TV s magic remote control y y This function m...

Page 31: ...matically turned off if there is no signal for a certain period of time from the TV connected by LG Sound Sync Optical Wireless y y After the unit is turned on by AUTO POWER function it will be automatically turned off if there is no signal for a certain period of time from the external device y y If you turned off the unit directly it cannot be turned on automatically by AUTO POWER function Howev...

Page 32: ...set top box or etc device set to on or connected CEC supported device is turned on If you want to use the auto function change turn off SIMPLINK function on your LG TV It takes for about 30 seconds to turn off SIMPLINK y y If the Bluetooth connection lock function is set Bluetooth connection will be only available on Bluetooth and LG TV function Page 35 Note Quick Start This unit can stay in stand...

Page 33: ...ion Profile Listening to Music of a Bluetooth Device Before you start the pairing procedure make sure that the Bluetooth feature on your smart device is turned on Refer to your Bluetooth device s user guide Once a pairing operation is performed it does not need to be performed again 1 Select the Bluetooth function by pressing F repeatedly Appears BT and then READY in display window 2 Operate the B...

Page 34: ...try pairing it again y y The sound may be interrupted when the connection has interference by the other electronic waves y y Pairing is limited to one Bluetooth device per unit and multi pairing is not supported y y Depending on the type of the device you may not be able to use the Bluetooth function y y You can enjoy Bluetooth function using smart phone MP3 Notebook etc y y The more distance betw...

Page 35: ...uto Power function to prevent it Page 31 Note Using BLUETOOTH App y y Only Android OS is available to use Music Flow Bluetooth app with this unit y y Additional data charges may occur if installed over 3G 4G according to your device plan Note About Music Flow Bluetooth App Music Flow Bluetooth app brings a suite of new features to this unit To enjoy more features you are recommended to download an...

Page 36: ... or later y y If you use Music Flow Bluetooth app for operation there would be some differences between Music Flow Bluetooth app and the supplied remote control Use the supplied remote control as necessary y y Depending on the Bluetooth device Music Flow Bluetooth app may not work y y After connection of Music Flow Bluetooth app music may be output from your device In this case try connecting proc...

Page 37: ...ssing C V on the remote control 3 Press N on the remote control A preset number will blink in the display window 4 Press FOLDER PRESET W S on the remote control to select the preset number you want 5 Press N on the remote control once again The station is stored 6 Repeat the steps 2 to 5 to store other stations 7 To listen a preset station press FOLDER PRESET W Son the remote control Deleting a sa...

Page 38: ...e level of the device No woofer sound y y The power cord of the subwoofer is not connected Plug the power cord into the wall outlet securely y y Pairing between the unit and the subwoofer gets disconnected Connect the unit and the subwoofer Page 16 The remote control does not work properly y y The remote control is too far from the unit Operate the remote control within about 7 m y y There is an o...

Page 39: ...een cleared when tuning by scanning preset channels Preset some radio stations see page 37 for details NOTES to use wireless Symptoms Cause Solution This device may have wireless interference y y Wireless may not operate normally in weak signal area y y Please install the device close enough to wireless subwoofer y y Do not install the device on metal furniture for optimum performance Bluetooth de...

Page 40: ... source with F such as BT Bluetooth HDMI etc and only DEMO indication is showing in the front display Unplug the power cord and plug it in again If that doesn t work press and hold F About 5 seconds on the main unit until the display indicates current selected function Remote Control does not work No response ...

Page 41: ...hts Reserved For DTS patents see http patents dts com Manufactured under license from DTS Licensing Limited DTS the Symbol DTS and the Symbol together Virtual X and the DTS Virtual X logo are registered trademarks or trademarks of DTS Inc in the United States and or other countries DTS Inc All Rights Reserved The Bluetooth word mark and logos are registered trademarks owned by the Bluetooth SIG In...

Page 42: ...F Operating humidity 5 to 90 Bus Power Supply USB 5 V 0 500 mA Available Digital Input Audio Sampling Frequency 32 kHz 44 1 kHz 48 kHz 88 2 kHz 96 kHz Available Digital Input Audio format Dolby Audio DTS Digital Surround PCM Input Output OPTICAL IN 3 V p p Optical jack x 1 HDMI IN 19 Pin Type A HDMI connector x 1 HDMI OUT 19 Pin Type A HDMI connector x 1 Tuner FM Tuning Range 87 5 to 108 0 MHz or ...

Page 43: ...PK8 S S78S1 S Sold Separately Wireless receiver Power requirements Refer to the main label on the wireless receiver Power consumption Refer to the main label on the wireless receiver Rear 70 W RMS x 2 3 Ω at 1 kHz THD 10 Dimensions W x H x D Approx 60 0 mm x 220 0 mm x 175 0 mm Rear speakers Each Type 1 Way 1 Speaker Impedance 3 Ω Rated Input Power 70 W RMS Max Input Power 140 W RMS Dimensions W x...

Page 44: ...not use volatile liquids such as insecticide spray near the speaker y y Wiping with strong pressure may damage the surface y y Do not leave rubber or plastic products in contact with the speaker for a long period of time Cleaning the speaker To clean the player use a soft dry cloth If the surfaces are extremely dirty use a soft cloth lightly moistened with a mild detergent solution Do not use stro...

Page 45: ......

Reviews: